“Versatile and easy to use, the CamBuddy can trigger your creative output.”
- 5 camera triggers in one small accessory
- Takes the guesswork out of setting each trigger’s sensitivity
- Accurately triggered shots from sound and light with no misses
- More affordable than the biggest competitor, Miops
- Laser trigger is difficult to set up
- A tripod screw mount (instead of velcro) would be more helpful
Some crowd-funded gadgets never come to light — or really aren’t what they were cracked up to be in the first place. The CamBuddy Pro hit Indiegogo in the fall with the promise of being the only all-in-one camera trigger out there. As a Wi-Fi remote, Wi-Fi tether, intervalometer, and trigger for light, sound, and motion, the gadget quickly surpassed the funding goal and now sits at nearly three quarters of a million dollars in funding.
A fan of gadgets that pull double duty while taking up less space and less cash, like my five-in-one reflector, I was intrigued by the CamBuddy from the get-go. When Joopic reached out with a beta version, I decided to see if the CamBuddy Pro really is all that it, by testing all of the gadget’s triggers in some egg-drop shots. Can CamBuddy capture what I was looking for without going through more than a single carton?
Design
The CamBuddy was smaller than I expected, about the size of a business card but with the thickness of a paperback. The sensor is made largely from plastic, but a rubber bumper makes it feel less inclined to break from a fall, as well as being easier to grip.
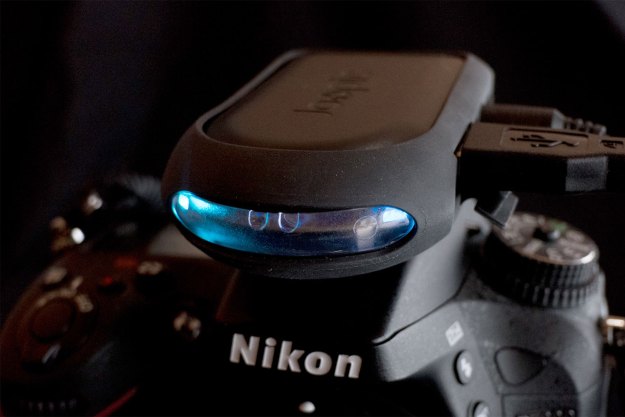
The CamBuddy doesn’t actually connect to the camera from the hot-shoe slot — there aren’t any metal contacts there — but the hot-shoe mold makes it a nearly universal, simple way to mount the control on top of any DSLR or mirrorless camera.

Instead, use the cable that shipped with your camera to connect via a USB port on the side. To trigger the shutter, a 2.5mm port also connects to your camera, or the CamBuddy can trigger a flash instead from the 3.5mm port with yet another cable. A set of four different cables is included in the $279 retail package ($199 pre-order) or you can add it on for $30 ($15 pre-order) to adapt those ports to different camera and flash models. A micro USB port charges the CamBuddy’s internal battery.
CamBuddy can actually detect the level of light in the room, and display it inside the app.
Since the hot-shoe option is only for mounting, two slits in the rubber casing and a strip of Velcro will hold the CamBuddy to a tripod’s leg or handle. While being able to remove the receiver from the camera is essential for some shots, a third mounting option with a tripod screw would have simplified the set-up for motion-triggered shots.
At the back of the CamBuddy is an on-off switch and a reset button, while the front holds the sensor as well as the indicator lights that signal when the CamBuddy is connected and ready.
Outside of the cable set and the actual CamBuddy, there are two additional accessories (yes, accessories for an accessory). A laser pointed into the CamBuddy’s sensor makes the motion-detection feature possible. While any laser will probably work, Joopic includes one in some bundles that has a tripod mount (essential unless you have an assistant or duct tape and lots of extra time) and a rechargeable external battery. And while it wasn’t included in my review kit, a radio transceiver allows multiple CamBuddies on multiple cameras to trigger high speed photography for what Joopic describes as “Matrix bullet time” footage. Neat!
Setup
The CamBuddy needs two cords for most of those triggering features: the USB cord that ships with your camera and a shutter release cord. Besides having to actually locate the cord that came with my DSLR, the physical connection was easy — the ports are labeled.
Along with the cables, both Wi-Fi and Bluetooth signals from the CamBuddy connect it with the Joopic app to allow for remote control of your camera. Pairing the two devices works simply enough; just find the CamBuddy in your phone’s wireless settings, type in the default password, then head to the app to finish connecting. I did have some trouble getting that first connection, but a quick reset with the inset button at the back of the CamBuddy fixed the issue.

Once connected, the CamBuddy triggers are all adjusted with the app. Along with the five different triggers (lighting, intervalometer, remote, sound, and laser), the app can access and download any images on the camera or automatically download images taken with the CamBuddy to both the camera’s media card and the mobile device.
For the light, sound, and laser triggers, I used manual focus to prevent the camera from delaying the shot as it searched for a focal point.
Lighting
One common complaint with basic lighting triggers is that the adjustable sensitivity takes some practice to get right. Because the CamBuddy is controlled through a smartphone instead of a basic built-in screen at the top, as other such triggers are, the CamBuddy will actually detect the level of light in the room and display it inside the app. A slider allows you to adjust, in percentages, how much light there should be to trigger the shot.
Multiple CamBuddies on multiple cameras can trigger “Matrix bullet time” footage.
That means in a well-controlled environment, like a studio, you can set the CamBuddy to go off at the slightest changes. In scenarios with a few more variables, adjusting the trigger level while knowing exactly what light the CamBuddy is picking up makes it possible to say, set up a shot for lightning without being triggered by headlights from a nearby road.
Outside of being able to control the sensitivity without the guesswork, the app allows you to choose between single shots or a burst of images, whether to delay that shot after light is detected, and whether the CamBuddy should trigger the camera’s shutter or a flash.
While my wait for a freak winter lightning storm proved fruitless, I was able to use the CamBuddy to sync an off-camera flash. Triggering the flash manually, the CamBuddy registered the light and took the shot every time, from several different angles and several different flash outputs.
Intervalometer
The CamBuddy’s intervalometer automates time lapses. While the feature is built-in to many cameras (including mine), the app puts the controls onto a smartphone for setting up time lapses remotely or simply adding the feature to a camera that doesn’t have it built-in.

Shooting a time lapse with the CamBuddy is straightforward. The top controls let you choose whether to start right away or delay the shots, how often to take them, and when to stop. The app also lets you choose “unlimited” so you can stop the time lapse manually, instead of after a certain length of time. Below that, a set of controls offers remote control of the camera’s mode, shutter speed, aperture, ISO, and exposure compensation. The top of the screen counts the number of images in the series.
Setting up a time lapse image on the CamBuddy was painless. While the feature isn’t enough to warrant the price of the CamBuddy on its own, it’s a nice little extra.
Remote
Most new cameras come equipped with built-in Wi-Fi, but for those that don’t — or those with ranges less than 100 feet, or horribly-designed apps — the CamBuddy and app serves as a remote with Live View. Again, like the Intervalometer, it’s not a feature that I was particularly excited about, since my camera has the feature built-in, but it worked without issues. I used the remote release to trigger the camera while dropping an egg at the same time.

At the top of the remote mode, the live feed from the camera is displayed (unless of course you turn the live view off). The app offers easy access to burst or single shooting along with aperture, shutter speed, ISO, and exposure compensation. A simple touch of the shutter icon triggers a shot or a set of shots in burst mode.
Like the Intervalometer, the remote is a more basic feature — but it worked well regardless.
Sound
The CamBuddy measures sound, along with all its other detectors, taking the guesswork out of choosing a sensitivity. I could leave Netflix running in the background and trigger a shot with a clap of my hands by reading the level of noise the CamBuddy detects — or drop an egg on my front porch and trigger a shot with the crack.
The top of the app displays the amount of sound the CamBuddy detects. Below that are controls for single shots or burst mode, whether to trigger the shutter or a flash, and any delays. A slider to adjust the sensitivity of the trigger sits just above the start button.
The CamBuddy captured every sound trigger that I tested without fail. The results might be a bit more mixed when there’s more than some Netflix and light traffic in the background, but the ability to both detect then adjust the sensitivity is something I haven’t been able to find anywhere else — other controls allow for adjusting the sensitivity, but leave it largely up to guesswork.
Laser
The laser trigger captured the best shot in my egg-drop experiment — but it was also the toughest to set up. To trigger a shot with the laser, you need to point it directly into a sensor on the front of the CamBuddy. When an object interrupts the laser, the shot is triggered. Since I was shooting a small subject (an egg) that wouldn’t hide the laser, I needed to take the CamBuddy off camera so that the laser passed through the photo at an angle, but the laser wasn’t actually in the photo. (Public Service Announcement: Laser pointers can also damage a digital camera’s sensor, so it’s best to keep them a good distance away from your camera lens regardless.)

While the laser pointer came with a tripod, the CamBuddy can only be mounted via hot shoe or strapped to a tripod leg. Mounting it sideways on a tripod leg and then trying to get the laser to point into a thin strip of sensor was frustrating, to say the least.
The sensor worked best while indoors, before I realized that I didn’t have enough light inside to freeze a falling egg (besides, breaking eggs over carpet isn’t the greatest idea). When I moved to the brighter light of my covered porch, I lost some of that sensitivity and the laser pointer needed to be lined up just right to trigger the shot.
Every time I needed to make an adjustment, several minutes of trying to get the laser perfectly aligned ensued. When I realized the laser needed to be lower to capture the moment the egg hit the table, more adjusting ensued.
Did I get good shots with the laser trigger? Yes. Was it as easy as using any of the CamBuddy’s other triggers? Not at all. With three tripods and some patience, CamBuddy’s laser trigger could be a pretty powerful tool — but practice hitting the width of a pencil with a laser pointer (and keeping it there) before you decide to invest in the CamBuddy on the laser trigger alone.
Our Take
I successfully took egg-drop shots from each of the CamBuddy’s five trigger modes without breaking more than a dozen eggs. I was impressed at how easy the sound and light triggers were to use and while the laser trigger was frustrating to set up, it also captured my best shot. CamBuddy is simple to use and an elegant, all in one solution.
Is there a better alternative?
The CamBuddy is the first light and sound trigger that I’ve used — and there are relatively few on the market. There are other options, such as the Miops and some budget brands, but the CamBuddy is the first all-in-one trigger to incorporate Wi-Fi with sound, light, and laser triggers. But more important, no other trigger measures the level of light or sound in the environment — the sensitivity controls are all there, but adjusting them is largely a matter of guesswork. As an all-in-one product, it’s pricer then basic options, yet still sits under the $239 price of the original Miops, retailing for $149 for just the CamBuddy or bundled with a laser and cable set for $209.
Miops did successfully fund an update to their original trigger, with similar wireless control plus a few extra triggers, including vibrance and distance, along with the ability to program a sequence of camera triggers. While the full funding goal was reached, it’s unclear when the Miops Mobile will be available for orders outside Kickstarter — and what the price will be outside those early pledges. Based on the price of the original version from two years ago, the Miops Mobile will likely have those additional triggers but at a higher price point.
How long will it last?
Accessories like the CamBuddy tend to be more long term then the cameras we replace every few years. With all the hardware built into it, and the Joopic already getting excellent performance from a beta version, the CamBuddy shouldn’t be an accessory that wears out after only a year or two.
Should you buy it?
Yes. The CamBuddy makes triggering a shot possible in countless different scenarios, thanks to five different sensors and trigger modes. Outside of setting up the laser mode, the CamBuddy is easy to use and accurately triggered shots in several different scenarios. Photographers that frequently need to trigger shots based on sound or light should pick up the CamBuddy, because it effectively takes the guesswork out of sensitivity levels — the remote control and intervalometer are just bonuses.
Now if you’ll excuse me, someone just egged my porch and I have to go clean up.