Frustrated by the software limitations of your router? Replacing it with the Linux-powered DD-WRT firmware can be a big upgrade. Maybe you want to use an old router as a second access point for your home network or as a Wi-Fi extender. Maybe you want more precise control over how your bandwidth is used so you can prioritize bandwidth for your gaming sessions, or perhaps you hate the firmware that came with your router and prefer something with more features.
Whatever you want your router to do, the odds are that DD-WRT can do it. Installing DD-WRT can be complicated, but the most common method includes using the “upgrade firmware” functionality built into your router’s default firmware.
That said, there’s is no universal way to install DD-WRT. Different routers require different versions of the firmware, and many require specific steps. We can’t even begin to outline all of these in a single article. Instead, we’re going to outline how installation works in the easiest cases while also explaining where to find the correct information should you encounter more advanced scenarios. Let’s get started.
How to make sure your router is compatible with DD-WRT
The first thing you need to do is ensure that your router is compatible. Head to the DD-WRT database, then type in the exact model number of your router. This database will tell you your router is one of four things:
- Supported, which means you can install DD-WRT. This is signified by a green “yes.”
- A work in progress, meaning you can’t install DD-WRT right now, but people are working on making it work. A yellow “wip” signifies this.
- Possible in theory, but no one is working on it, meaning you can’t install DD-WRT. This is signified by a red “no.”
- Impossible to install because of hardware limitations, meaning you can’t install DD-WRT. This is signified by a gray “not possible.”
You’ll also find out if activation of DD-WRT is required for each router.
The odds are that your router isn’t supported if it isn’t listed here, but you could also try searching the DD-WRT wiki or simply Googling your router model number followed by “DD-WRT.” Note that “close enough” doesn’t work — you need the exact model number. Often, a different letter or number in a model name can signify an entirely different router.
For this article, we’re going to install DD-WRT on a Netgear Nighthawk R7800 as a demonstration. Here are our database results:
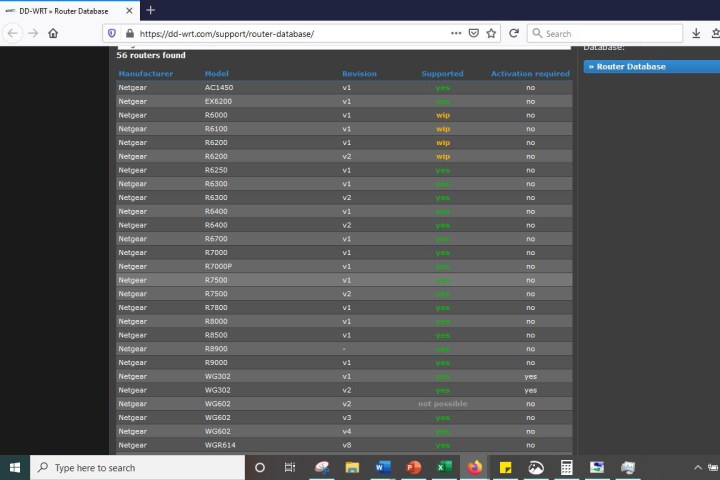
As you can see, our router is supported. But knowing that isn’t enough. To install DD-WRT, you need to find out about any specific steps your router might require, and you also need to be certain you’ve found firmware compatible with your router.
How knowledge is the key to success with DD-WRT
It’s important that you read as much as possible before downloading the firmware. The router database often contains outdated information or subpar firmware or may not tell you the whole story. More information is always necessary.

From the database’s page for your router, click the link to the wiki under Documentation. Read the instructions there, if there are any. If there is a forum post linked, read through that as well.
See if anyone has had any trouble installing the firmware and read other people’s suggestions for solving them. You should also, if possible, find out which firmware users have had success with most recently. Router threads will usually offer downloads known to work, with other users confirming that they work. You want to know about that before proceeding.
This sounds like a hassle, but there is a chance you’ll brick your router without complete information, so take the time to read as much as possible. You’ll discover firmware that you can download and flash in many cases, but the process will be much more involved than that for many other routers. If that’s the case for your device, you need to know, and you need to understand the extra steps before proceeding completely.
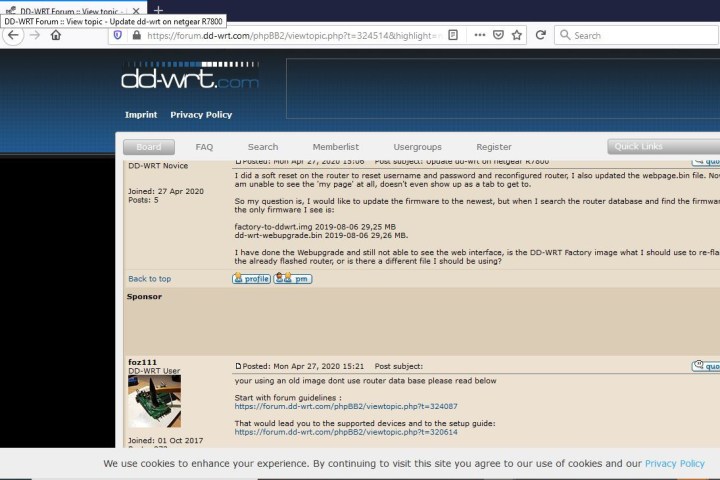
To give you an idea of what I mean, let’s get back to our example: The Netgear Nighthawk R7800, a newer router, but one that can benefit from flashing. We found the proper firmware in a forum thread and encountered a post about downloading and installing outdated firmware, which ended up bricking the router. If the original poster had started by reading the forum guidelines, they would have encountered setup guides and a list of supported devices, thus preventing the accidental bricking.
We cannot stress enough how important it is to do a thorough investigation of the firmware. Once you’re certain you’ve found a firmware that precisely matches your router and you understand the steps necessary for installation, go ahead and download it. If you start to download without knowing what you’re doing, you’re in for a major headache.
How to begin DD-WRT installation
We hope your router is not on and operating when you want to execute the installation. It would be best if you unplugged everything plugged into your router, including the power supply.

Now we’re going to reset your router to factory settings. Again, this is where proper research or your system comes in because protocol differs from one router to the next. Typically, however, this involves unplugging your device and holding down the Reset button on the back of the router for 30 seconds.
How to install DD-WRT from your router admin page
The following instructions assume that the research you did told you to flash the firmware using your router’s default upgrade tool. This is sometimes not the case, so make sure you’ve done your reading before continuing. Keep in mind that failing to do so may result in your router ceasing to function.
Step 1: Once your router is reset, plug it back into its power supply and connect to it from the computer you used to download the firmware earlier. You can connect either directly with an Ethernet cable or via Wi-Fi. Remember that you previously reset your router to its factory settings, so the network’s name has changed to the default. Consult your router’s manual if you’re not sure what that is.
Step 2: Now, you need to connect to the router’s admin page, which in most cases means typing 192.168.1.1 into your browser’s address bar and entering the default username and password. Consult your router’s documentation if that IP doesn’t work or if you’re not sure what the username and password are. Alternatively, check out our list of default usernames and passwords for routers. In the case of the Netgear Nighthawk, you can update the firmware via the router’s iOS or Google app or by going to routerlogin.com.
Step 3: Find the Firmware Upgrade section on your router — which is typically found under Administration or something similar — and click the Browse or Choose File button. Select the firmware you downloaded earlier, then tell the firmware to upgrade. Again, only do this if you confirmed that this is the proper procedure while researching.
Step 4: Patience is essential at this point. The firmware will upload to your router, which will then restart. Do not unplug it or turn it off until all the lights come on, which may take a while. Unplugging things too early could brick your router, so wait.
After your router reboots, you can begin configuring. If your connection relies on an Ethernet cable, browse to 192.168.1.1. If you use Wi-Fi instead, bring up your wireless adapter and search for the network dd-wrt. When you connect to it, browse to 192.168.1.1. If you can’t successfully log in to DD-WRT with this IP, use this guide to find the correct IP address, regardless of whether you use Ethernet or Wi-Fi for your connection.
Step 5: If you see the DD-WRT sign-in screen, you should clear your router’s NVRAM with a 30/30/30 hard reboot. To do this, press and hold the reset button for 90 seconds. Hold it for 30 seconds while you have the router plugged in. Then unplug the router and hold the reset button for an additional 30 seconds. Finally, plug the router back in and hold the reset button for a final 30 seconds. Then you can let go of the button.
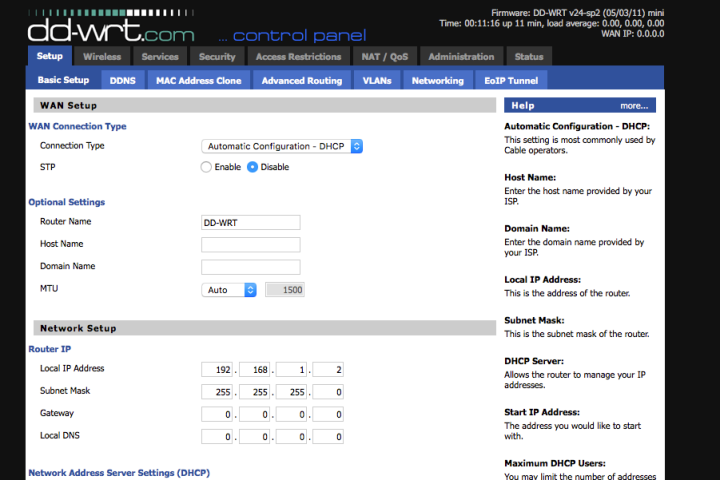
Step 6: After you’ve connected to the dd-wrt network, open a browser window and navigate to 192.168.1.1. You’ll see your router’s configuration screen, and you can check out its new options. You can also find more information on the DD-WRT wiki. Here, you’ll see data about bridged Wi-Fi networks, QoS prioritization of traffic, and much more. We suggest taking a look at all of its offerings.
Editors' Recommendations
- How to change your router’s Wi-Fi password
- Linksys’ new dual-band Wi-Fi 6 routers are surprisingly affordable
- How to find the IP address of your router for customization and security