
Oh, YouTube. The video-sharing beast that knows no bounds. Since 2005, the website has been churning out a steady stream of cuddly cats, cute kids, and overly-dramatized rants about how we should just leave Britney alone (don’t act like you haven’t seen it). The video diversity spans countless topics including how-to shorts, comedy routines, news reports gone wrong, music videos, sports recaps, and pretty much anything and everything in between. The sheer amount of video data being uploaded amounts to more than 100 hours of video a minute, representing more than 50 countries from around the globe, a never-ending contribution to the six billion hours of video watched each month on the Google-owned phenomenon. To say it hasn’t changed the Web, and the world, would be an understatement given it’s profound imprint and integration into society.
Considering you’ve landed on this page however, there’s good chance this is your first time tackling your own video. The basics for making a YouTube Video – deciding content, recording, editing, uploading, etc. – are easy tasks to perform, but difficult ones to master. Perhaps you want to start up your video blog series like Japanese-American comedian Ryan Higa, AKA Nigahiga, or launch your own cooking channel to combat the Heavy Metal Vegan Cooking. Or maybe you want a viable avenue to show the world just how adorable your 3-year-old daughter is, or a place to showcase your latest flamenco rendition of Daft Punk’s “Get Lucky” or blistering cut of “Canon in D.”
Here’s our overarching guide on how to make a YouTube video. We can’t guarantee a sizable two billion views like the always-rollicking “Gangnam Style,” but at least your creation will be on the Web for all the world to see – or you know, not. Also, check our our guide on how to make money on YouTube if you’re looking to hone those entrepreneurial chops without leaving your home.
The process:
- Choosing your YouTube video’s content
- Recording your YouTube video
- Editing your YouTube video
- Uploading your YouTube video
Step 1: Choosing your YouTube video’s content
The first step in creating a YouTube video is deciding its content or purpose. Are you seeking to inform or entertain? What type of audience are you aiming at? How long do you want the video to be? These questions elicit some of the countless factors you should consider regardless of whether your goal is to be the next YouTube sensation or you’re merely trying to showcase your work in a vast public forum. If you want your video to catch on, do something original and buck the trend, or mull over an ongoing series if you think monetization will be key down the line. If you’re looking to go viral, try to grab your audience’s attention within the opening moments to combat the overwhelming amount of audience ADD that seemingly proliferates with every passing year.
Try to keep your goals reasonable and within your capabilities considering you may not have the prowess of big-name producers (or big-name budgets). A YouTube video doesn’t have to be of the highest-caliber as far as technical design goes because the content itself will likely speak volumes more than your potentially poor audio or sub-par video ever could. Also, depending on how intricate or complex you plan on making your video, consider scripting, storyboarding, or other pre-production tasks outlined in YouTube’s stripped-down production guidebook.
It all starts with an idea – so make it one worthwhile.
Next Page: Recording your YouTube video
Recording your YouTube video
The concept is a good place to start, but a video is not a video without a proper recording. Whereas quality filming was once only manageable on a dedicated device, there are now numerous methods for recording high-definition video sans expensive and high-end recording equipment. The most common methods include your smartphone and your computer’s built-in webcam, but you can always opt for the traditional method if you prefer a dedicated device specifically tailored for recording video.
Below is a simple tutorial for recording video on Windows and Mac OS X using a basic webcam. We obviously can’t break down how to record on every and all devices, but most laptops and all-in-one desktops feature a built-in webcam on the top for video conferencing, snapping photos, and other similar purposes. Alternatively, you can download and use YouTube Capture for iOS devices, or click the Record from webcam link on the YouTube upload page to directly record a video to YouTube using your webcam (both outlined below). However, doing so will require you to use YouTube’s editing software opposed to the more robust packages we recommend on the next page.
Also, be sure to check out some of our favorite camcorders at the bottom if you’re looking for a dedicated, video-capturing device.
Recording in Mac OS X
Mac OS X has never sported a superbly effective method of recording video. However, the introduction of Photo Booth several years ago offered a simple and easy-to-use tool for snapping photos, conferencing from afar, and recording video using your Mac’s built-in webcam. It doesn’t provide much in the way of editing tools, but that’s what iMovie and some of our other recommendations are for.
Step 1: Launch Photo Booth. Although Photo Booth is by no means the most effective method of capturing video on Mac OS X, it is one of the quickest and most convenient considering the application has shipped with operating system for several years. To begin, navigate to and launch the application by clicking Finder – represented by a smiling, blue face in your dock – and selecting Photo Booth from the main Applications folder on the left-hand side of the window.
Step 2: Select the recording option. Once open, click the gray Record a movie clip button to switch to video-capture mode. The button depicts a filmstrip and is located in the bottom-left corner above the photo tray and to the right of the default button for capturing still images.

Step 3: Record. When ready, click the bright-red Record button featuring the video camera to begin recording your video. Click the button again to stop recording when finished and drag the resulting video file from the photo tray to your desired save location.
Recording in Windows
Windows’ built-in software is by no means the most effective method of capturing video in the OS, but it’s still one of the quickest and most convenient considering the application comes preinstalled on all Windows machines. Likewise, the coupled editing software leaves much to be desired despite its innate functionality and easy-to-use design.
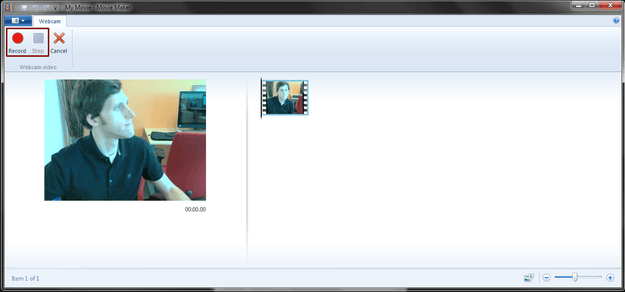
Step 1: Launch Windows Live Movie Maker. Navigate to and launch the application by clicking the Windows Start menu and selecting Movie Maker from the All Programs folder or by searching for the application using the Windows search bar. The program’s icon depicts a filmstrip with an orange flower.
Step 2: Access the recording feature. Once open, click the Webcam video button located below (but not within) the Visual Effects tab.
 Step 3: Record. When ready, click the Record button featuring the bright-red circle to begin recording your video. Click the Stop button featuring the blue circle to stop recording when finished and select your desired save destination for the resulting video file. Click the gray Save button in the bottom-right corner when done.
Recording in iOS
Step 1: Download, install, and launch YouTube Capture. If you haven’t already, download and install YouTube Capture from iTunes or the App Store. The software is specifically designed for the iPhone and iPad, but remains compatible with the third-generation iPod Touch and newer devices running iOS 5.0 or later. Once installed, tap the red YouTube Capture icon depicting a camera lens to open the app.
Step 2: Adjust the recording settings. Tap the gray gear icon in the bottom-left corner of the app to access the basic recording options. Connect to the appropriate accounts (i.e. YouTube, Google, Facebook), choose a resolution quality up to 1080p and specify your appropriate recording orientation. Tap the black Back button in the top-left corner to save the changes.
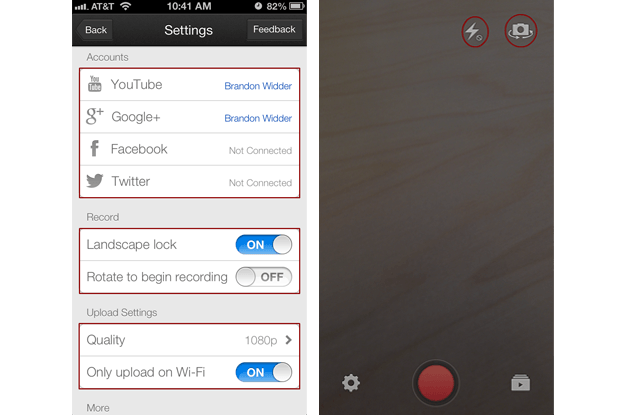
Step 3: Select the lighting and camera. If applicable, tap the lightning icon in the upper-right corner to turn on the camera flash. You can also switch between rear and forward-facing cameras by tapping the camera icon with the arrows in the upper-right corner of the screen.
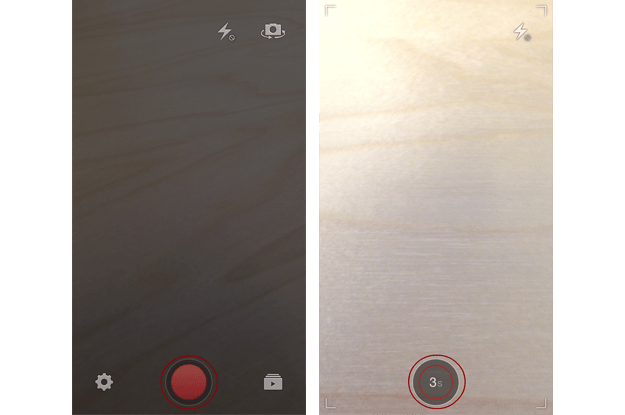
Step 4: Record. When ready, tap the bright-red button to begin recording your video. A clock will appear in place of the record button, indicating the elapsed video time and serving as the stop button. Tap the circle again when finished recording.
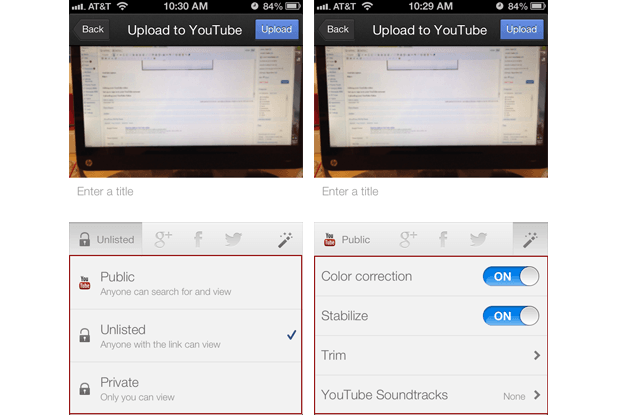
Step 5: Select the upload preferences. Title your newly-recorded video in under 100 characters and choose the appropriate upload options for publishing the video on YouTube, Google+, Twitter, and Facebook. Tap the magic wand icon to access various settings for color correction, stabilization, trim, and audio preferences. Tap the blue Upload button in the top-right corner when finished and refer back to the video library, accessible by clicking the square icon in the lower-right corner of the video interface, for making any on-the-fly adjustments.
Recording in YouTube
It’s not ideal in terms of customization or mobility, but recording using YouTube’s innate software is quick and proficient in creating video blogs, and things like simple how-to guides. There’s no external software required given the application is Web-based, but the site will utilize your webcam and microphone during the recording process. Ignore the candid images of me doing absolutely nothing in the video snapshots and remember that videos can always be edited at a later time by accessing YouTube’s main video manager.
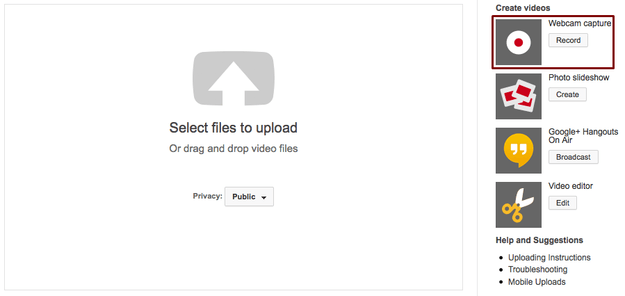
Step 1: Access the software. Assuming you have a YouTube account, click the gray Record button housed beneath the Create videos panel on the right-hand side of the YouTube Upload page.
Step 2: Allow camera and microphone access. When prompted, click the Allow option with the green check mark to permit YouTube to access your camera and microphone, whether built-in or external. Click the gray Close button when finished.

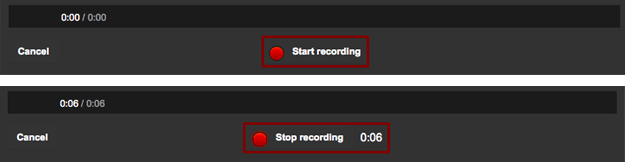
Step 3: Record. When ready, click the bright red Start recording button to begin recording your video. When finished, click the button again to stop recording, and click the gray Play button to preview the resulting video.
Step 4: Upload. When satisfied with your video, click the blue Upload button in the bottom-right corner.
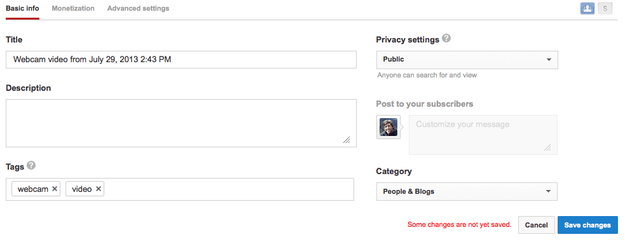
Step 5: Input basic information. Once uploaded, enter the basic information for your video (i.e. title, category, description, tags) and click the blue Save changes button in the bottom-right corner when finished. Remember, try to keep tags short and relatable as they are descriptive keywords that help other users find your content.
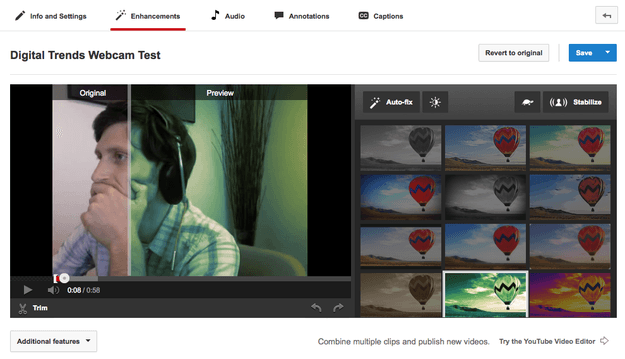
Step 6: Perform enhancements. If desired, click the Enhancements tab next to Info and Settings to access the basic video editor. Then, select a filter on the right-hand side or manually adjust the lighting and color by clicking the sun button at the top and adjusting the various sliders. Other enhancements include an image stabilizer, an auto-fix options, slow motion controls, and a trim function for clipping the video to a specified length. Click the blue Save button in the top-right corner when finished.
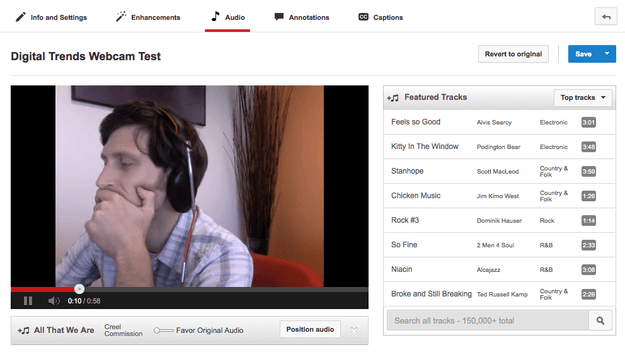
Step 7: Add audio. If desired, click the Audio tab next to Enhancements to access the audio panel and add additional audio. Select or search for your desired track, by genre or specific title, using the navigational pane to the right of your video. Once chosen, click the gray Position audio button beneath your video to trim and position the audio clip in your desired location. Click the blue Save button in the top-right corner when finished.
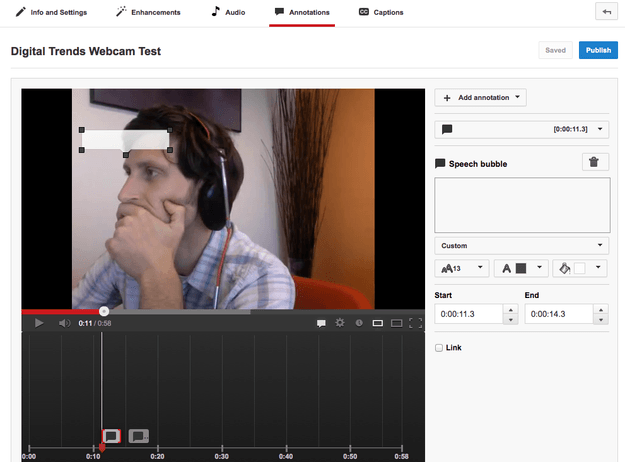
Step 8: Add annotations. If desired, click the Annotations tab next to Audio to access the various annotation options. Click the Add annotation button in the top-right corner, select your desired annotation (i.e. a speech bubble, note, title) and enter your desired annotation specifics. The specifics will vary based on the type of annotation, but all annotations include options for for text formatting and time placement. Click the gray Save button in the top-right corner when finished.
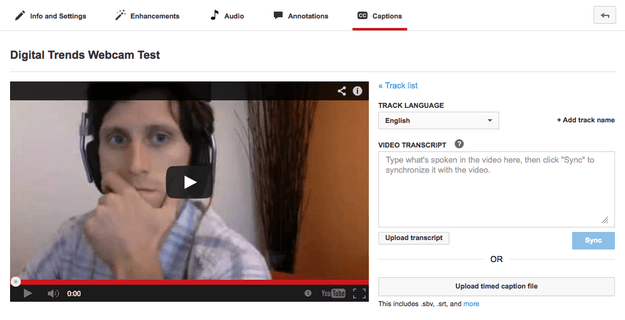
Step 9: Add captions. If desired, click the Captions tab next to Annotations to access options for inserting captions. Select the language from the top drop-down menu, type the spoken dialogue in the box to the right of your video, and then click the blue Sync button in the bottom-right corner to synchronize the subtitles with the visuals. Alternatively, click the gray Upload transcript or Upload timed caption file button below the transcript box to upload captions you’ve previously created.
Recording using dedicated equipment
Smartphones and built-in webcams are fantastically convenient and surprisingly well-suited for recording YouTube-quality videos, but they aren’t the best. If you want to take your YouTube goals to the next level – or don’t own a smartphone or webcam – consider purchasing a dedicated camcorder and microphone to satisfy all of your recording needs. Below are several of our favorites, but be sure to check out all of our camcorder reviews for a more in-depth look at what the current market has to offer.
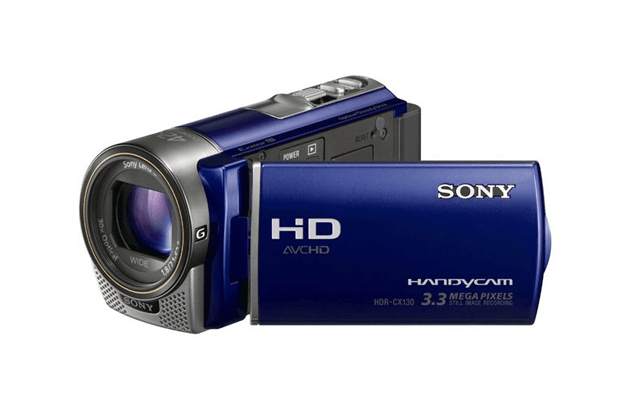
Sony HDR-CX130 ($300)
Sony’s HDR-CX130 may be a couple of years old, but that doesn’t mean it lacks any of the modern amenities we all know and love. The compact camcorder – one of the company’s most affordable, and available in blue, silver, and black – touts a 30x wide-angle lens, a 3-inch touchscreen LCD, and excellent recording capable of delivering excellent AVCHD videos up to 1,920 x 1,080 resolution. The coupled interface is understandable and easy to navigate, as are the few manual controls housed outside the touchscreen, and the built-in USB adds a level of upload convenience unparalleled within the realm of camcorders.
We can’t say the 3.3MP stills are astonishing (your smartphone likely puts them to shame), but it’s a handy feature when you have nothing else. The battery is also capable of lasting more than 2 hours, giving it an upper hand over most non-dedicated recording devices featuring HD recording as a secondary component. The internal image stabilization works as intended, reducing the potential for motion blur, and the equipped stereo microphone once again gives it the edge over the mono mics associated with smartphones and various pocket cams. The HDR-CX130 isn’t the cream of the crop, but it’s a solid budget investment.


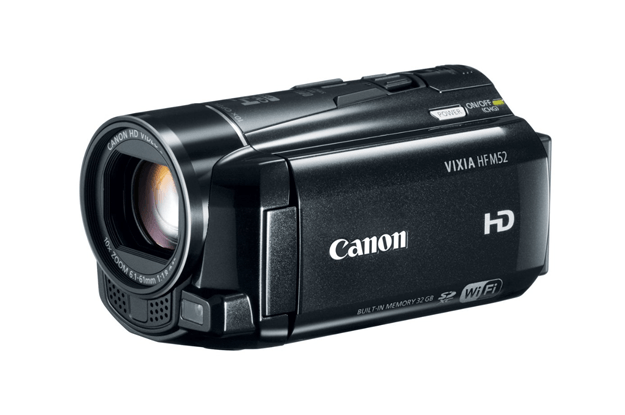
Canon Vixia HF M52 ($700)
When it comes to balancing advanced features and affordability, Canon’s Vixia HF M52 remains king. The powerful high-definition camcorder delivers 1080i video in the highest AVCHD quality or 720p as an MP4, and is equipped with a 10x optical zoom and several frame-rate selections to choose from (60i, 30p and 24p). It offers no shortage of features, with built-in Wi-Fi support for wireless multimedia transfer between devices as well as aperture and shutter priority modes, all of which can be controlled rather intuitively using the standard 3-inch touchscreen display.
Unlike similar models, the 1/3-inch CMOS sensor is better suited for low-light scenarios, increasing light sensitivity while adding greater depth-of-field control. We aren’t huge fans of the meager 2MB stills or the overly-draining Standby mode, but the Audio Scene is one of the most unique features of its kind, allowing users to automatically or manually filter the captured audio using one of six modes that hone in on various aspects of the audio spectrum. The menu interface and added features have a bit of a learning curve associated with them, but once sorted out, both amateur, and advanced videographers will find themselves right at home.


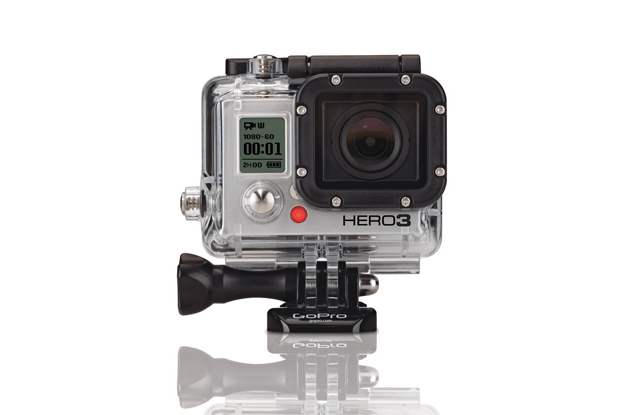
GoPro Hero3 Black Edition ($400)
As much as we love the sheer convenience, versatility, and portability of smartphones, they aren’t the best suited for a harrowing tumble down a mountainside or in active situations that require a hefty and more rugged exterior build. Similar to the Drift HD Ghost ($400), the GoPro Hero3 is a highly-compact and lightweight camcorder specifically tailored for the adventurous type, laden with features including built-in Wi-Fi and a burst mode for capturing quick stills in succession. It even shoots 4K video at 15 frames per second – which may be rather moot given the average consumer isn’t near sporting a 4K monitor quite yet.
Fortunately, the GoPro provides users with an astonishing level of control regarding how a shot looks, offering slick video capture at multiple frame rates and resolutions. The bundled case is waterproof, with an easily-wearable or mounted design, and the built-in Protune Mode allows users to make post-recording tweaks and adjustments as if it was simply raw, uncompressed video. You may want to invest in a Battery BakPak ($40) if you truly want to make the most of the of the camcorder, but the Hero3 remains the go-to camcorder of choice for the action junkie looking to post high-definition videos on the Web.


Next Page: Editing your YouTube video
Editing your YouTube video
Editing video is a tutorial in and of itself. Like YouTube’s built-in video editor, most programs will allow you to splice together multiple video segments, delete unwanted clips, and add audio in addition to a vast assortment of other basic tools for adding pizzazz and flare to your video. Annotations and captions can be incorporated into your video once uploaded to YouTube, thus allowing you to fine tune your video with a more fully-featured video editor prior to publishing your masterpiece.
Luckily, both Windows and Mac OS X come with their own free video-editing software – titled Windows Movie Maker and iMovie, respectively – capable of performing any basic edits necessary to produce a good-looking YouTube video. Costly premium alternatives include Final Cut Pro ($300) and Adobe Premiere Pro ($800), but there are plenty of other free options to give your YouTube videos the shimmer and shine of Hollywood blockbusters without resorting to your system’s built-in software. Just check out our picks for the best free video editing programs for an in-depth breakdown of all their merits and impressive features.
It’s important to note that editing can be just as important to your video as the actual recording. It sets the tone, the length, and overall aesthetics of how a video is perceived. For instance, can you imagine if Quentin Tarantino’s iconic Pulp Fiction was presented in chronological order? It would be an entirely different movie, or at the very least, not as intriguing. A video blog or how-to guide probably won’t need a complete overhaul, but you may want to fine tune some components for a more powerful effect. Consider adding b-roll footage, transitions and audio effects, as well as changing the camera angle and other visual components. The process for doing so will vary from software to software, but there are more than enough free tutorials available online straight from the manufacturer and user base to carry out even the most advanced of tasks.
Step 1: Upload your video. When finished recording, upload your video to your computer. The process will vary depending on your video-capturing device and editing software, but it can typically be done by opening the video from within the software’s main file menu or by dragging it to the program.
Step 2: Make your edits. Perform all the edits you deem necessary or desirable for your video. Again, the exact methodology differs between software, but don’t hesitate to look up guides and tutorials online from the manufacturer or the associated support forums.
Step 3: Save your video. When finished editing, save or export your YouTube video in one of the following YouTube-capable formats: MOV, MPEG4, AVI, WMV, MPEGPS, FLV, 3GPP, or WebM.
Next Page: Uploading your YouTube video
Uploading your YouTube video
So your video is recorded, edited, and ready to be posted on YouTube after hours of painstaking work. Fortunately, uploading is the easiest part of the entire video-making process, requiring no more than the simple Web uploader.
Step 1: Sign in to your YouTube account. Navigate to the YouTube homepage and click the blue Sign in button in the top-right corner. Proceed in entering your login information, click the blue Sign in button or click the orange Create an account button in the top-right corner to sign up for the free service.

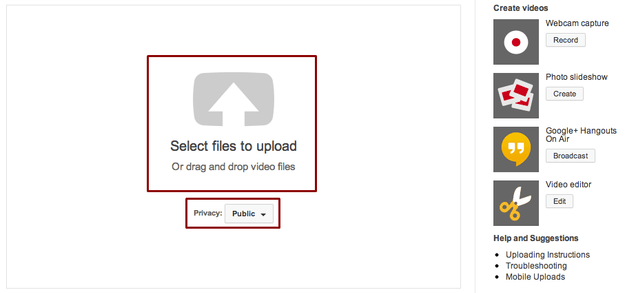
Step 2: Upload your YouTube video. Once signed in, click the gray Upload button to the right of the search bar at the top any YouTube page. Click the drop-down menu to the right of the Privacy option, select your desired privacy level, and click the giant up arrow before selecting your YouTube video and clicking the Open button in the bottom-right corner of the resulting pop-up window.
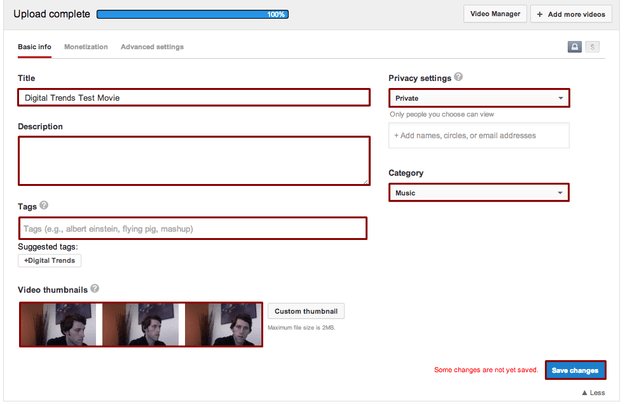
Step 3: Input basic information. Once uploaded, enter the basic information for your video (i.e. title, category, description, tags) and click the blue Save changes button in the bottom-right corner when finished. Remember, try to keep tags short and relatable as they are descriptive keywords that help other users find your content.
Step 4: Monetize your video. Though purely optional, monetizing your account is a nice little way of making some money via Google’s YouTube partner program. Check out our quick guide on how to make money on YouTube if you want to try to cash in on that viral video of you and your cat.
Step 5: Input advanced settings. Click the Advanced settings tab to the right of Basic info and Monetization. Afterward, specify the various settings for comments, syndication, caption certification, and distribution options among others. None of it is necessary to post your video to YouTube, but it does offer a custom options for comment moderation and video embedding.
Additional editing
It’s not always necessary to continue tweaking and altering your YouTube video once uploaded and published with the basic settings in place. However, the following steps are included in case you would like to refine your edits or include additional features such annotation and captions. Feel free to skip them unless you missed something in your initial edits.
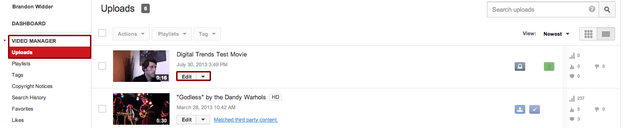
Step 6: Access the YouTube editor. Click the Video Manager option on the left-hand side to access your video library and upload history, then click the gray Edit button beneath your video title to access the editor.
Step 7: Perform enhancements. If desired, click the Enhancements tab next to Info and Settings to access the basic video editor. Then, select a filter on the right-hand side or manually adjust the lighting and color by clicking the sun button at the top and adjusting the various sliders. Other enhancements include an image stabilizer, an auto-fix options, slow motion controls, and a trim function for clipping the video to a specified length. Click the blue Save button in the top-right corner when finished.

Step 8: Add audio. If desired, click the Audio tab next to Enhancements to access the audio panel and add additional audio. Select or search for your desired track, by genre or specific title, using the navigational pane to the right of your video. Once chosen, click the gray Position audio button beneath your video to trim and position the audio clip in your desired location. Click the blue Save button in the top-right corner when finished.

Step 9: Add annotations. If desired, click the Annotations tab next to Audio to access the various annotation options. Click the Add annotation button in the top-right corner, select your desired annotation (i.e. a speech bubble, note, title) and enter your desired annotation specifics. The specifics will vary based on the type of annotation, but all annotations include options for for text formatting and time placement. Click the gray Save button in the top-right corner when finished.

Step 10: Add captions. If desired, click the Captions tab next to Annotations to access options for inserting captions. Select the language from the top drop-down menu, type the spoken dialogue in the box to the right of your video, and then click the blue Sync button in the bottom-right corner to synchronize the subtitles with the visuals. Alternatively, click the gray Upload transcript or Upload timed caption file button below the transcript box to upload captions you’ve previously created.
Conclusion
Making a YouTube video is not a tough process, but it can be an increasingly complicated one depending on your goals and methodology. There’s an art to it, an acquired skill that you’ll surely master the longer you work with the software and develop your video-sharing prowess. Remember, your video can always be altered, reposted, or taken down entirely at your own discretion (or at YouTube’s should you violate its Terms of Service). Don’t hesitate to make changes as you see necessary.
What do you think of our exhaustive guide on how to make a YouTube video? Too much to take in or still in need of further clarification? Let us know in the comments below.


