
Is your computer running slow? It doesn’t necessarily mean you need to dump it in the garbage. Sometimes all your computer needs is a good restart, cleaning, or updates. A well-maintained system results in a happy, peppy computer.
- Turn off your PC
- Update your software
- Update or reinstall drivers
- Delete unnecessary files, apps, and programs
- Delete apps and desktop programs
- Defragment your hard drive
- Disable apps and programs in the startup
- Clean your vents
- Use native and third-party software
- Modify visual effects
- Run the troubleshooters
- Change power settings
- Reset or restore your PC
- Overclock your CPU
- If all else fails, upgrade your hardware
This guide will teach you how to clean your PC, so it runs closer to the way it did when it was brand new. Try these steps to improve performance and learn about helpful habits to stop slowdowns.
If you have a Mac, check out our tips for speeding up a Mac, too.
Turn off your PC
While this doesn’t fall under the “clean your PC” umbrella, poor performance may be nothing more than excess junk dumped into your PC’s system memory.
Sometimes you just need to turn off the computer — not simply let it sleep, enter hibernation, or restart — so the memory sticks completely drain. Without power, memory can’t retain any data.
When you turn the PC back on, you start with a semi-clean slate.
Update your software
Ensuring your computer’s software is up to date is one of the easiest ways to potentially speed up your computer. Much of your computer’s software could be at the mercy of third-party developers who are less religious than big-name developers like Microsoft and Apple when it comes to issuing updates.
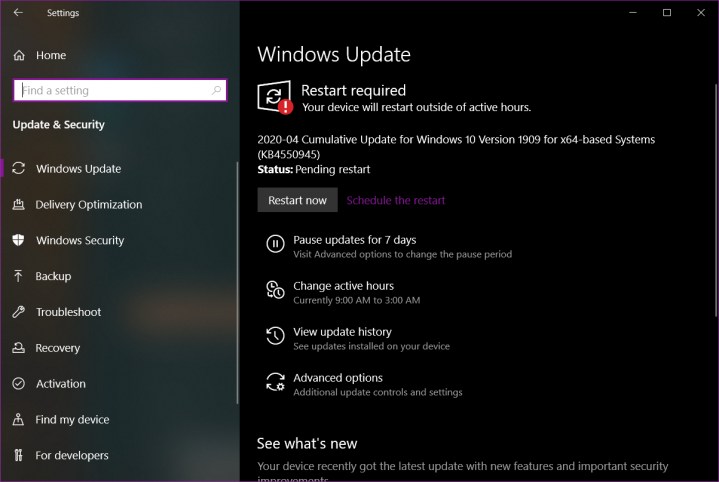
However, verifying that Windows 10 is up to date should be a top priority. In some cases, sluggish performance stems from Windows 10 when it’s currently updating and/or needs to restart. Updates can fix performance issues in addition to enhancing security, which is why Windows 10 needs to remain current.
Step 1: Click the notification icon next to the system clock and select the All Settings tile in the Action Center.
Step 2: Select Update & Security within the Settings app.
Step 3: The Windows Update category appears by default. Click the Check for Updates button.
Windows 10 typically installs important updates automatically, but it’s always nice to check and make sure that everything is current.

You should also verify that all Windows 10 apps are current. Again, you may experience sluggish performance while Windows 10 updates these apps and needs to reboot.
Step 1: Click the shopping bag icon on the taskbar. This opens the Microsoft Store app.
Step 2: Click the three-dot ellipsis icon located in the top right corner.
Step 3: Select Downloads and Updates on the drop-down list.
Step 4: Click the blue Get Updates button, or the Update All link (if available).
Finally, be sure that all heavily used software is current. Most provide in-app notifications while others may need a manual update by visiting the developer’s website.
Update or reinstall drivers
Outdated or corrupted drivers can cause serious performance issues, especially in the latter scenario. On a basic level, drivers provide a bridge between Windows 10 and the underlying hardware. Without that proper communication, your PC simply won’t function optimally.

Many pre-built systems include a proprietary desktop program that downloads and installs driver updates. On the Start Menu, they’re typically listed under the OEM’s name, like Dell or HP, or under the PC’s brand, like Alienware. Run this program to see if the manufacturer provides new updates, including BIOS upgrades.
You may also need to check with component manufacturers. For instance, Nvidia issues new drivers for its discrete GPUs regularly, even more so slightly before or after a hot new game arrives. They are acquired through the company’s GeForce Experience desktop software — which sends notifications when new drivers become available — or you can manually download them from Nvidia’s website.
The same goes for your motherboard. You don’t need to worry about CPU or memory drivers.
If you suspect driver issues, one resolution is to uninstall and reinstall the offending driver. It may already be marked in the Device Manager, flagging your attention with a yellow triangle icon.
Step 1: Right-click on the Start button and select Device Manager on the Power Menu.
Step 2: Select and right-click on the component that may be causing issues and select Uninstall Device on the pop-up menu.
Step 3: Select Action on the Device Manager toolbar followed by Scan for Hardware Changes on the drop-down menu. Windows 10 should reinstall the driver.
Another option is to update the driver through Device Manager:
Step 1: Right-click on the Start button and select Device Manager on the Power Menu.
Step 2: Select and right-click on the component that may be causing issues and select Properties on the pop-up menu.
Step 3: The Properties window appears on your screen. Select the Driver tab.
Step 4: Click the Update Driver button.
Step 5: Select the Search automatically for updated driver software option. If you have new drivers already downloaded to your PC, select the Browse my computer for driver software option instead.
Delete unnecessary files, apps, and programs

Storage plays an important role in your PC’s overall health. Not only does it house the operating system, all your programs and apps, files, and temporary data, it plays a part in memory management. Windows 10 turns to your primary drive and uses a portion as “virtual memory” when the system memory is overloaded. This typically shouldn’t be a problem in PCs with large memory capacities, like 16GB and up.
For example, Windows 10 may allocate 5GB of free space for virtual memory. If your drive is so packed full of files and programs that it only has 4GB of free space, you could see performance issues. Deleting files and programs you no longer need will help.
Step 1: Click the folder icon on the taskbar. This opens File Explorer.
Step 2: File Explorer should open with the This PC category selected — if not, select This PC listed on the left. Right-click on your primary drive and select Properties on the pop-up menu.
Step 3: Click the Disk Cleanup button.
Step 4: The Disk Cleanup window appears on your screen. Under Files to delete, select all the file types you want to delete.
You can safely remove these files:
- Delivery optimization files
- Downloaded program files
- Recycle bin
- Temporary internet files
- Temporary files
- Thumbnails
Note that you can also delete files in your Downloads folder. If it contains files you don’t want, include this category. If you’re storing files in this folder, leave Downloads unchecked.
Step 5: Click OK to complete.
You can also click the Clean up system files button to delete even more files, but you want to be cautious. Here’s a list you can safely delete:
- Delivery optimization files
- Device driver packages
- Language resource files
- Windows upgrade log files
When in doubt, read each description before deleting. If you see a listing labeled as Windows ESD installation files, don’t delete it. These files are used to reset your PC.
Delete apps and desktop programs

You can make further room on your PC so that both you and Windows 10 have enough room to play by eradicating unwanted apps and desktop programs.
For apps: Simply right-click on its tile or Start Menu listing and select Uninstall on the pop-up menu.
For desktop programs: Right-click on its Start Menu listing and select Uninstall on the pop-up menu. If the program comes with an uninstaller, use that instead.
You can also delete apps and desktop programs through one interface by following these steps:
Step 1: Right-click on the Start button and select Apps & Features on the Power Menu.
Step 2: Select an app or desktop program and click the Uninstall button followed by a second Uninstall prompt.
Defragment your hard drive

Note: SSDs don’t require defragmentation. In fact, the process could shorten its lifespan because cells degrade as data is written and erased.
Drive fragmentation is caused by deleting old files and writing new ones in their place. When your PC was once baby-fresh new, the hard drive wrote data in an ordered sequence. However, when chunks of data are deleted, the remaining gaps are used by new data that are not part of the original sequence. Because data is out of sequence, the drive must search in multiple locations for the requested data. This process takes longer than if all the data was organized in a logical sequence, thus reducing your PC’s overall performance.
However, fragmentation is an issue with mechanical drives, not SSDs. That’s because data is written to tracks on a spinning disk — similar to how music exists in grooves on a vinyl record, only mechanical drive data is held magnetically. If data resides in multiple tracks and multiple platters, the read heads take longer to access that data.
The good news here is that Windows 10 automatically recognizes the difference between a mechanical drive and an SSD. It also does an excellent job keeping your drive(s) neat and tidy. However, if you suspect a hard drive may suffer long read and write times, checking the current optimization state is a good idea. Do the following:
Step 1: Type Defrag in the taskbar’s search field and select Defragment and Optimize Drives in the results.
Step 2: The Optimize Drives window appears on your screen. Select a drive and click the Optimize button.
For a mechanical drive, you’ll see an additional Analyze button. This will quickly check the drive’s fragment level and provide a percentage. This button is inactive for SSDs.
By default, Windows 10 optimizes all drives every week. To change the schedule, click the Change settings button. You can alter or disable the scheduling, increase the tasks, change the priority, and select the drive you want automatically optimized.
Disable apps and programs in the startup

Many apps and desktop programs load when Windows 10 starts. They consume system resources before you even have a chance to read your first email of the morning. On PCs with low memory, this can be problematic, leaving little room for the services you and Windows 10 need most.
You can remove these apps and desktop programs from the startup without deleting them altogether. Here’s how:
Step 1: Right-click on the Start button and select Task Manager on the Power Menu.
Note: If you find yourself accessing Task Manager often, right-click on its taskbar icon and select Pin to Taskbar on the pop-up menu.
Step 2: Click the Startup tab listed in the Task Manager window.
Step 3: Select an app or desktop program you don’t want to load automatically and click the Disable button in the bottom right corner.
What should remain enabled? Anything directly tied to your PC, like components from Intel and Realtek, Microsoft services, and so on. Here are apps and desktop programs you can safely disable:
- Adobe software
- Apple iTunes components
- Discord
- Google software
- HTC software
- Java Update Scheduler
- Opera Browser Assistant
- Pandora
- Razer software
- And so on
Clean your vents

Nearly every computer requires airflow to keep the components inside cool. One set of vents allows fans to pull in cool air while the second set of vents exhausts warm air. In some cases, you’ll see ultrabooks without vents, as the chassis itself transfers heat away from components. However, most desktops and laptops rely on constant airflow.
For PCs that require airflow to keep cool, you absolutely must keep the intake vents clean. Because the internal fan(s) pull in air, these vents accumulate dust and other detritus. Over time, this collection of nastiness will reduce the air intake, causing the internal components, like the processor and memory, to get hot. The hotter the PC, the slower it performs. Eventually, you’ll see programs crash, the infamous Blue Screen of Death, and random reboots.
On desktops, the intake vents are primarily on the front. You may even see them on the side and/or along the top. Warm air blows out through vents on the back, including your PC’s power supply.
On laptops, intake vents are typically found on the bottom. The exhaust vents are usually mounted on the back or along the sides, depending on the model. Intake fans are typically the dirtiest.
The best way to clean these vents is to use compressed air. You can grab a can from Walmart or similar stores. In some cases, you may need to open the side of your desktop and simply blow everything out or clean the dust filters by hand. For laptops, there may be a panel on the bottom you can remove to use compressed air on the fan and surrounding components.
However, don’t take anything apart unless you’re familiar with the process. Just clean the intake vents or get someone more experienced to help.
Use native and third-party software
Third-party software can help remove unnecessary files and browser histories, which in turn could improve performance. Here are a few recommendations:
Antivirus software
Viruses are often to blame when your system loses its mojo. Fortunately, you don’t need to shell out any money to get quality antivirus software. While Windows 10 provides built-in antivirus protection, BitDefender performs even deeper scans to identify and eliminate malicious software.
For more options, we provide a list of the best free antivirus software.
Registry cleaners
As you install and uninstall software over time, the Windows 10 registry becomes muddled with outdated and corrupted entries that can provoke system errors and crashes. That’s where a registry cleaner comes in handy.
Auslogics Registry Cleaner selects a default list of drives and items on your computer and swiftly scans and repairs issues before they become more troublesome. In case it deletes something you need later, the Rescue Center feature can restore files from a backup.
Modify visual effects

Windows 10 is rather fancy in appearance, but all those visual effects may put a burden on older PCs. That includes animations, smooth edges on fonts, shadows, translucency, and so on.
If you notice a performance drop by simply dragging a window, your PC’s graphics chip may be struggling under the load. You could try lowering the resolution, reinstalling or updating the drivers, or using the following steps to change the platform’s visual effects.
Step 1: Click the Start button and select Control Panel listed under Windows System on the Start Menu.
Step 2: The Control Panel appears on the screen. Click Category next to View by and select Large icons or Small icons.
Step 3: Select the System option on the expanded interface.
Step 4: Select Advanced system settings listed on the left.
Step 5: The System Properties window appears on your screen. Select the Advanced tab.
Step 6: Click the Settings button shown under Performance.
Step 7: The Visual Effects tab loads by default in the Performance Options window. Select the Adjust for best performance option and click Apply followed by OK.
If you don’t like the way Windows 10 changes the visual effects, return to the Performance Options window, select Custom, and manually adjust the settings. If you don’t want jagged fonts, be sure to enable Smooth edges of screen fonts.
Run the troubleshooters
Windows 10 provides built-in troubleshooters that can help target issues in performance. You can find them by following these steps:
Step 1: Click the notification icon next to the system clock and select the All Settings tile in the Action Center.
Step 2: The Settings app appears on your screen. Select Update & Security.
Step 3: Select the Troubleshoot category listed on the left.
Here you have access to 17 troubleshooters. Notable options include:
- Internet Connections
- Network Adapter
- Power
- Search and Indexing
- Windows Store Apps
- Windows Update
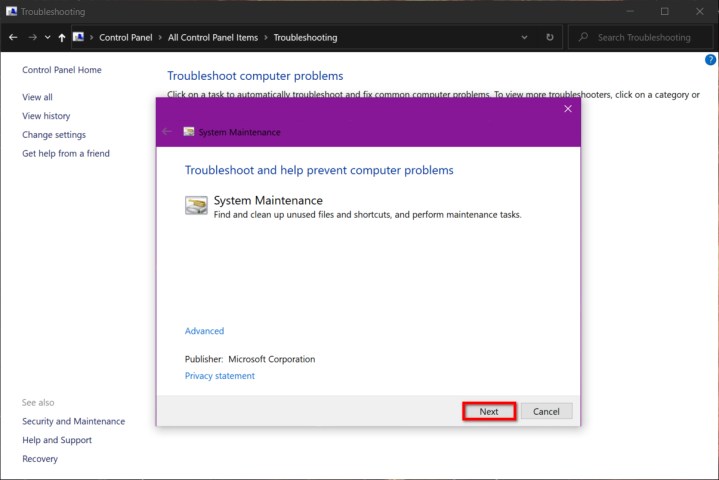
You could also try running the System Maintenance service in the Control Panel. Unfortunately, it’s not easily accessible:
Step 1: Click the Start button and select Control Panel listed under Windows System on the Start Menu.
Step 2: The Control Panel appears on your screen. Click Category next to View by and change the setting to Small icons or Large icons.
Step 3: Click Troubleshooting.
Step 4: Click Run maintenance tasks listed under System and Security.
Step 5: Click the Next button to start the maintenance tool.
Change power settings

If your PC is set to the recommended Balanced power profile, you can sometimes get an extra boost by switching over to the High Performance plan. Your PC will use more power using this profile, but it shouldn’t set your wallet on fire when the power bill arrives.
Step 1: Click the Start button and select Control Panel listed under Windows System on the Start Menu.
Step 2: Select System and Security.
Step 3: Select Power Options on the following screen.
Note: On laptops, right-click on the battery icon located next to the system clock and select Power Options on the pop-up menu.
Step 4: Select the High Performance power profile. You can tweak this profile by clicking Change plan settings followed by Change advanced power settings, if available.
If you don’t see a High Performance profile, be sure to click the down arrow next to Show additional plans.
Reset or restore your PC

With Windows 10, you can get that factory-fresh feeling without deleting your files. This is accomplished by using the Reset This PC feature in the Windows 10 settings. We provide a separate how-to guide if you want to take that route. However, here’s the shortcut:
Settings > Update & Security > Recovery
If you remember when your PC once felt speedy and believe that updates and/or software may be causing issues, you can use a restore point to send your PC back in time. Granted, everything you’ve installed since that time will be removed, but your files will remain untouched. This method requires that Windows 10 previously created a restore point.
Step 1: Click the Start button and select Control Panel listed under Windows System on the Start Menu.
Step 2: When the Control Panel appears on your screen, click Category next to View by and change the setting to Small icons or Large icons.
Step 3: Select Recovery in the expanded interface.
Step 4: Select Open System Restore on the following screen.
Step 5: The System Restore window appears on your screen. Click Next to begin.
Step 6: Select an entry at a time when your PC was faster and click Next.
Overclock your CPU

Overclocking refers to turning up the clock rate for your processor, increasing how frequently it performs operations. This is one of the most straightforward ways to increase computer speed, but it also carries risks. The native clock rate is chosen so the CPU will function optimally: Increasing that clock rate can cause CPUs to overheat and develop additional problems. That’s why it’s a good idea to read up on how to do it before you take a stab at it yourself.
If you don’t mind the research and work that goes into overclocking, the process has never been easier thanks to current software and monitoring options. Take a look at our guide on overclocking, the risks you should know about, and what software to use.
If all else fails, upgrade your hardware

You’ve tried all our tricks and even reset your PC, but it’s still running like a snail. That’s a good indicator that you’re due for an upgrade.
Memory (RAM)
If you run heavy programs like Photoshop, or just tend to run a lot of programs at once and notice that your system slows down when you switch from one to the other, installing more system memory, or RAM (random access memory), could make your life easier.
To find out how much RAM you already have, follow this path:
Settings > System > About
Next, you must determine how much more RAM your computer can handle and what kind you can install. Crucial and Kingston Technology are good resources to figure out what kind of RAM will work for you.
Solid-state drives (SSDs)
Switching from a mechanical disk to a solid-state drive (SSD) can make a huge difference in speed and reliability.
An SSD doesn’t have moving parts. Instead, it relies on stationary flash memory to provide faster read and writes while lowering drive failure rates. Mechanical drives, on the other hand, resemble old-school vinyl record (or CD) players, relying on rotating magnetic platters and read/write heads that move in and out like a record needle.
With an SSD, your file fragments can be located in adjacent spots or scattered loosely all over — they’re just as quick to read. SSDs can even purposefully store pieces of files in different places to level the overall wear and tear. The lack of moving parts not only make SSDs lighter and less energy-dependent, but also shockproof and more durable, further extending the life of your machine.
If you want an SSD, you’ll need to determine what kind is compatible with your computer. Samsung, Western Digital, and Intel have great SSD options to explore, no matter what size you’re looking for. Once you choose a new SSD, you can manually add it to your system using an upgrade kit — with no experience necessary.
For suggestions, check out our list of the best SSDs you can get right now.
Graphics card
f you’re an avid computer gamer and begin to notice slow (and highly agitating) performance, you might need to opt for a video card upgrade. Cheaper machines usually include built-in graphics, while more expensive builds may consist of a separate graphics processing unit (GPU), which has enhanced graphics abilities.
Even if you own a GPU, you may desire a quicker model, depending on the particular games you play regularly. Just like with all RAM and SSDs, you must first determine which card will work best on your personal computer, as not all cards will be supported by your motherboard.
Maybe you have an outdated accelerated graphics port (AGP). Chances are, it’s a PCI Express (PCIe). Ask yourself whether or not it’s integrated into the motherboard or if it’s a separate card in and of itself.
Do some research before you go all-in, as some video card upgrades demand a power supply upgrade as well.
Lastly, the GPU is the only element you can’t alter in a laptop out of these three choices. It’s important to note that you might enjoy access to these sections for storage and RAM, but your upgrade choices may be restricted.
Editors' Recommendations
- How to choose the best RAM for your PC in 2024
- How to take a screenshot on a Mac
- How to change the default apps on a Mac
- How to change your Zoom background on Mac and Windows
- How to clean a laptop screen without scratching it


