Prepping for surgery
Ok, so “surgery” may be a little dramatic, but there is a bit of prep work involved in converting that old office computer into a streaming-ready device. If you’re going to have roommates or family members using the computer to watch shows or movies, you might want to either run a fresh install of your operating system first, or create a separate user account just for these purposes. You’ll be installing software on it that runs on any of the major operating systems, as well as on smartphones and tablets.
You should know that while the media management program we’re going to use, Plex, is great for streaming to a single device, and even older machines shouldn’t have too much trouble, the stress of transcoding multiple HD video files and streaming to different devices simultaneously may be too taxing for older, slower machines. The results aren’t disastrous if your laptop or desktop isn’t quite up to the challenge, but expect to to deal with longer loading and buffering times, or keep it limited to one stream at a time. Our test machine had an older Intel Core i5 and a healthy amount of RAM, but still stuttered a bit when faced with the challenge of streaming multiple videos to different devices.
Setting up Plex
In order to make the most of all your different file formats, we’re going to use Plex as an easy way to manage music and videos across all the devices you want to connect. It’s simple software with a number of useful features, including a wide range of codecs, easy set-up, and compatibility with a large number of devices. For the software to work, we’ll set up your old computer as the central media server from which you’ll stream content to your tablet, phone, set-top box, game console, or television.
From the Plex downloads page, you can download the Media Server software. This computer will act as the base station for everything else on the network, storing media and distributing it to any other device that runs the application. As part of the installation process, you’ll set up your Plex account, allowing you to register all of your devices and server together.
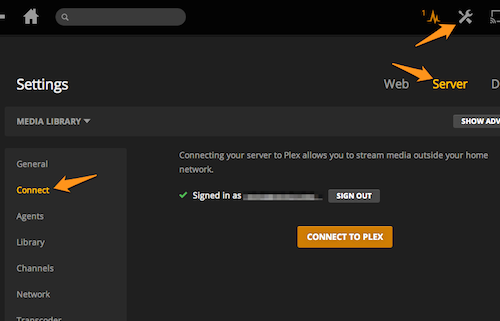
If you’d like to make your content available when you’re off your home network, simply open the Server menu under settings, and select connect. From here you’ll be able to connect your Plex media server to the Internet and access it from the bus or the park … wherever you have Internet access. You can also just plug the computer directly into your TV to watch videos, but the best part of Plex is the ability to keep the computer in a single location and use smaller, less expensive devices like an Amazon Fire TV stick, Roku stick, or Chromecast to access it.
All of your devices
For a few dollars, you can download an app for Android, iOS, Amazon, and Roku devices, as well as a smattering of smart TVs, that lets you view any of the content on the server. Alternatively, Plex offers a subscription service that includes expanded functionality, as well as access to free apps on a number of platforms. If you have a Chromecast, Plex supports it for free right out of the box, you just have to install the Plex app on your device and sign into your account.
There are a number of benefits to letting the software handle all of this for you. Your device will send information to the server about its capabilities and connection speed, and the server will not only convert any appropriate video file, but also scale the quality to achieve a balanced of resolution and speed. It’s also easily compatible with a large range of devices, something that’s simply not true if you just use the computer as a storage device with no media software to manage everything.
File naming and storage is as important here as when dealing with more sensitive files. Because Plex will let you point to any folder or file system where you have media stored, it’s best to keep your files separated by type into their own folders, close to the root of your drive. If your computer is particularly old and you worry it might turn off one day and never turn back on, you can also point Plex to hardwired or network attached external storage. We like to use a USB-connected hard drive. By keeping files on a separate drive, you’ll avoid a huge headache if something does go wrong with your new, re-purposed media server — all your files are still available, and could easily be connected to another computer running Plex if necessary.
Happy streaming
By using Plex on an old computer, you not only harvest a piece of technology that might otherwise head to a landfill, but you also place your digital copies of movies and TV shows right alongside other streaming entertainment options such as Hulu, Netflix, and Amazon Prime Instant Video. Keep in mind that Plex can’t play back certain DRM-protected files, such as those purchased through iTunes. In many cases, you can remove the DRM restrictions through a converter — for instance, TunesKit works well for media purchased through iTunes. However, the law regarding DRM removal is a little fuzzy. We strongly urge you not to strip DRM from anything you haven’t purchased the rights to own, nor should you ever distribute such content.