Choosing the right software
While Kodi is a popular option for DIY media streamers, support has fallen off for Raspberry Pi versions of the software as better hardware allows the Linux-based OpenElec to run better.
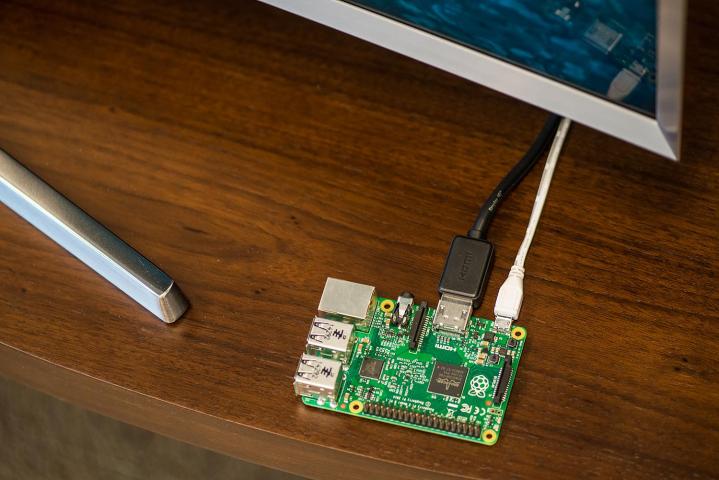
Before you get started with installation you’ll want to make sure you have everything else ready to go. In addition to a Rasperry Pi and power cable, you’ll need a Micro SD card, and while extra space is great, it only needs to be 1GB. You’ll also need to connect your Pi to the network, which you can do by attaching a compatible USB Wi-Fi adapter, but we prefer Ethernet for its ease of setup and more stable connection speed. It’s easier to use HDMI because it automatically carries audio with it, but you can also use an analog cable and a 3.5mm output. You don’t need it, but a wired USB keyboard will help the process go smoothly, especially if you have issues with network connectivity.
Make sure to back up any data you have stored on the SD card, as the process of installing OpenElec will wipe the card clean. The process varies a little based on your Operating System, but downloading and unpacking the image is the same.
We’re going to have to secure a copy of the OpenElec image. Very advanced users get some unique levels of control by building their own image, but the process is complicated and requires the user to be at least familiar with a Unix terminal environment. Instead, we can use the official site to download the latest version of OpenElec that’s been configured for Pi already.
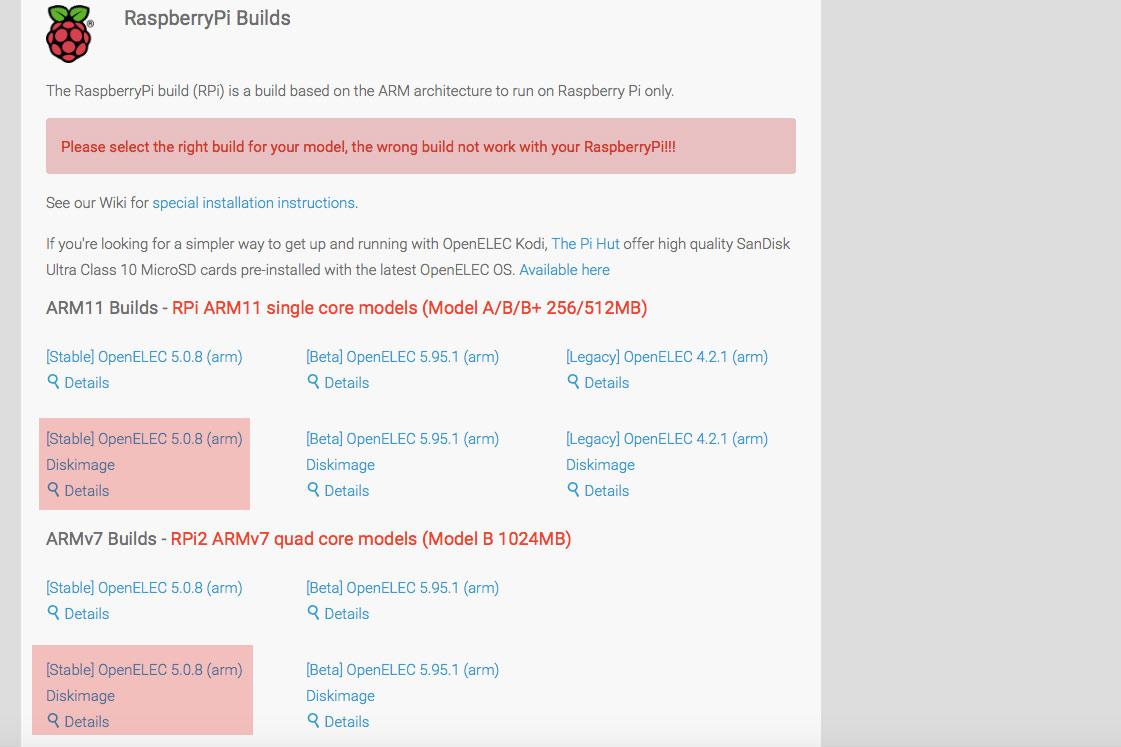
If you’re using an older model Raspberry Pi, download the stable Diskimage for the ARM11, if you’re using the new Raspberry Pi 2, use the ARMv7 stable Diskimage download. After you’ve downloaded the .zip file, make sure you put the extracted image into a easily accessible place, like the root of your hard drive.
For the remaining instructions continue to the next page for Windows or the following page for Mac OS X.
Next page: Windows Instructions
Windows
It’s recommended you unplug or remove any other USB or flash storage devices beside your intended card before getting started. The free software Win32 Disk Imager is the preferred method for writing images to SD cards for Raspberry Pi installations. Simply point Disk Imager to the latest version of the image file from the OpenElec website, select the drive letter that corresponds to your SD card, and hit start.
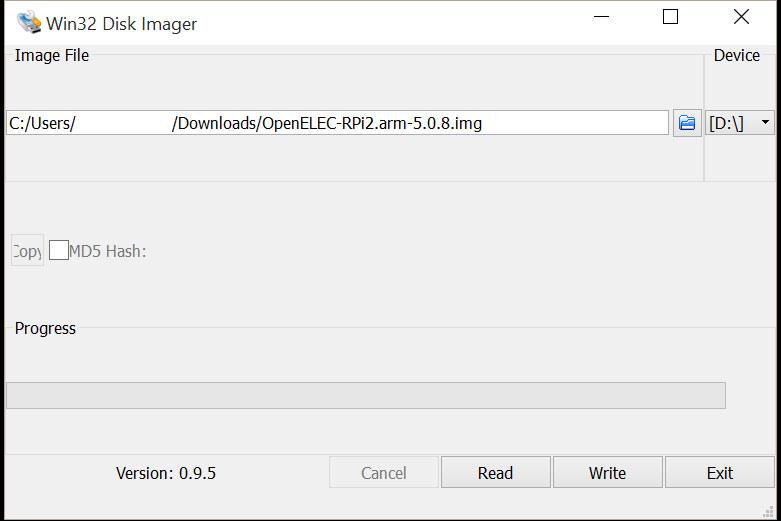
When the program finishes running, eject the device and remove it from your computer.
That’s it!
Insert your newly imaged SD card into the slot on your Raspberry Pi, connect an HDMI cable, then plug in the power cable to boot it up. After 30 seconds or so, you’ll be able to access the device both locally and over the network via SSH. The default username for OpenElec is “root” and the password is “openelec” so you can login initially. Once the system is booted you can easily use any Kodi-connected device to play media, as well as connect USB storage for local playback.
Next page: Mac OS X Instructions
Mac OS X
To identify the proper drive to write to, you’re going to use the Disk Utility application, which can be found in the Applications folder in a sub-folder called Utilities. To quickly open this folder, with Finder as the active program, hold Shift and the function (apple) key, then press U.
diskutil list
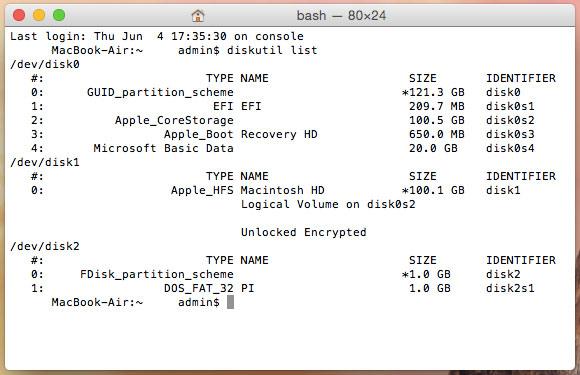
In the output, you’ll see a selection of attached drives marked as /dev/diskX/ where X is a number, starting with 0 and increasing by 1 with each drive attached. Write down the number of the SD card’s current drive number, then leave that window open and return to the Disk Utility program.
Upon returning to the terminal, we’re going to use several Unix commands that are very powerful, and if you’re not careful are capable of erasing all of the files on your system, screwing up your SD card, and causing headaches in general.
It’s important to take careful note of the drive number of your SD card, and that you haven’t added or removed any drives since then. You can always double check right before issuing the command by typing the diskutil list command in again.
The first is a command that’s going to reconfigure your partition map. To do that, you’re going to enter the following command into your terminal windows, making sure to replace the X in diskX with your memory card, as listed in diskutil.
dd if=/dev/zero of=/dev/rdiskX bs=1024 count=1
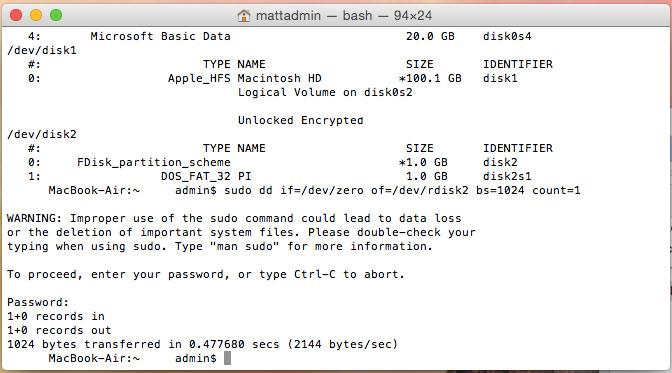
Next, type the following command into the terminal, making sure to change /PATH/TO/OPENELEC.img to the path to the image file we extracted from the .zip already, and replacing the X in /dev/diskX with the proper drive number for your SD card. This is going to write the image to the base level of your card, where the Pi can access and boot from it.
sudo dd if=/PATH/TO/OPENELEC.IMG of=/dev/diskX 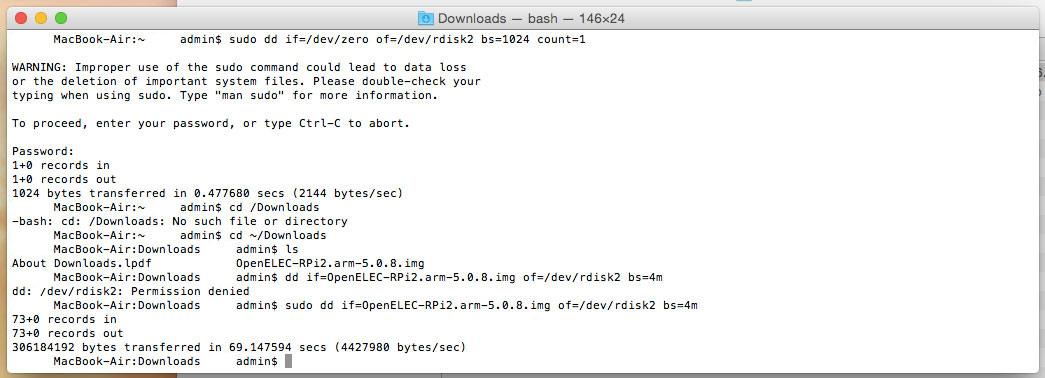
That’s it!
Insert your newly imaged SD card into the slot on your Raspberry Pi, connect an HDMI cable, then plug in the power cable to boot it up. After 30 seconds or so, you’ll be able to access the device both locally and over the network via SSH. The default username for OpenElec is “root” and the password is “openelec” so you can login initially. Once the system is booted you can easily use any Kodi-connected device to play media, as well as connect USB storage for local playback.
Editors' Recommendations
- This custom hoverboard is entirely powered by Raspberry Pi
- What is a Raspberry Pi and what can I do with it in 2022?
- You can now cram your Raspberry Pi 4 with 8GB of RAM for $75
- Powerful upgrades turn 4th-gen Raspberry Pi into a more capable $35 desktop
- NASA hacked: 500 MB of mission data stolen through a Raspberry Pi computer