Still, hiding your stuff is one thing, but it can be beyond inconvenient when troubleshooting Windows errors or merely trying to delete the said folder to free up space on your hard drive. And though you can quickly hide a file or folder from within each item’s respective property settings, viewing them requires administrative privileges and access to Window’s main control panel.
Here’s our guide on how to show hidden files in Windows, whether you’re running the latest version of Microsoft’s flagship operating system or an earlier incarnation. Also, check out our guide on how to password protect a folder.
Skip ahead to how to view hidden files in Windows 7 (and earlier).
Windows 10
The short way: Using File Explorer — This is the easiest way to show hidden files in Windows 10. Simply click on the file-based icon on the taskbar to open the File Explorer window. Next, click on “View” in the Quick Access Toolbar, and then make sure “Hidden items” is checked in the “Show/hide” section of the drop-down menu. That’s it.

For kicks, you can do the same for “File Name Extensions” if you want to see file types (EXE, JPG, INI, BAK, and so on).
The long way: Using the Control Panel — If you like taking the scenic route to your destination, there is the old-fashioned method of using the Control Panel. This access isn’t blatantly visible like File Explorer, so you need to type “Control Panel” into Cortana’s search field on the taskbar. Microsoft’s assistant will then provide the shortcut needed to access this buried desktop feature.

Step 2: Navigating the Control Panel — With this window open, you see “Appearance and Personalization” listed in the right column, which is where you need to go. Click on that, and the Control Panel will roll out four options spanning from the taskbar to fonts. You want to click on the “Show hidden files and folders” link under the “File Explorer Options” settings.
Step 3: Unhide those hidden files — A little window will appear after clicking on the “File Explorer Options” link. Here, you will see a bunch of settings to toggle on/off under “Advanced Settings > Files and Folders,” one of which is a section called “Hidden Files and Folders” with a mere two options: Show or don’t show hidden files.
Windows 8 / 8.1
Step 1: Navigate to the Folder settings — Swipe in from the right-hand side of the screen, or move your cursor to the upper-right corner of the screen, and click or tap “Search.” Afterward, type “Control Panel” in the search field, select it the from the results and click or tap the green “Appearance and Personalization” option located on the right-hand side prior to selecting the blue “Show hidden files and folders” option below the Folder Options section.

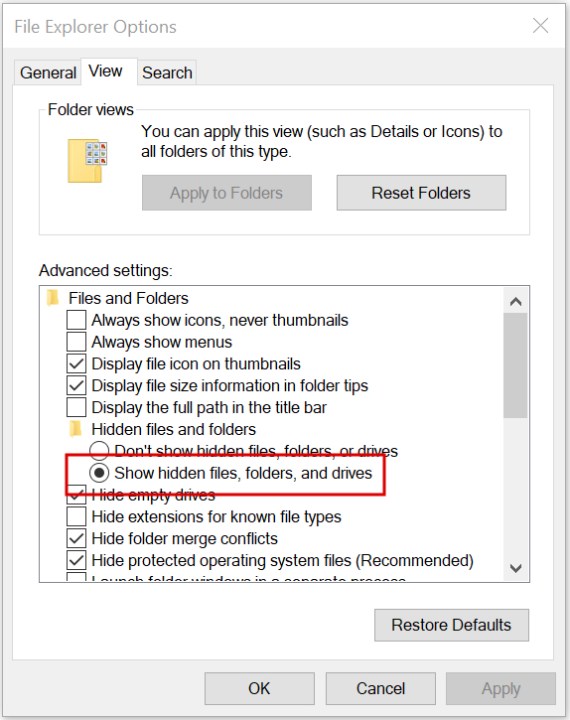
Step 2: Enable viewing of hidden folders — Click or tap the View tab at the top of the resulting window and check the bubble directly left of “Show hidden files, folders, and drives,” beneath the Hidden files and folders section. If desired, check the bubbles directly left of “Hide extensions for known file types” or “Hide protected operating system files (Recommended)” to view other hidden file and folder elements. When finished, click or tap the “Apply” button in the bottom-right corner.

Windows 7 (and earlier)
Step 1: Navigate to the Folder settings — Click the Start button in the Windows taskbar and select “Control Panel” from the right-hand side of the resulting drop-down menu. Afterward, click the green “Appearance and Personalization” option located on the right-hand side, followed by the blue “Show hidden files and folders” option beneath the Folders Options section.
Step 2: Enable viewing of hidden folders — Click the View tab at the top of the window and click the bubble directly to the left of “Show hidden files, folders and drives” within the Hidden files and folders section. If desired, check the bubbles directly to the left of “Hide extensions for known file types” or “Hide protected operating system files (Recommended)” to view other hidden file and folder elements. When finished, click or tap the “Apply” button in the bottom-right corner.

For addition guides for navigating Windows 10, check out these cool how-tos:
- How to set up dual monitors
- How to enable dark mode
- How to set up speech-to-text
- How to re-install Windows 10
- How to revert to an older version
- How to use File Explorer
- How to hide specific files and folders
Editors' Recommendations
- PC gamers — Windows 7, 8, and 8.1 are officially dead
- How to customize File Explorer in Windows 10
- How to zip a file in Windows 10
- Windows 7 vs. Windows 10
- Don’t upgrade from Windows 7. Here’s why you should buy a new laptop instead