If you’ve never seen a Rubens’ Tube before, you’re in for a treat. In a nutshell, this crazy contraption is basically a waveform visualizer that uses fire to display the shape of sound — and it’s surprisingly simple to build. The whole apparatus is basically just a closed tube with a few holes drilled in it and some propane pumped through it. Light the jets, put a speaker on one end, and the flames will magically start to pulse along with the music.
Here’s how it works: As sound moves through the gas, the waves create areas of high pressure and low pressure form at fixed points along the tube. This forces the propane gas to be expelled from the holes more quickly in some zones (generating a taller flame) and more slowly in others (creating a shorter flame) This effectively allows you to visualize the standing wave that’s created inside the tube.
When you play a constant tone of, say 440 Hz (the musical note A), the flames will form a perfect sine wave. Adjusting the frequency of this tone will alter the shape of the wave accordingly, and playing a full song will cause the flames to dance and pulse with the music. This pyrotechnic visualization is absolutely mesmerizing to watch, and is guaranteed to be a hit at your next backyard party.
*Note: Working with fire and propane is a potentially dangerous activity. Digital Trends accepts no responsibility for injuries sustained while performing these activities, and recommends the use of proper safety equipment during all stages of the process.
What you’ll need
Tools
- Electric drill
- Drill bits: 1/2 inch and 1/8 inch
- Tape measure
- Duct tape
- Masking tape
- Scissors
- Pliers
- Permanent marker
- Metal file
Materials
- 5 feet of metal duct pipe (3-inch diameter)
- Plastic or metal end cap (3-inch diameter)
- 2 brass barb MIP adapters, (3/8 inch x 1/4 inch)
- 1 plastic barb tee adaptor (3/8 x 3/8 x 3/8 inch)
- 2 rubber o-rings (1/2-inch diameter)
- 2 washers (1/2-inch inner diameter)
- 10 feet of latex hose (3/8-inch outer diameter, 1/4 inch inner diameter
- 1 latex balloon (large)
- Old computer speakers (Or new, whatever. I find that Goodwill typically has a good selection.)
- Propane tank (20 gallon)
- Propane tank regulator w/ 3/8 inch barbed output
- Safety glasses
Next page: Let’s do this!
Instructions
The big picture
From a broad perspective, this is a fairly simple project. Regardless of the materials and tools you use, all you really need to do is:
- Drill some evenly-spaced holes in a tube
- Cover one end of the tube with a cap
- Cover the other end with a balloon
- Pump some propane into the tube
- Light it, and put a speaker next to the balloon end
That’s really the gist of it. The only tricky part is making sure you seal everything off and don’t have any gas leaks (which is really important). So, to help guide you through the process, here’s a more in-depth breakdown of the entire build. Here goes nothing:
Step one: Building the tube
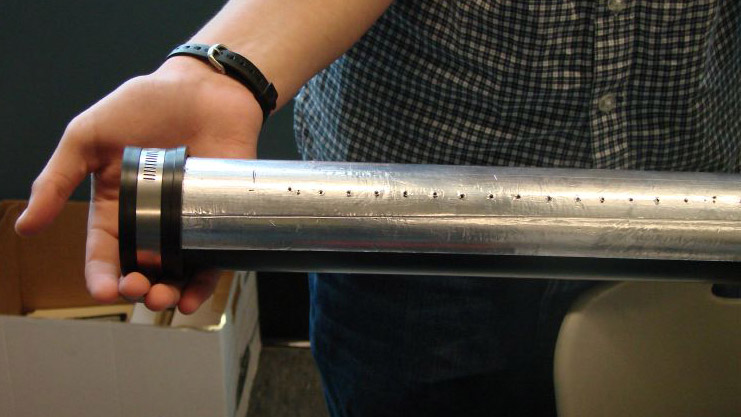
Grab your metal duct pipe and put a nice, big strip of duct tape down the seam. As you tape it, make absolutely sure the seam is smooth and has no wrinkles. When you reach the end of the tube, cut the tape so that it reaches the edge but doesn’t wrap around it. The side of the tube with the seam will function as the bottom of your Rubens’ Tube, so all the holes will be drilled on the opposite side.
To make sure that all the holes are drilled in a straight line, put a strip of masking tape down the length of the pipe. Next, use your tape measure and a pencil/marker to mark out where you’re going to drill. Starting at about 8 inches from one end of the tube, make marks every 3/4 of an inch, and stop when there’s about 8 inches of unmarked territory left on the opposite end. This should result in about 60 marks.
Now it’s time to start drilling. Use your 1/8 inch drill bit to bore a hole through each of your marks. Before you drill each hole, make sure your bit is perfectly lined up on the mark. Uniformity and precision during this process will make the end product look much better. Also, due to the nature of duct pipe, some of your holes will be jagged — so you’ll want to smooth them with a file before you fire up the tube. This will ensure that your flames are uniform in height.
Next, grab your cap and place it on the crimped end of the tube. Push it down as far as it’ll go, and then seal it off by wrapping the junction with duct tape. Just like before, make sure that the tape is smooth and wrinkle-free. On the other end of the tube, you’ll need to install a flexible diaphragm. To do this, grab your balloon, and use a pair of scissors to cut off the end. Stretch it over the tube, but take care not to pull it so tight that it’ll tear against the metal edge. When that’s done, secure it in place with another strip of duct tape.
Step two: Adding the gas line

Now that you’ve completed the main body of the tube, it’s time to add the gas line. To do this, you’ll first need to drill two 1/2-inch holes. To do this, start by measuring in about 18 inches from each end and making a mark. This is where you’ll drill the holes with your 1/2-inch bit. When that’s done, revisit the holes with a file to make sure they’re not jagged.
Grab your two brass barb adapters, O-rings, and washers. Place a washer over the threaded end of each adapter, then place your O-ring over the end of each adapter. Next, screw the threaded end of each barb adapter into the 1/2 inch holes you just drilled. You might need pliers to tighten it sufficiently, so that you get a solid seal. Do what you need to do to ensure that gas wont leak through this connection.
Next, it’s time to build your hose assembly. Bust out your scissors and cut your rubber tubing to create two 15-inch pieces, then connect those pieces to the barb adapters you installed into the side of your tube. After that, just join their free ends together with the tee adapter. Make sure that the hoses are connected as far up as possible on each adapter, so that you get a good seal. Once that’s done, just use the remaining rubber hose to connect the completed Rubens’ Tube to the regulator on your propane tank.
Step three: Firing it up
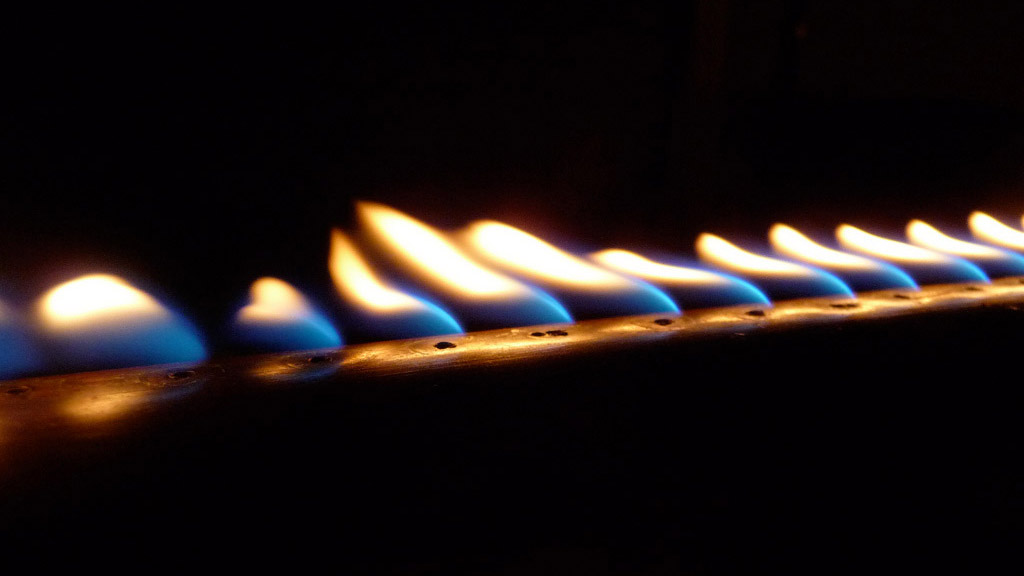
Once everything is connected, open up the valve on the propane tank and wait for a second or two. When you sense that the tube is full of gas, carefully spark a lighter over the row of holes on your tube. If everything’s working properly and there are no leaks, you should get a line of flames that are all roughly the same height. Adjust the flow of propane as needed to increase or decrease the height.
When you’re flames are at a suitable height and remaining somewhat still, fire up your speaker and place it directly next to the balloon end of your tube. Regardless of what you play (be it a single tone or a full song) you should see the flames immediately begin to flicker and dance.