
E3 2011 hands-on: Star Fox 64 3D

Star Fox 64 3D(This article comes courtesy of N-Sider, a site for well-adjusted Nintendo fans. N-Sider has served the Nintendo community for more than a decade.)

Here’s another update to a game I’ve never played before (you can go ahead and insert your expressions of disbelief right… here): Star Fox 64 3D. In this context, the one thing that’s front and center in my mind is that the screenshots I’ve seen don’t do it justice. A lot of things lookreally good in this game, particularly in 3D.

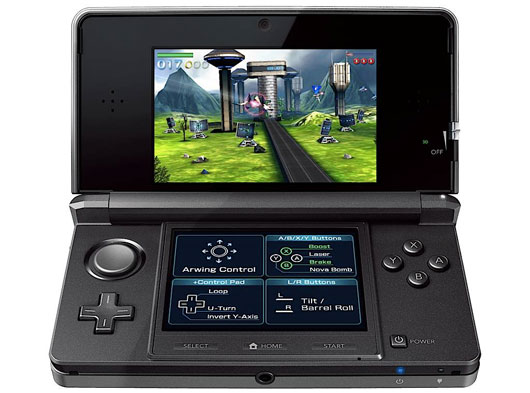
On display at the show was the Score Attack mode, letting you choose one of three missions to go through, and a four-player multiplayer mode. I tried the former first, exploring various control options. The much-touted gyro controls, which let you control your ship by moving the 3DS around in space in front of you, proved to be both rather awkward and annoying as I tended to move the 3D out of focus. I eventually ended up switching the gyro off first and switching to the slide pad (which you still needed to use anyway to pull off many moves), then inverting the Y-axis, before it came together.

star-fox-64-3d-e3-2011
Image used with permission by copyright holder

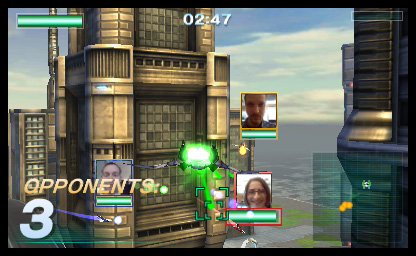
What I really liked, though, was the multiplayer mode. Likely in the interests of keeping things fair, gyro mode was locked on in this game. But in the more open area of the multiplayer arena (as opposed to the largely on-rails nature of the missions), I found it worked substantially better to use the gyro to move around—far less tight quarters made for a much better experience with the motion controls.

Multiplayer has one other feature: it will use the 3DS’ internal camera to take really grainy, low-fps shots of the player as he plays the game. It proved to be really difficult to make out anything on the tiny photos that were floating around the arena as we played; only when the game took snapshots with a victory/loss event was it possible to make out any detail, and even then it was really only at the conclusion of the game that I felt I could pay enough attention to them. Not exactly a game-changer.

After playing Kid Icarus: Uprising last night with its stylus aiming, the designed-for-analog-stick aiming mechanic of Star Fox feels kind of archaic; I don’t think I’d see myself particularly interested in pursuing the single-player campaign in this game. But I wouldn’t hesitate to jump into a multiplayer game—even if I wasn’t winning. It turned out to be a lot of fun.

star-fox-64-3d-asteroids
Image used with permission by copyright holder

Editors' Recommendations

Topics
Matt Behrens
Former Digital Trends Contributor
Matt Behrens is a software developer based in Michigan, working on networked software on Unix and Linux. He was a longtime…
All Trinkets in Tales of Kenzera: Zau, explained
The main character of Tales of Kenzera: Zau stands with two elemental items.

Your main upgrades in a metroidvania like Tales of Kenzera: Zau will always be your new abilities. These transform the way you move and fight, but there are other ways you can make Zau a more powerful shaman. Trinkets are introduced right away, but aren't given away as freely as you might think. Each one requires you to overcome a small trial that tests your platforming abilities off the main path. Technically, you can miss every single one aside from the one you begin the game with. Even though there are a few fast travel points, backtracking isn't a particularly fun experience. Here are all the Trinket locations in Tales of Kenzera: Zau, plus which ones you should equip.
All Trinket locations
You can see which zones have Trinkets on the map, and for the most part, you will be able to grab them as you navigate through them for the first time. Here are each of the Trinket locations roughly in the order you should naturally be able to get them.
Battering Stance
This is the Trinket you begin the game with and is equipped by default.
Lifted Spirit

The first Trinket is found in this side path trial in The Buluu Caverns.
Retaliating Spirit

Read more
How to start The Forgotten Kingdom DLC in Remnant 2
Invoker

Remnant 2 is a massive game that already boasts nearly endless replayability, but that isn't stopping developer Gunfire Games from adding even more to do in the popular looter shooter. The game's new DLC, The Forgotten Kingdom, provides players with a substantial amount of extra stuff to check out, such as new biomes to explore, an additional archetype known as The Invoker, and plenty of fresh enemies to take down. If you're ready to see all of what The Forgotten Kingdom DLC has to offer, read on to learn how to access it from within the game.
How to start The Forgotten Kingdom DLC
The first step in accessing The Forgotten Kingdom DLC is to ensure you've purchased and downloaded it. You can buy the standalone version from your respective storefront for $10, or you can opt to snag the $25 bundle, which includes The Awakened King, The Forgotten Kingdom, and another future DLC that has yet to be announced. If you intend to play the full trilogy of DLCs, the former is your best option, as you'll save five bucks off the total cost of all three.

Once you've purchased and downloaded the DLC, you'll be ready to access The Forgotten Kingdom by visiting a World Stone and opening Adventure Mode. You'll need to have completed the Yaesha biome at least one time. At that point, you can select "Reroll Adventure Mode" and choose The Forgotten Kingdom: One Shot on the right, which will notably give you exclusive DLC content your first time through. Keep in mind that while this initial run won't feature any older content, your subsequent playthroughs of Yaesha will weave DLC areas in with main campaign content.

Read more
All Baobab Tree locations in Tales of Kenzera
Zau fights a dragon in Tales of Kenzera: Zau.

While it wasn't marketed as being a particularly punishing game, Tales of Kenzera: Zau is by no means easy. You will have plenty of environmental challenges that can instantly sap your life, and the enemies you face -- especially the bosses -- are no slouches. When you first begin, it will only take a couple of bad hits to send Zau to the land of the dead himself. Alongside the Trinkets you can unlock through hidden challenges around the map, there are also Baobab Trees where Zau can stop to reflect on his journey thus far, have a short dialogue with Kalunga, and get a small addition to his health bar. Like everything in the game, these trees aren't prohibitively hidden, but you could easily pass one by and have no idea where it was when trying to backtrack. These are all the Baobab Tree locations so you can max out your health bar.
All Baobab Tree locations
There are six Baobab Trees to find in Tales of Kenzera: Zau and each adds a small segment of health to your total. When you collect them all, you will roughly double your HP bar. Here are each of their locations in the rough order you should naturally find them in. Most can be picked up on your first time through that area.
Ikakaramba

This one is very hard to miss as it is directly on your critical path. If you do, you can fast travel to the nearby campfire to grab it.
The Great Cliffs

Read more