These days, even entry-level A/V receivers are likely to come with some form of auto-setup system that promises to make crucial speaker-related adjustments by simply plugging in a microphone and hitting the go button. Sounds appealing, right? Why would anyone want to spend an hour reading a manual, busting out a tape measure, and fiddling with a decibel meter when the auto-setup will do it for you, hassle-free?
Unfortunately, the measurement and crossover settings provided by these systems aren’t always accurate, and they also usually make EQ adjustments that don’t always improve sound quality. In fact, using auto-setup can actually make your awesome set of speakers sound less than their best. With a couple of tools and some guidance, however, even the most electronically-challenged can get the very best sound quality by performing a manual speaker setup. Here’s our plain-language guide to doing just that.
Step 1
Make sure you can see your receiver’s on-screen display (OSD) on your TV
Trying to set up your receiver using its tiny LCD display is a hassle you don’t need. Instead, make sure you can see your receiver’s display on your TV. Nearly all modern receivers will put out the on-screen display via HDMI, but some older receivers (like, more than five years old) require an old-school video connection. If you don’t see a menu pop up on your TV when you press the “menu” or “setup” button on your receiver’s remote, make sure you have at least an RCA cable handy for connecting the receiver’s composite video (yellow RCA jack) output to your TV’s composite video input.
 Onkyo OSD (image via)
Step 2
Know your receiver’s menu
You can spend time looking at the manual, sure, but getting a hands-on experience with your receiver’s menu by hunting and pecking through it with your remote provides significant benefits. After browsing for a while, you’ll find that you remember where a lot of the menu options are because you actually navigated there before. Don’t worry if you don’t understand what some of the terms mean. We’ll explain some of them below.
Step 3
Place your speakers
We understand that the room in which your speakers live can dictate where the speakers must be placed, and placement can also vary based on the types of speakers you’re using. Some of us have entertainment centers with specific places for speakers, or we only have a handful of open spots in which to put a speaker. With that in mind, do the best you can to follow these basic speaker placement rules.
First, take a look at the simple speaker location graphic below:
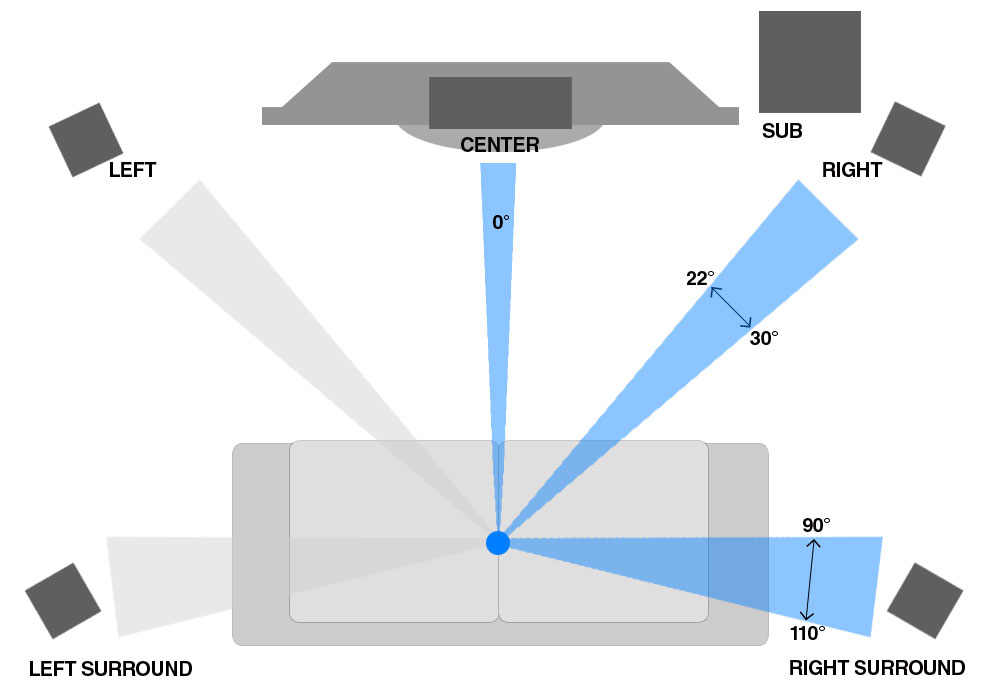
Note that the center channel should be placed directly below or above your television. Since almost all dialogue comes from this speaker, it needs to be as close to the TV as possible to maintain the illusion that the voices are coming from the picture itself.
Try to place your left and right speakers as far away from each other as your central listening position is from your TV, creating an equilateral triangle between your head and the two speakers. For most, the central listening position is the seat located directly in front of the TV. If this doesn’t apply, then choose the spot in the room where most of the listening will be done. It also helps if you place the top of the speaker at about 40 inches off the floor (average ear height).
Next, place your surround speakers above ear level (somewhere between 48 inches and 72 inches) and just behind your listening position. If you have surround back speakers (the sixth and seventh channels), mirror them in the same positions as the front speakers, but on the wall behind you.
If you’re adding Dolby Atmos/DTS:X speakers (i.e. height speakers for 3D/object-based surround setups), you’ll want to position upward-firing speakers (those that bounce sound off the ceiling) directly on top of each of the front left and right speakers and, if you’re adding back height speakers, directly on top of the left and right surrounds. If this is not possible for some reason, Dolby recommends you make sure they’re within three feet of those speakers at the front and back respectively. Dolby also recommends you assure the speakers are at or slightly above ear level.
If the speakers are wall-mounted they can be higher, but no more than half the height of your wall. If you’re mounting them in the ceiling (and if you’re installing them yourself, bravo), Dolby recommends the ideal height as between 7.5 and 12 feet, with 14 feet as the maximum. If you’re only adding two ceiling-mounted speakers, they should be mounted directly above the central listening position at an angle of around 80 degrees from the top of your head, as shown in this diagram.
If you’re adding four ceiling-mounted height speakers, you’ll want them mounted equidistant from the front, back, and sidewalls, and set above the central listening position. The front speakers should be set about 45 degrees forward from the central listening position, while the back should be about 135 degrees behind, as shown in this diagram.
For the subwoofer, avoid placing it flush with a corner of the room or within another cabinet like an entertainment center. Subwoofers usually sound best placed a third of the way into the room from the side and front (or back) wall. It’s OK to place a subwoofer in the back of the room, but make sure it is at least 3 feet away from your head. If you can’t find a good place in your room to adhere to these instructions, make sure to keep at least 1 foot of distance between the sub and any given wall.
With your speakers placed and connected to the terminals, it’s time to set up the receiver to handle them properly. Start by accessing your receiver’s menu and selecting the “speaker setup” option. Most receivers offer the same basic adjustments. These include speaker distance, speaker size and crossover setting, and speaker level. We’ll go through each setting one at a time.
Step 4
Speaker distance
Speaker distance refers to the distance between each speaker and your central listening position, as defined above. This setting is important for making sure that sounds from each of your speakers reach each ear at precisely the same time. Grab a pen, notepad and tape measure. Measure the distance from the front of each speaker directly to where your head resides when seated in the central listening spot, then jot each measurement down on your notepad. Once all the measurements are made, add them into the receiver. The receiver will prompt you, speaker by speaker, to input a distance measurement in increments of feet, half-feet or sometimes down to 1/12 of a foot. Round up or down as necessary.
Step 5
Speaker crossover
Perhaps the most easily misunderstood and critical speaker-related setting in an A/V receiver is the crossover setting. In this case, “crossover” refers to the point at which your receiver stops sending bass to each of your speakers and starts sending it to your subwoofer. The correct crossover setting will depend on your speakers’ ability to produce bass. Most speaker manufacturers provide specs that indicate where your speakers stop producing bass. For example, you may see something like “Frequency Response: 60Hz-20kHz.” In this example, the manufacturer indicates the speakers can play to 60Hz, but often the bass is much weaker as its lowest-rated point than it is in the rest of its performance range. So, you may want to move the number up by 20Hz or so to be on the safe side.
It is common in speaker setups to have larger front left and right speakers than surround speakers. In this case, expect to have to make different crossover settings for each speaker. For those with systems that use the exact same speaker for all channels, set the same crossover frequency for each speaker.
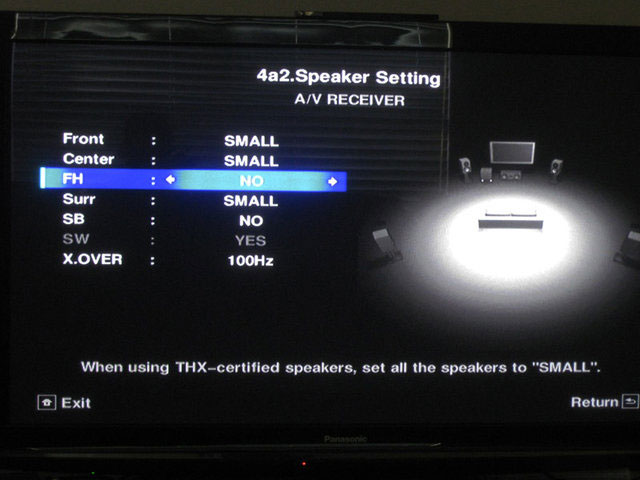
Older or cheaper receivers may not allow a specific crossover frequency to be set for each speaker. Instead, they often allow a simple choice of “large” or “small” with a single crossover point for all the “small” speakers. For the purposes of this guide, a large speaker would be a full range (often floor-standing) speaker capable of producing plenty of low bass. A small speaker would be anything else. Set the speakers as large or small, then choose the lowest bass frequency of your smallest speaker as the crossover point for all of your “small” speakers. For instance, if you have front speakers that go down to 80Hz but your surrounds are smaller and only play down to 100Hz, you would want to set the crossover point at 100Hz. This will ensure the most uniform performance among the speakers.
You will also find a separate subwoofer setting within the speaker size or crossover portion of your menu. Receiver manufacturers all call this setting something different, but the function it represents is the same. If your speakers are set to large, your receiver will open up the option (it’s usually grayed out if your front speakers are set to small) for you to decide how the subwoofer is used. You can choose to have the subwoofer used only for low-frequency movie effects (the .1 in 5.1 or 7.1) or you can have it reproduce the bass that is being sent to the front left and right speakers in addition to any LFE signal. By choosing “Double Bass: On” or “LFE +Main” you are instructing the receiver to send bass signals to both the sub and your main speakers thus increasing the bass response of your system. Those with high-performance speakers may prefer to hear their speakers on their own when listening to music, so they may prefer to leave this option off or set at “LFE only.” For more information, see our complete guide to subwoofer placement and setup.
Step 6
Speaker-level calibration
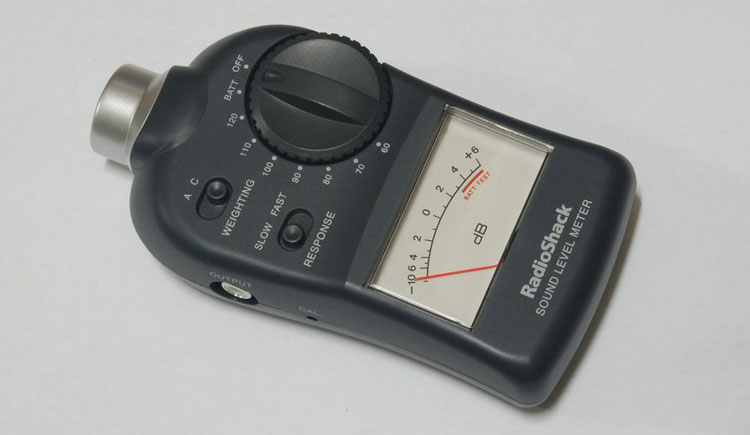
With the distance, size, and crossover settings made, it is time to balance the volume level of each speaker relative to your seating position. This ensures that you hear each speaker at the proper level regardless of how far or close each speaker may be. While this setting can be made by ear, using a decibel meter will get you more precise results. You can or at most electronics stores for a pretty reasonable price. Plus, when you aren’t using it to calibrate your speaker system, you can use it to make sure you aren’t violating your city’s noise ordinance when rocking out to your favorite tunes.
There are also several decibel meter apps available for both Android and iOS devices, of course. While generally not as accurate as a dedicated decibel meter, they’ll get the job done.
The speaker-level setting will allow you to turn on a test tone or “white noise” in order to measure the speaker’s output. As you move through the speakers, you will be able to move the output level up or down as needed.
If performing this process by ear, do your best to make sure that each speaker sounds as loud as the one before it. You can bounce back and forth often to make a comparison. When you’re done with your first pass, go back through to make sure each speaker is the same level as the one before and after it.
If using a decibel meter, sit down in your central listening position, turn the meter on, set the dial to 70 dB, the weighting to “C” and the response to “slow.” Hold the meter in front of your face with the microphone end pointed straight up at the ceiling. Do not point the meter at each speaker. You may choose any level you wish to calibrate the speakers to: 70, 75 and 80 dB are popular levels to use. Whatever you choose, adjust each speaker’s test tone so that it pushes the meter’s needle to the same decibel level.
When you reach the subwoofer, you will find that your decibel meter does not read the subwoofer’s super-low frequency output as well. There are conversion charts online that will guide you in using a decibel meter with a subwoofer, but you can achieve good results by setting the sub by ear. First, make sure your subwoofer’s volume dial is set to the manufacturer’s recommendations or at about the half-way point. Then, proceed with the test tone and adjust the subwoofer level output such that the sub just begins to shake the room. Real bass signals will be much louder, so don’t over-do it.
To test your subwoofer settings, we recommend using a piece of music or a movie that you are familiar with. If while listening to the music or movie of your choice you find you desire less or more bass, go back into the speaker level portion of your menu and adjust accordingly.
Step 7
Enjoy
Grab some popcorn and kick back with a great movie. You’ll enjoy the smooth, balanced, and natural sounding performance of your speaker system and receiver with the satisfaction of knowing that you did it yourself.
Editors' Recommendations
- Best OLED TV deals: Save on LG C3, Samsung S90C, and more
- The best Blu-ray players for 2024
- Best Bluetooth speaker deals: Save on Bose, Sonos, JBL, and more
- The best speakers for 2024: great hi-fi options for music and more
- Best AV receivers 2024: top sound for your home theater