
With a back panel riddled with connections, a front panel speckled in all manner of buttons, and an array of different wires needed to get everything all hooked up, a receiver can be an intimidating piece of equipment. Contrary to that feeling in your gut when you open the box, however, setting up your receiver doesn’t have to be palm-sweat inducing. In fact, it’s really not as complex as it seems, especially with all the handy features on modern receivers. Here’s how to get an A/V receiver up and running in no time, without headaches.
Make sure to check out our picks for the best A/V receivers before you start setting up.
Find the right spot
Receivers can get very hot. When they get too hot, most will shut off automatically to avoid serious damage, which at the very least makes for a truly annoying movie-watching experience. That means you need to put your receiver in a well-ventilated space. Most furniture designed for audio and video will have some sort of ventilation system in place so you won’t have to worry about it. If you are installing your home theater receiver in your own furniture, however, you’ll need to make sure there is adequate air getting to the receiver. Don’t ever put a component (like a Blu-ray player) on top of your receiver—especially on the vents.
Additionally, position your equipment near a spot with adequate power outlets. You don’t want to run extension cords around the room, especially considering the amount of sources you’ll need to plug in to a power outlet. In fact, we suggest plugging your sources, TV, and receiver into a surge protector to safeguard equipment in the case of a power outage.
The graphic user interface (GUI)
The GUI on your receiver can make all the difference in the world when you actually begin to set up your system. It’s much easier to set up your receiver from the couch via your TV screen than having to look at a tiny display screen on your receiver’s front panel.
“The ability to visually show each area of the unit that can be changed gives the customer a clear idea of how they can set up the product and make changes as they live with the product,” says Rob Rodriguez, product manager, home audio, Sony Electronics. “No longer do they need to dig out the 100-plus page manual.” For speaker set up, a good GUI is a godsend, clearly showing speaker configuration and even height in some cases.
Consider your sources and use the right inputs
“The most important thing is to consider is what your sources are (and will be),” says Rodriguez. Take the time to make sure your prospective receiver has enough inputs for all your devices.
When you get your receiver home, it’s also important to know your connections. “It’s always better to use HDMI than other video inputs, or — for audio — using a digital coax/optical input rather than using RCA-type plugs,” says Rodriguez. “Also consider, if you’ll be integrating a gaming system or a new camcorder in the future? If so, having extra, available inputs for the system to grow will allow for easy additions to your home theater.”
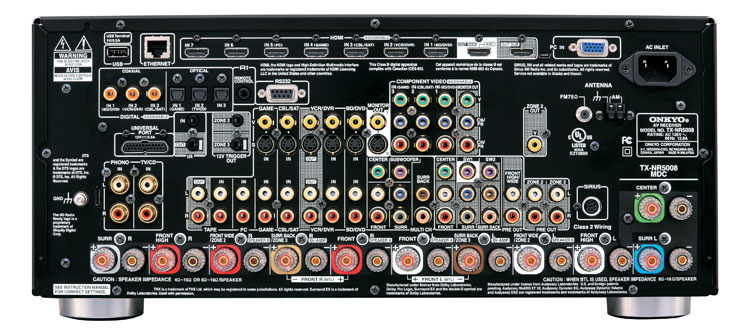
These days, there are plenty of HDMI connections on receivers to accommodate all your sources. For example, the Onkyo TX-NR5008 receiver shown here has no less than seven assignable inputs for a Blu-ray player, a DVR, a cable or satellite box, one or more game systems, and a PC player. Most receivers will already have suggested uses for your inputs, and have prelabeled them as such. For example, HDMI input one on this receiver is suggested for a Blu-ray or DVD player. Following the manufacturer’s lead will make it easy to switch between your sources when you want to go from, say, watching a movie to playing a PlayStation game without getting confused.
If you are considering a projector, Integra recommends considering dual HDMI outputs as a key feature so you can use a smaller monitor when you don’t want to bother with the projector. Another increasingly important connector is a Made-for-iPod/iPhone USB port, which is usually located on the front panel. This allows you to listen to your tunes from these devices through your home-entertainment system without using an analog audio connection.
Receivers should also have some component video inputs (the three pronged red, blue, and green cable) for your older pre-HDMI components, which will also pass high-def, but don’t pass audio. If you use these connections, you need to make sure to connect the corresponding audio cables or you’ll later wonder why you can see a picture but not hear anything.
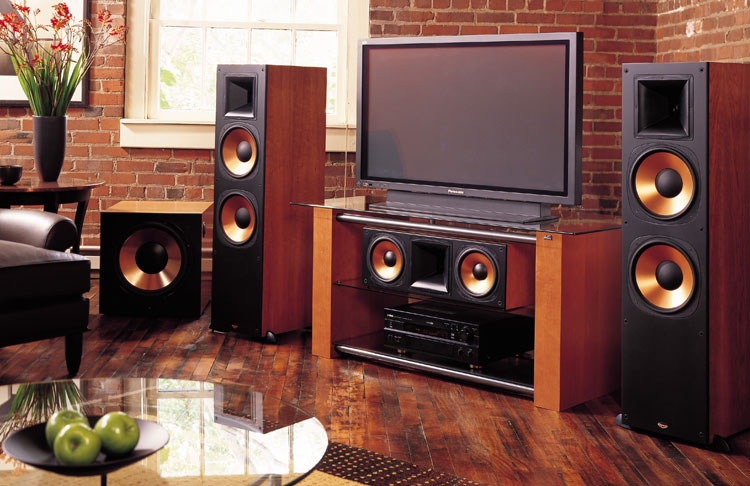
Connecting your speakers
Connecting your speakers is very easy, as long as the manufacturer took care to label the speaker connections properly (Front Right, Front Left, Center, etc.). All you have to do is plug the appropriate speaker cables into the corresponding slots on your receiver and speakers and you are good to go. For example, the front left speaker cable should go to the speaker labeled front left on the back panel of your receiver. Fortunately, if you are worried you didn’t get it right, your receiver should have a way to test each speaker with white noise to ensure that it’s both connected, and that the right audio information is going to the right speaker. It’s very important to get this correct, because different audio goes to different speakers in a surround-sound soundtrack. For example, dialogue comes out of the center-channel speaker, surround effects go to the surround channels, and low-frequency information goes to the subwoofer.
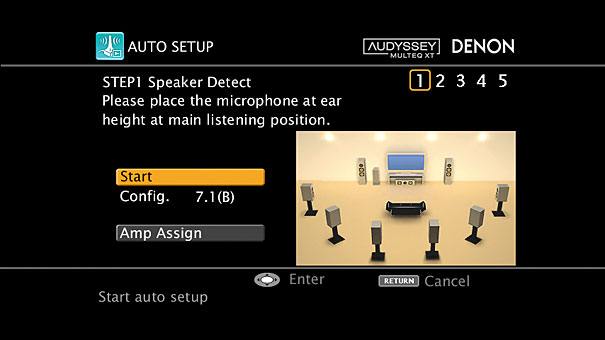
According to Rodriguez, bad speaker placement is one of the biggest consumer mistakes when it comes to hooking up your home entertainment system. “Bad placement of the speakers and not calibrating them properly is a big problem,” says Rodriguez. “So much of the quality of sound is how that sound is delivered to your ears.” For example, if the rear speakers are set too loud, or are accidentally placed in front of the room. Subwoofers can be too boomy or the left and right speakers are not balanced. Taking care when setting up your speakers will avoid these common problems.
In fact, many receivers have microphones that actually measure the room’s acoustics and adjust speaker levels accordingly. Audyssey EQ, for example, is a lauded calibration solution that can be found on receivers from Marantz, Denon, Integra, Onkyo, and NAD. Sony’s has Digital Cinema Auto Calibration in many of their receivers, as well. These solutions can make a drastic improvement on the sound of your speakers by taking acoustics into consideration.
Some users prefer to manually tweak their speakers to get them sounding just right. Check out our complete guide to manual speaker calibration for more information.
Wiring labels and issues
We recommending labeling your wires and keeping them tidy. There is nothing worse than going behind your AV rack only to find a mass of tangled black wires, dust-bunnies and god-knows-what-else back there waiting to assault your serenity. Tape or color-coded stickers can be very helpful at this stage. Some AV furniture pieces even have wire-management systems built in, and many allow rear access to the equipment. “The easiest way to approach organization is to label the cables you are going to use at each end before connecting,” says Rodriguez. “Place the same label or sticker, such as ‘DVD’ on both ends. Once you have your sources wired, it will be very easy to connect the right cable into the correct input, since the cable will already be labeled. This is a good practice and used all the time by professional installers.”
Another common issue, according to the folks at Integra and Onkyo, is not giving cables enough slack. If your cables aren’t given enough slack, when you move the equipment, wires get pulled out of their connections. Stiff HDMI cables are especially vulnerable. Use plastic wire ties to support and consolidate wire bundles, and make sure each plug is not being twisted up, down, or sideways in the connection socket.
Dealing with multiple zones
If you have a multi-zone receiver, things get slightly or severely more complex depending on your particular situation, mostly because you have to run wires to another room. Novices attemping a complex install may want to enlist the help from an AV installer (visit BrandSource to find an installer near you, or give Best Buy’s Geek Squad a call).
If you are especially keen on doing it yourself, the main thing to consider is what you want in that second zone: audio, video, or both. Then, you have to figure out where the zones are going to be. Do you want music on the patio or kitchen, or do you want a second system stereo/flat-panel TV in your bedroom? Then get ready to snake some wires. You’ll need to buy a long snake and wear dust and eye protection.
Not too keen on punching holes in the wall? Except for very simple multizone speaker-wire runs, we recommend checking out some of the various wireless solutions available. For example, you could get an Onkyo or Integra receiver with Zone pre-outs and a wireless interconnect system such as Atlantic Technology’s WA-50, which is effectively a stereo interconnect with a radio transmitter between one end and the other. Similar capabilities are available from Rocketboost and other companies. Likewise, Sony’s HomeShare system connects using Wi-Fi, which is easier and less expensive than running wires.
There are multi-room video solutions on the market, but for reliable distribution and control, the best solution is still to run wiring from your main system into that other room. If this is your decision, we highly recommend talking to an installer to go over the options and cost associated with adding additional zones to your A/V system.
Connectivity features
With all the streaming and “connected” features out there, it’s important to consider what your receiver has to offer. For example, Sony has added audio streaming to its higher-end models, focusing on the audio experience. “This is somewhat replacing traditional AM/FM listening,” says Rodriguez. Other manufacturers are doing the same, integrating streaming audio, Netflix, USB, and wireless interfaces into their wares.
Setup for connected features varies widely from receiver to receiver, but it’s always convenient to have a laptop on hand for testing and setting up features that require online activation, like Netflix.
Whatever your particular setup or needs are, a receiver is a great addition to any home entertainment, allowing you to do more. These devices let you switch between sources, listen and watch any source through your speakers and display, and can actually improve the performance of your system altogether.
Also check out our Home theater calibration guide.
Editors' Recommendations
- Best projector deals: Replace your TV with a big screen from $58
- How to mirror your smartphone or tablet on your TV
- Best 65-inch TV deals: Get a 65-inch 4K TV for under $400
- Is the Apple Vision Pro the ultimate personal home theater?
- The 7 best HDMI switchers for 2024


