Step 1: Locate air leaks
Drafts are one of the biggest causes of wasted energy in your home, and getting rid of them can save you anywhere from 5 to 30 percent of your annual energy costs, so it makes sense to tackle them first. Here’s the quickest and most efficient way to spot them:
- Shut all windows, exterior doors, and fireplace flues, but leave all interior doors open.
- Turn on all exhaust fans that blow air outside, i.e. your clothes dryer, bathroom fans, or stove vents.
- Light an incense stick and pass it around the edges of common leak sites (electrical outlets, switch plates, door/window frames, attic hatches, vents, and pretty much anywhere else where two different materials meet).
Wherever the smoke wavers or is sucked out of or blown into the room, there’s a draft. Make note of its location, and come back later to seal it up. If you don’t have incense handy, you can also use a damp hand to locate leaks — any drafts will feel cool to your skin.
*Pro tip: close a dollar bill in your door. If you can pull it out without dragging, you’re losing energy and should probably get better weather stripping
Step 2: Check your ceiling insulation
According to the U.S. Department of Energy, “Heat loss through the ceiling and walls in your home could be very large if the insulation levels are less than the recommended minimum. When your house was built, the builder likely installed the amount of insulation recommended at that time. Given today’s energy prices (and future prices that will probably be higher), the level of insulation might be inadequate, especially if you have an older home.”
To check and make sure your home’s insulation is up to snuff, you need to figure out two things: 1. The current recommended amount of insulation for homes in your area, and 2. How much insulation you currently have. Here’s the fastest way to do those things:
- Go to this website, and fill out the form. This will tell you the recommended insulation rating for your home. Insulation is rated in terms of thermal resistance, called R-value, which indicates the resistance to heat flow. The higher the R-value, the greater the insulating effectiveness.
- Submit the form, and write down your results (or just snap a picture of them with your smartphone).
- Grab a flashlight and a tape measure (or ruler), then head up to your attic.
- Take note of the type of insulation you have, and then measure the depth of it.
- Calculate your home’s R-value with the formula provided in the following table.

If your calculated R-value is lower than the recommended level, you’re probably losing energy. Consider adding more insulation to remedy the problem.
Checking the insulation in your walls is a bit trickier, but if you’ve got an infrared thermometer handy, it’s fairly easy. If you don’t already own one, hit up some tool rental companies in your area. Jump over to our full article on this topic for more info.
Step 3: Check your windows
 Glass is a horrible insulator, and if your house has a lot of windows, you could be losing a substantial amount of heat. Take a stroll through your house and look for window stickers.
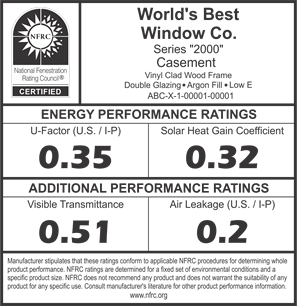
If you can find a window with a sticker on it, take a closer look. If it says NFRC on it, you’re in business. NFRC is the National Fenestration Ratings Council, an organization that rates the efficiency of windows and doors. The sticker should look something like the one to the right.
All of the numbers are useful information for your energy audit, but the most important one to look at is the U-Factor. This measures how well the window prevents heat from escaping your home. Ratings generally fall between 0.15 and 1.20. The lower the U-factor, the better your window is at keeping heat inside the building.
Now here’s the tricky part. In order to make sense of those numbers and tell if they’re adequate for your area, you need to know the recommended U-Factor rating for your area. Here’s the best way to do that:
- Remember the recommended R-Value you found back in step two? Get that number again. (Here’s the link if you forgot.)
- Plug that R-Value into this calculator, and hit enter. (Don’t put anything in the U-Value field.)
- The resulting number is the recommended U-Factor rating for your area.
If the number you just calculated is drastically lower than the number listed on your window, you’re losing energy. That said, replacing windows is a laborious and expensive endeavor, so unless the difference between the two numbers is substantial, don’t worry about this too much.
*If you can’t find any stickers or information about your windows, just look for the number of panes on each one. Double-pane windows trap heat much more effectively than those of the single-pane variety. So, if you spot any single-pane windows in your pad, take note of them and consider installing some temporary window insulation to circumvent energy loss during colder months
Step 4: Pinpoint “energy vampires”
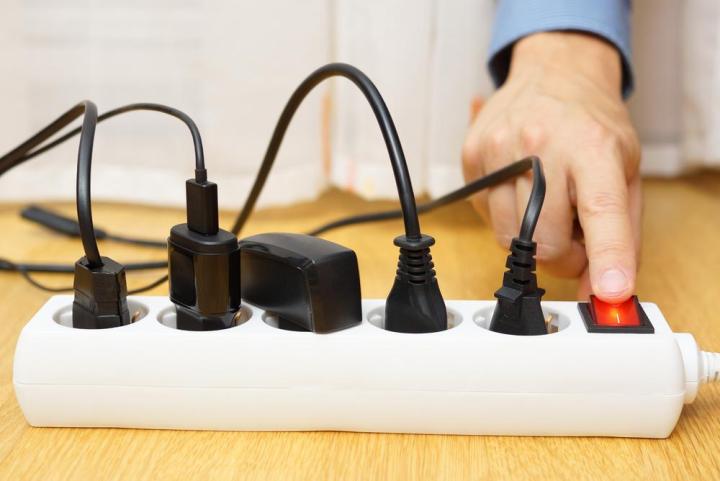
This one isn’t as important as the previous three, but if you’ve got a lot of electronic gizmos in your house, you could be inadvertently wasting a lot of power. Standby power, or “vampire power,” is electricity used by appliances and equipment while they are switched off or not performing their primary function. That power is consumed by power supplies (the black cubes — sometimes called “vampires” — converting AC into DC), the circuits and sensors needed to receive a remote signal, soft keypads, and displays including miscellaneous LED status lights. Standby power use is also caused by circuits that continue to be energized even when the device is “off.”
Individually, vampires might not consume a lot of energy, but collectively they can suck up a substantial amount of power — especially if you’ve got a lot of electronics in your home. To pinpoint these vampires and stop them from sucking money out of your wallet, take closer look at these areas of your home:
- Home theater
- AV receivers
- Subwoofers
- Set-top streaming boxes
- DVRs
- DVD or Blu-Ray players
- Game consoles
- Home office
- Computer towers
- Laptop charger cables
- Printers
- Speakers
- Kitchen
- Coffee makers
- Microwaves
- Ranges
Take stock of what you’ve got plugged in and how often you use each device. If it can be turned off completely without disrupting your lifestyle, then consider plugging them into a power strip that can be completely switched off.
Step 5: Keep track of everything
Once you’ve gone over all of this, you should have a pretty good idea of how efficiently your home is running and in what areas it could be improved. Keep an eye on your monthly energy bill to make sure your improvement efforts are actually effective, and don’t be discouraged if you discover you’re only saving a few bucks a month; those savings quickly add up over time, and you also get the satisfaction of knowing you’re helping the planet.
Other helpful resources:
- DoE guide to DIY Home Energy Audits
- EnergyStar Home Energy Yardstick
- Lawrence Berkley National Laboratory Home Energy Saver
Editors' Recommendations
- Get up to 26% off Dabbsson portable power solutions to light up your holidays
- How to check if your smart thermostat is performing well
- Household electrical usage increased in 2020. Here’s how a smart home can help
- WiCharge’s PowerPuck can power your smart home devices through the air
- You may be able to ask Amazon Alexa about your bills soon