Knowing how to restore Mac files from a Time Machine backup is very important, offering a solution when a file is missing or a document has been changed in an unexpected way. Recovering files with Time Machine is quick and easy and protects the owner from both hardware failures and accidents.
Time Machine is the failsafe software built into MacOS since the very first version of OS X, which brought major changes and improvements to Apple's operating system. With Time Machine, backups are automatic, and restoring a missing file or recovering anearlier version of a document is easy.
How Time Machine works
Rather than simply saving a snapshot of the entire system when the user remembers to back up their drive, Time Machine saves backups every hour and keeps multiple copies of each change that's made to every file. This means it enables a sort of time travel where past versions of files can be accessed. If multiple versions of every file were saved hourly, the size of the backup would quickly become unmanageable. Apple found a way to save only changes and keeps older versions only as long as space remains to store them. As the space allocated to Time Machine begins to fill up, the system deletes older copies of files and saves as many new versions as possible.

How to enter Time Machine on a Mac
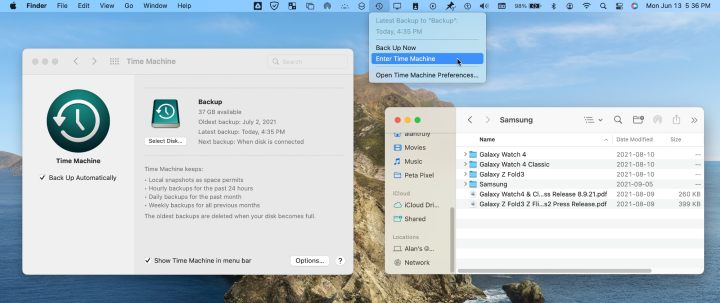
To restore a file from Time Machine on a Mac, open the Time Machine app — you'll find it in Launchpad or the Applications folder. If the Time Machine icon appears in the menu bar, the app can be launched by selecting Enter Time Machine from the menu. The Time Machine menu icon looks like a clock face that's circled by an arrow pointing counterclockwise (to suggest time moving backward), a nice visual representation of the purpose of the app.

How to restore Mac files from Time Machine
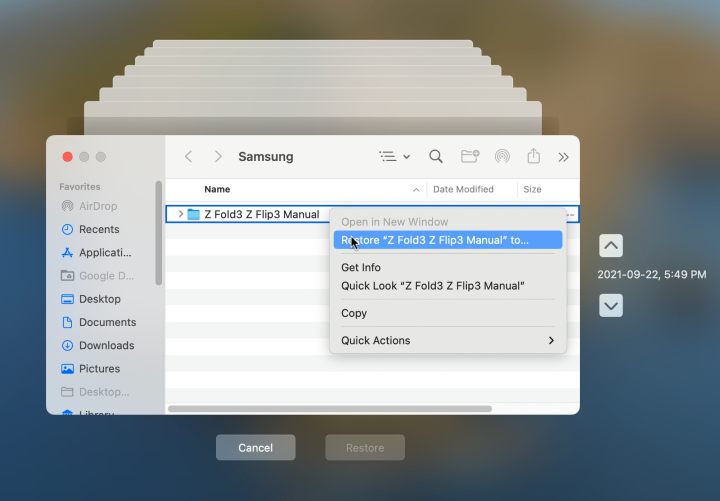
When the Time Machine app opens, the most recent Finder window will be centered on the screen with several faded copies of the window stretching out behind it. It's a nice effect that immediately conveys the sense of seeing back in time. You can click any of the windows behind the main window to shift back to an earlier view of the contents but it's much more helpful to get a sense of the preferred period by using the timeline that appears at the right edge of the screen. The newest copies appear at the bottom, and hovering over a month or day expands that period to show more detail, making it possible to select a time more precisely. Clicking anywhere in the timeline will show the contents of the current Mac folder at the specified time and date.
Step 1: Locate the file you want to restore, then right-click the file or folder and choose Restore to... from the menu.

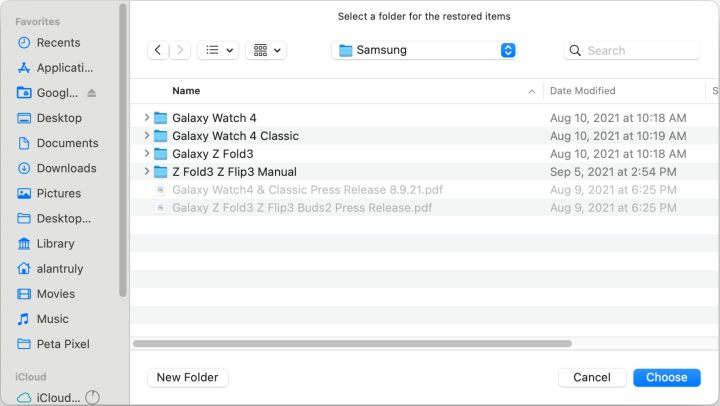
Step 2: A file browser window will appear asking where the file or folder should be saved, and if an item with the same name already exists there, MacOS will give you options to Keep original, Keep both, or Replace. If both versions are kept, the older version will have "(original)" added to the end of the file name.

Step 3: After the file or folder is restored, it will appear in the destination folder that you selected.

How to use Quicklook for better Time Machine searching
Sometimes being able to choose a time and date isn't that helpful if a particular change in the contents is what's relevant. For example, seeing when the second paragraph in a document was revised and restoring the file from that date might be much more useful than blindly restoring the file saved on April 1, 2022, at 12:34 p.m. The MacOS QuickLook feature helps to preview documents and images easily by simply tapping the spacebar when a file of interest is selected.
By moving through times and dates with Time Machine and using QuickLook, you can find the correct version of a file. Missing files are even easier to locate if you know the folder they're in.
What if Time Machine isn't enabled?
Time Machine backups are only available if the feature has been set up and the backup drive is connected before changes are made to a file. It isn't possible to restore a file from Time Machine if it was never saved to begin with. In this case, you might want to check if any other backups have been saved. For example, iCloud can be used to save backups, and several third-party solutions exist. If no backups have been made, perhaps the file that's needed has been shared to an iPhone or iPad and a copy can be sent back to the Mac.
What if Time Machine doesn't work?
If Time Machine opens but won't allow browsing to a different date, the backup drive might not be available. For an external drive, make sure that it's connected to the Mac. If the backup drive is connected via Wi-Fi, network problems could interfere with Time Machine operation.
Restoring files using Time Machine on a Mac is quick and painless. Even when troubleshooting is needed, it's often just a matter of plugging in the backup drive. While iCloud is convenient for backing up photos and videos from an iPhone, it can lead to higher monthly subscription costs. Time Machine is a good solution for saving backups on a Mac, and it's free. Apple's Time Machine makes using a Mac easier, and it's there to take care of occasional accidents and glitches, keeping all of the user's important files safe.
Editors' Recommendations
- These 6 tweaks take MacBooks from great to nearly perfect
- How to select multiple files on a Mac
- How to connect a MacBook to a TV
- How to show the battery percentage of your Mac
- Forgot your Mac password? Here’s how to reset it


