If you have an account on your Mac that’s no longer used and is taking up valuable disk space, you can remove it in just a few steps. Our guide will take you through everything you need to do to delete a user on a Mac quickly and easily.
There are plenty of other changes you can make to improve your Mac — if you want to use Split View on a Mac or learn some handy trackpad gestures, we’ve got you covered. But for now, let's set about deleting a user on your Mac.

Ensure you have administrator access
Deleting a Mac user account requires you to have administrator access. You’ll need to be logged in to the administrator account and know the admin username and password to continue. You’ll also have to ensure you’re not logged in to the account you wish to delete — if you want to remove an administrator account, you’ll have to create another admin account and log in with that first.
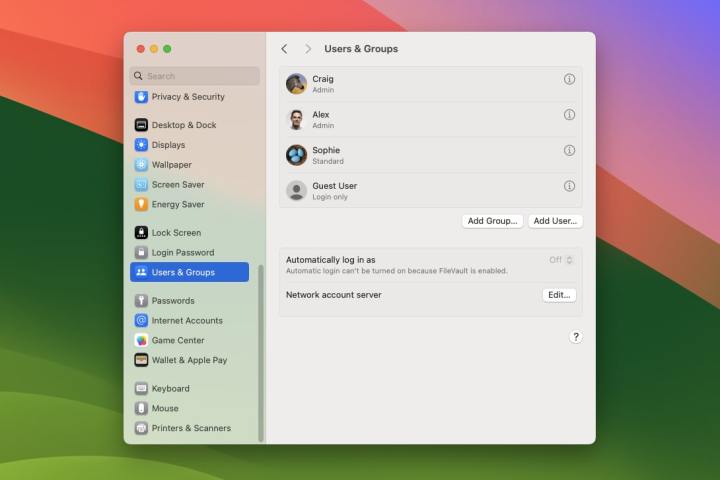
Step 1: Open the Settings app and select Users & Groups in the left-hand sidebar. You will now see a list of all the accounts on your Mac.
Step 2: Select the small i button to the right of the user account you want to delete. This will load a pop-up window where you can change the account's name, reset its password, and switch it being an administrator account (or revoke that status).
Step 3: In the bottom-left corner of this pop-up window you'll see a button reading Delete User. Select this button. You might have to enter your admin password the first time you do this.

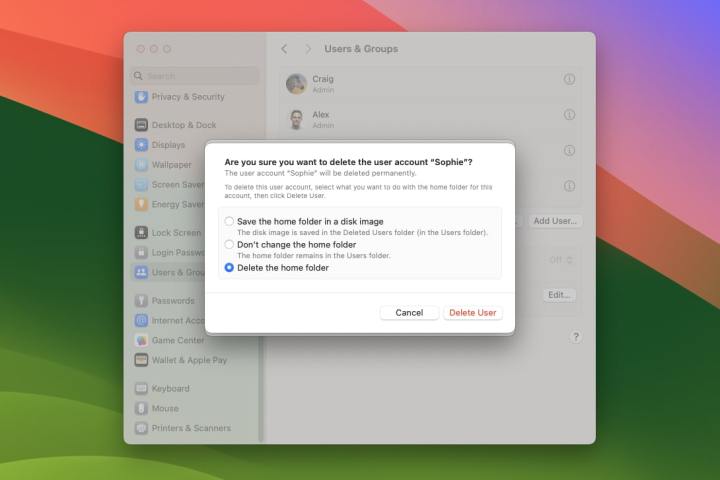
Step 4: Your Mac will give you a few options for what to do next. You can save the account's home folder to a disk image, which will preserve all their documents and information in case you want to restore the account later (the disk image of their files is saved in /Users/Deleted Users/). You can also leave the user's home folder where it is (which keeps it in /Users/), or delete it entirely.
Step 5: Once you've made your choice, pick Delete User. The account will now be removed.

Remove the guest user account
Creating a guest user means you can let friends, family, and coworkers use your computer without gaining access to any of the private data stored in your own account. That's helpful if you want to let them use your Mac from time to time, but don't want them messing with your personal account. And if you want to instead remove the guest account, it's easy to do.
Step 1: As before, open the Settings app and head to Users & Groups.
Step 2: At the bottom of the list of accounts, you'll see one called Guest User. Select the small i button on its right-hand side.
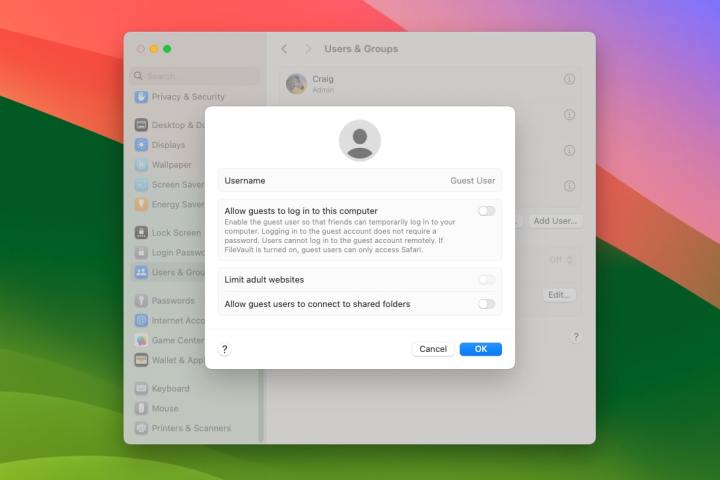
Step 3: To remove the guest account, simply disable the toggle next to Allow guests to log in to this computer. Select OK when you're finished.
Step 4: The pop-up window where you can disable the guest user account also lets you adjust its settings. If you'd prefer to keep the guest user account active but want to restrict it a little more, you can limit its access to adult websites and decide whether guest users can connect to shared folders using the toggles in this pop-up section.
Deleting a user account on your Mac is easy to do and a good way to free up space on your computer. Provided you have admin access when you try to do it, it should take more than a few minutes.
Editors' Recommendations
- How to check your CPU temperature
- How to convert M4A files to MP3 on Mac, Windows, and web
- How to forget a network on a Mac
- These 6 tweaks take MacBooks from great to nearly perfect
- Don’t download the latest macOS Ventura update just yet


