You’re likely spending more and more time at home on your PC, but did you know that Windows 10 has your back and can help you stay productive during your busiest times? There are a lot of tricks built right into Windows itself that are designed with productivity in mind.
From window tiling to window scaling to setting your favorite websites as progressive web apps and more, here’s a look at our top five ways you can maximize your productivity in Windows 10.
Tile and “snap” your windows
Our first tip is one that is sitting right under your nose in Windows 10. If you have a lot of windows open while you’re working, you might find yourself frequently switching back and forth between them by minimizing or moving them around. However, Windows has built-in keyboard shortcuts that can help you “tile” your open windows. You can follow our instructions below for how to do this:
- Tile two windows side by side: In an active window, press and hold the Windows key plus the left or right arrow key to snap a window to the left or right side of the screen. You can select another window to fill the empty space.
- Tile more than two windows: Drag and drop your first window to any corner. Then press and hold the Windows key, followed by the left or right arrow key, to snap the active window to the left or right. Finally, press and hold the Windows key plus the up or down arrow key to move the snapped window into the top or bottom corner.
Microsoft officially calls this “snapping,” and it lets you snap your Windows side by side, up and down, and in many other orientations. This might be useful if you’re working on an external monitor with a high resolution or with a newer laptop with a 4K screen.
If these keyboard shortcuts aren’t working for you, then you might have to open the Settings app in Windows 10 and search for Multitasking. Make sure the toggle switch for Snap Windows is turned on.
Decrease your window scaling
If you own a Surface tablet or a laptop and can push your screen resolution beyond the minimum Full HD (1920 x 1080) standard, it is likely that a lot of the text on your screen is super large by default. This means you’re probably not able to multitask effectively as we just described above.
No worries, though, as our second tip has you covered: You can decrease your window scaling to make items on your screen smaller so more items fit on your screen.
To decrease window scaling, right-click on the desktop and choose Display Settings. From there, you should see a box that says Change the size of text, apps, and other items. You’ll want to choose one that’s lower than the suggested or default value on the list.
You should automatically see everything on your screen become smaller, letting you fit more on your screen. It’s best to quickly log out and log back in to ensure that apps can scale properly after the change.
Turn on Focus Assist so apps don’t bother you with notifications
In a Teams or Zoom meeting? Working on something important? The last thing you want is an app bothering you with a notification and for you to get the annoying “ping” sound from Windows when you have an incoming notification.
Well, just like do not disturb mode on your iPhone, Windows 10 has your back with a feature known as Focus Assist. It’s the third item on our list.
To turn on Focus Assist, toggle to the Action Center in Windows 10 by pressing the Windows key plus the A key on your keyboard. You should then look for the crescent moon icon in the bottom list. When you toggle this, Windows will silence all app and system notifications.
You can right-click the icon and choose Go to Settings to see more ways you can customize Focus Assist. From here, you can set automatic rules, add apps to a priority list, and a lot more. Go ahead and play around with it! The sky is the limit!
Create progressive web apps for websites you frequent to get quick access
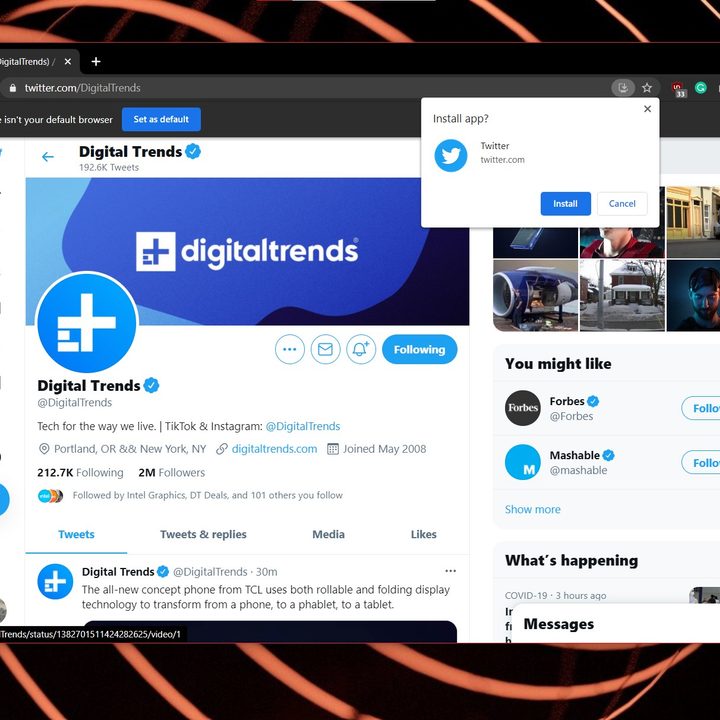
If you find yourself always going to a specific website (say Twitter, Microsoft Teams, Instagram, or Facebook) you might favorite it in your web browser of choice so you can quickly access it. But did you know that you can create a progressive web app (PWA) for that website so you can “pin” it to your taskbar or Start Menu for even quicker access?
Progressive web apps also look cleaner and can feel a lot like a dedicated system app rather than a website with traditional window and menu controls up top. We’ll cover the top two major web browsers when talking about creating a progressive web app — Google Chrome and Microsoft Edge.
- In Google Chrome: Visit the website of choice, then click the three downward-facing arrows at the top of your screen next to your profile icon. Then, look for the Install [Website name] button. This should launch the website in its own window as an app, free of regular Chrome controls. You can then see the website listed as an app in your Start Menu. Right-click it to pin it if you want.
- In Microsoft Edge: Visit the website of choice, then click the three horizontal dots at the top of the screen next to your profile icon. From there, look for the Apps button, and then click Install [website name].Your website will then pin to the list of apps in the Start Menu, and the next time you launch it from there, it will be free of regular Edge controls.
Note that in some instances, you might not be able to create a PWA through those settings in Chrome. If this is the case, you can force a website to become a PWA by creating a shortcut. Just visit the website and tap the same menu button, select More Tools, and then Create a Shortcut. Make sure the Open as Window button is toggled. The website will then save to your Start Menu on the list of apps.
Chose different battery plans to get the most battery life out of your PC
The last thing on our list involves saving battery. After all, productivity involves staying unplugged so you don’t have to worry about running to a power outlet while you’re in the middle of work. Well, Windows 10 has a built-in feature that can help.
If you go to the taskbar and look for the battery icon, there’s a slider for different power plans that can be helpful in various productivity scenarios. We’ve explained these below:
- Best Battery Life: This setting puts your laptop into a battery saving mode and reduces power consumption. It’s good for getting the best battery life when you’re in a pinch and when a power outlet isn’t nearby. Usually, it will automatically toggle on when your battery goes below 20%.
- Better Battery: This setting lowers the amount of power your laptop uses to ensure that you can get the most out of your battery, without going into reduced power consumption mode. Good for when you’re below 40% battery and want to save battery.
- Better Performance: This represents a mix of better battery life and good performance. It’s useful for ensuring that your laptop isn’t throttling and you can get the most power out of your laptop when multitasking.
- Best Performance: This setting uses the most battery but ensures maximum performance. It’s good for gaming on battery power or when video editing and doing other CPU-intensive tasks.
If you’re not seeing these power options, then it’s likely your laptop is too old and doesn’t support the various power modes. You can try heading into Windows 10 settings and searching for “battery.” From this settings page, there’s a lot of suggestions, showing you which apps are using the most power and how you can improve battery life.