
It’s not as easy as you might think to completely eradicate a file from your system. When you delete a file, you’re moreso designating it as free space, allowing your operating system to overwrite the file with new data opposed to simply wiping it off your hard drive with one fell swoop. If you deleted the file recently and haven’t used your computer much since then, there’s a good chance the file is intact within the dark recesses of your machine – you just need a method to help find it.
Here’s our guide on how to recover deleted files so you can save what you once thought was lost. Also, check out our guide on how to back up your computer, our picks for best external hard drives for doing so, and our hard drive recovery tips and tricks for more in-depth recovery options. Remember, precaution is often the best recovery method. Back it up!
Choose your OS:
- Windows
- Mac OS X
How to recover deleted files on Windows
Step 1: Take it easy on the computing. The less you use your machine, the better your odds are of recovering your deleted files. Downloading and saving files should be avoided as much as possible as it increases the likelihood of your PC overwriting the file with new information that may prove detrimental to your cause.
Step 2: Double check. If you haven’t done so already, double check the file’s original location as well as the Recycle Bin to ensure you didn’t merely overlook it. If found in the Recycle Bin, right-click a file and select Restore to restore the file to its original location or simply drag and drop the file outside to a new location.
If you have a previous backup available, previous versions of certain files – sometimes known as “shadow copies” – can also be restored by right-clicking their original location and selecting Restore previous versions from the resulting drop-down menu.

![]() Step 3: Choose, download, and install recovery software. There is plenty of capable recovery software available on the Web, both premium and free. We recommend Recuva Free given its user-friendly wizard utility, light footprint, quick scans, and efficient recovery options. Files are individually listed, whether recoverable or overwritten, and can be restored in a matter of clicks. Alternatively, check out Undelete Plus ($40) or Restoration (free) if you’re looking for advanced filtering, intensive software recovery, or an overall more robust feature set.
Step 3: Choose, download, and install recovery software. There is plenty of capable recovery software available on the Web, both premium and free. We recommend Recuva Free given its user-friendly wizard utility, light footprint, quick scans, and efficient recovery options. Files are individually listed, whether recoverable or overwritten, and can be restored in a matter of clicks. Alternatively, check out Undelete Plus ($40) or Restoration (free) if you’re looking for advanced filtering, intensive software recovery, or an overall more robust feature set.
The bulk of the software works in a similar manner, scanning your selected drive and curating a list of potentially recoverable files, but there are a few slight differences between software programs and various versions. For our purposes, we will be using Recuva Free as the basis for the rest of the guide.
Step 4: Launch the software. Once installed, navigate to and launch the recovery software by clicking the Windows Start button, selecting All Programs from the bottom of the drop-down list, and choosing the appropriate program. In Recuva, you will be greeted by a general welcome page and setup wizard before continuing.
Step 5: Choose the file type. Click the gray Next button in the bottom-right corner of the welcome screen and select the desired file type you wish to recover (i.e. pictures, music, documents) from the list of various formats on the next page of the window. Although you can’t select more than one at a time, the All Files option at the top will encapsulate all file types on the list. Click the gray Next button when your selection is completed.
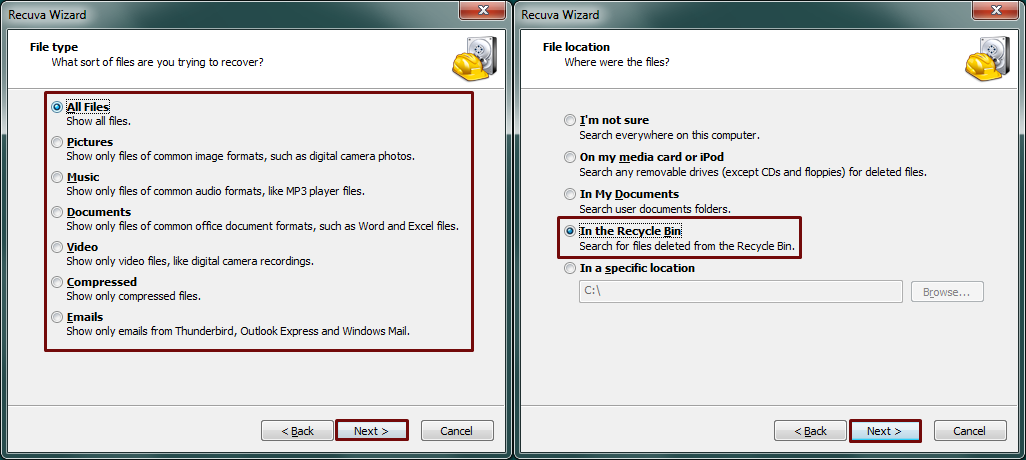
Step 6: Choose the file location. Select the previous location of the deleted file. If you accidentally purged your Recycle Bin of the file, select In the Recycle Bin, otherwise choose the proper location or select I’m not sure to search your entire computer for the delete files. Click the gray Next button when finished.
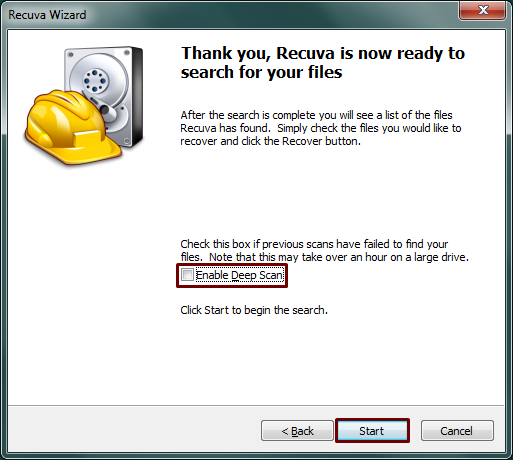
Step 7: Start the scan. Click the gray Start button to begin scanning your computer based on your specifics. Additionally, check the box to the left of Enable Deep Scan to enable the function.
Step 8: Recover the deleted files. When finished scanning, peruse the pop-up window displaying the newly discovered files for the ones in question. The list will primarily consist of basic system files pertaining to your computer’s operation, but there will be an assorted mix of other files mixed into the batch as well. Keep in mind that a green circle to the left of a file indicates it’s still in excellent condition, yellow means it’s in poor condition, and red indicates the file is unrecoverable (see the Comments column for more details).
Check the boxes on the left-hand side next to the files you wish to recover, click the gray Recover button in the bottom-right corner, and select the save location for the newly recovered file from the pop-up window. Click the gray OK button in the bottom-right corner when finished.

Next Page: How to recover deleted files in Mac OS X.
How to recover deleted files on Mac OS X
Step 1: Take it easy on the computing. The less you use your machine, the better your odds of recovering your deleted files. Downloading and saving files should be avoided as much as possible as it increases the likelihood of your Mac overwriting the file with new information that may prove detrimental to your cause.
Step 2: Double check. If you haven’t done so already, double check the file’s original location as well as the Trash to ensure you didn’t merely overlook it. If found in the Trash, right-click or control-click a file and select Put Back to restore the file to its original location, or simply drag and drop the file outside to a new location.
 Step 3: Choose, download, and install recovery software. While it may be true that there is plenty of capable recovery software available for Windows, Mac OS X isn’t as fortunate in terms of freemium software. We therefore recommend Data Recovery III ($100) given its nicely-design interface, moderately-quick scans, and various recovery options. Files are individually listed, whether recoverable or overwritten, and they can be restored in a matter of clicks. Alternatively, check out Stellar Phoenix Mac Data Recovery ($100) or Disk Drill ($90) if you’re looking for advanced data protection, intensive raw recovery, or an overall more robust feature set.
The bulk of the software works in a similar manner, scanning your selected drive and curating a list of potentially recoverable files, but there are a few slight differences between software programs and various versions. For our purposes, we will be using Data Recovery III as the basis for the rest of the guide. It’s costly, but you can always download the free demo and recover a single file of 10MB or less.
Step 4: Launch the software: Once installed, navigate to and launch the recovery software by clicking the Finder icon in the Dock – its icon depicts a blue, square face – and selecting the program from within the main Applications folder on the left-hand side of the window. In Data Recovery III, you will be greeted by a welcome page prompting you to enter your activation code or select the demo.
Step 5: Start new scan. Once activated, select Start New Scan from the list of scan options or choose one of the two alternative options for resuming or reviewing previous scans.

Step 6: Select drive and task. Select the your Mac’s internal boot drive or choose another drive you’d like scanned, and click the gray Next button in the bottom-right corner when finished. Then, select the Deleted Files Scan option and click the gray Start button in the bottom-right corner to begin thoroughly combing your hard drive for any recently deleted files.

Step 7: Recover the deleted files. When finished scanning, peruse the pop-up window displaying the newly discovered files for the ones in question. The list will primarily consist of basic system files pertaining to your computer’s operation, but there will also be an assorted mix of other files mixed within the batch of simple navigational folders and various files. Check the boxes on the left-hand side next to the files you wish to recover, click the gray Recover button in the bottom-right corner and select the save location for the newly recovered file from the pop-up window. Click the gray Open button in the bottom-right corner followed by the black OK button when the file appears once the recovery is complete.

What did you think of our bare bones guide on how to recover deleted files? Do know of better software – free or premium – for either OS? Let us know in the comments below.
Editors' Recommendations
- How Nvidia’s DLSS 3 works (and why AMD FSR can’t catch up for now)
- We can’t believe how cheap this Dell gaming laptop is today
- Does Equifax owe you money? Here’s how you can find out