How to remove a page break in Word

how to stay sane when working from home 4 tips a professional macbook office
Image used with permission by copyright holder

Think you know how to use Microsoft Word but can't work out how to remove an inconvenient page break?

Don't worry, you do have options. In some cases, you can the break outright, and in others, you can adjust your page break so that it doesn't interfere with the flow of your text. And we can show you how to handle either instance in a few quick, hassle-free steps. Let's take a closer look at how to remove a page break in Word.

Difficulty

Easy

Duration

5 minutes

What You Need

  • A PC

  • Microsoft Word

A note about page breaks before we start

We mentioned earlier that there are two ways to deal with unwanted page breaks. And that's because there are two kinds of them: Automatic and manual. The main difference between them to know is that automatic page breaks are created by Word and can't be removed, and manual page breaks are ones you added to the document, and those can be removed. Our instructions are broken up in two main sections, one for each of these scenarios. That way, you can just scroll to the set of instructions you need.

How to remove a manual page break (for Windows)

Step 1: Open or create a Microsoft Word document.

Step 2: Within the Paragraph section of the Home tab, click on the Show/Hide icon. (It's a paragraph symbol -- which looks like a backward P.)

how to remove page break in word ms home tab paragraph section show hide button screenshot
screenshot

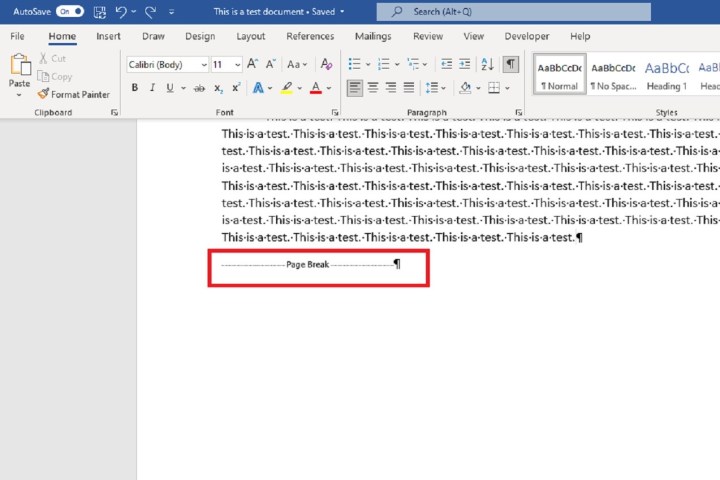
Step 3: A manual page break icon should appear in your document. Double-click on the space after it and then hit the Delete key on your keyboard.
how to remove page break in word ms icon document screenshot
screenshot

How to remove a manual page break (for MacOS)

Removing a manual page break you insert in Microsoft Word on Mac is as easy as a key press.

Step 1: Open your document in Microsoft Word on Mac.

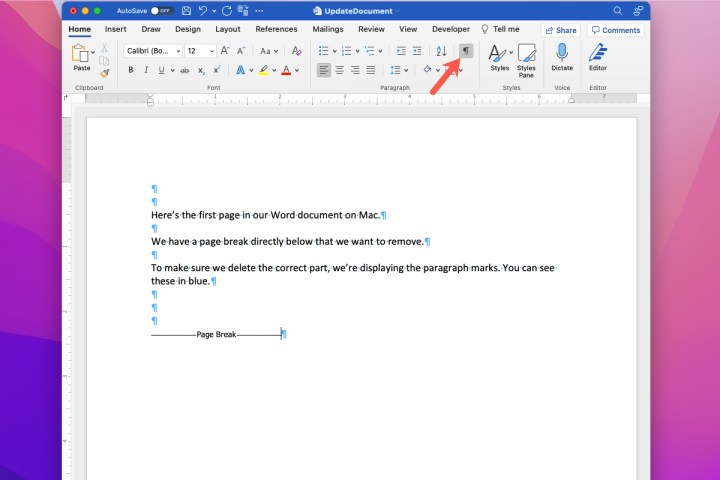
Step 2: Display the paragraph marks so that you can place your cursor correctly. You can do this by going to the Home tab and clicking the Paragraph icon so that it’s selected.
how to remove page break in word mac show paragraph marks
Image used with permission by copyright holder

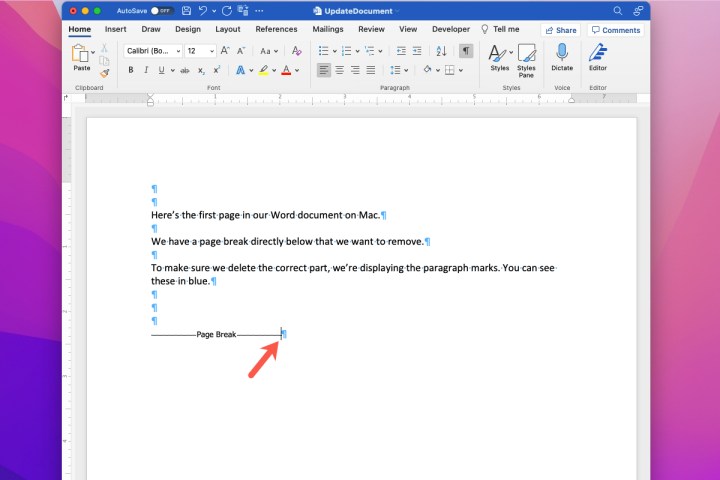
Step 3: When you see the page break appear in your document, place your cursor next to it on the right and press the Delete key.
how to remove page break in word mac cursor
Image used with permission by copyright holder

How to alter an automatic page break (for Windows)

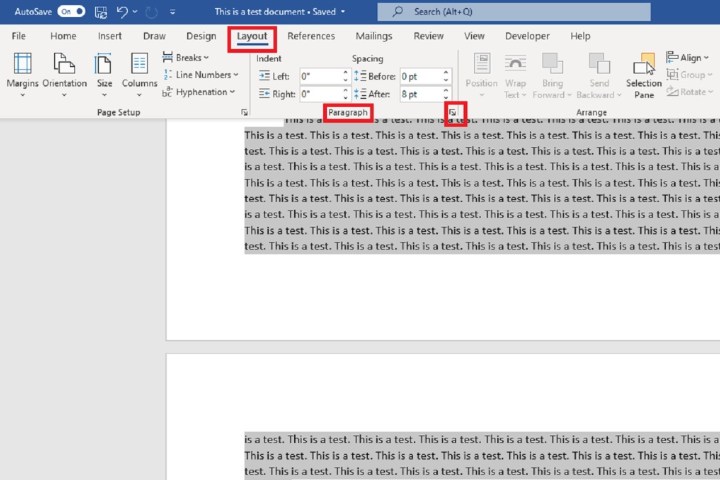
Step 1: Select the paragraph or paragraphs you want to fix. Then select the Layout tab from the Ribbon Menu at the top of the screen.
how to remove page break in word ms layout tab paragraph settings adjust automatic screenshot
screenshot

Step 2: In the Paragraph section of the Layout tab, click on the Paragraph Settings icon. It looks like a tiny arrow pointing southeast.

Step 3: The Paragraph dialog box will appear, and under the Line and Page Breaks tab (next to Indents and Spacing, which you would use for adding hanging indents to Word documents), you'll see four options for adjusting your automatic page break: Widow/Orphan Control, Keep With Next, Keep Lines Together, or Page Break Before. Tick the boxes next to the ones you want to use.

  • If you want to keep a paragraph from being split between two pages, choose Keep Lines Together.
  • If you want a minimum of two lines at the top and bottom of your pages, choose Widow/Orphan Control.
  • If you want multiple paragraphs to stay together, choose Keep With Next.
  • If you need a page break before a particular paragraph, choose Page Break Before.
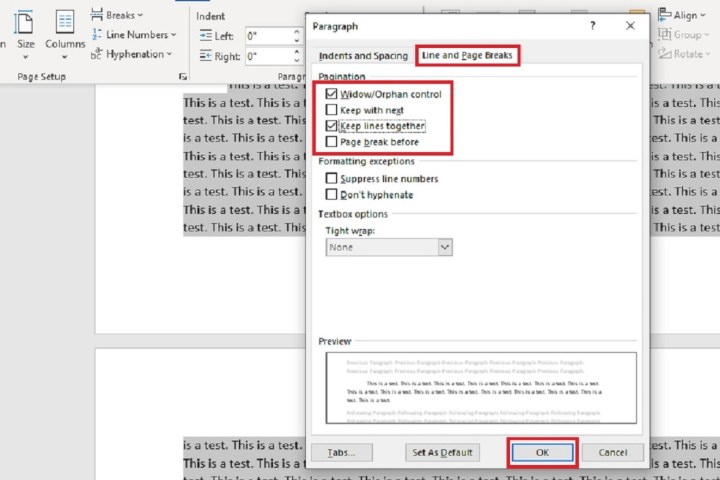
how to remove page break in word ms paragraph dialog box for adjust screenshot
screenshot

Step 4: Then click OK.

How to alter an automatic page break (for MacOS)

Word provides you with ways to automatically break pages as well as keep lines together. You can adjust these in Word on Mac as well.

Step 1: Select Format > Paragraph from the Menu Bar.

Step 2: When the Paragraph box appears, you’ll see the Pagination options at the top. Check the boxes for those you want to use.

  • Widow/Orphan Control: Stop an individual line in a paragraph from appearing alone at the top or bottom of a page.
  • Keep With Next: Keep paragraphs together – for example, those that include headings.
  • Keep Lines Together: Keep lines in a paragraph together. This stops a paragraph from splitting onto two pages.
  • Page Break Before: Insert a page break before a particular paragraph.
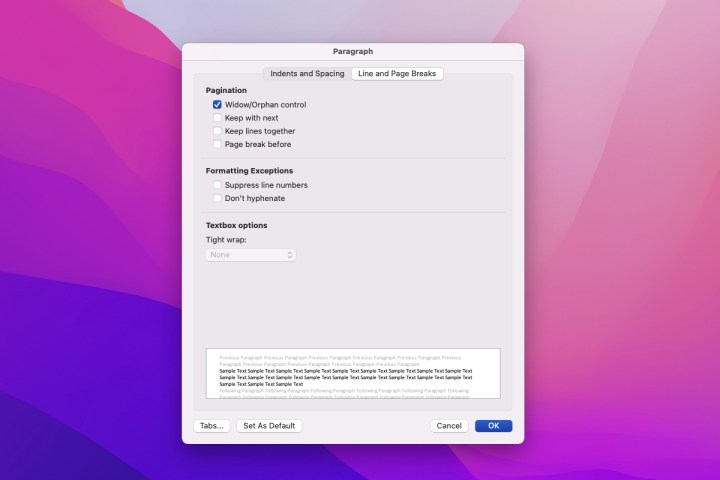
how to remove page break in word mac paragraph pagination
Image used with permission by copyright holder

Step 3: Finish making your adjustments and click OK to apply the changes.

Whether it is an automatic page break or a manual one, it should be simple to remove. However, if it doesn't work out or you've got a problem with too many breaks causing blank pages it is worth knowing how to delete a page in Word.

Anita George
Anita has been a technology reporter since 2013 and currently writes for the Computing section at Digital Trends. She began…
How to create a pivot table in Excel to slice and dice your data

Microsoft Excel is arguably the greatest spreadsheet application from Redmond, and there's a good reason so many number crunchers use it for all of their number crunching needs. While using Microsoft Excel is fine for simple spreadsheets to track expenses or build calendars, it comes into its own when you need to slice and dice and then present complex data. Here, we show you how to create a pivot table in Excel to take advantage of one of the application's most powerful tools.

Before we start, just what exactly are pivot tables good for? Simply put, pivot tables let you look at the same data in different ways and from different angles, to make it easier to perform in-depth analysis and to spot important trends. When you're evaluating sales results, for example, you may want to look at an individual person, a specific product, or a specific timeframe. With a pivot table, you can create one pool of information and then easily change your focus from one thing to another -- an analysis that would be tedious to perform manually.

Read more
How to set an ‘Out of Office’ message in Microsoft Teams
Person using Windows 11 laptop on their lap by the window.

Many people use Microsoft Teams regularly to communicate with colleagues both inside of the office and remotely. It is considered one of the most efficient ways to ensure you can stay in contact with the people on your team, but what if you need to let people know you’re not readily available? Microsoft Teams has a method for you to set up an "Out of Office" status for your profile to let staff members know when you’ll be gone for the afternoon, for several days on vacation, or for an extended period.
Where do I go to set up my ‘Out of Office’ status for Teams?
It is important to note that your Microsoft Teams and Outlook calendars are synced. This includes your out-of-office status and automatic replies. So, whatever you set up in Microsoft Teams will reflect in Outlook. Similarly, you can set up your out-of-office status in Outlook, and it will be reflected in Teams; however, the former has a more straightforward instruction.

The following steps will work whether you use Microsoft Teams online or on the desktop.

Read more
How to delete or hide chats in Microsoft Teams
Running Microsoft Teams on the Galaxy Tab S8.

Microsoft Teams is a terrific workplace platform for keeping the camaraderie strong. Featuring collaborative messaging, video conferencing, and file-sharing tools, it’s your one-stop-shop for in-office, hybrid and at-home workers alike. But anyone with a long history of using Microsoft Teams will tell you how clogged up your message stockpile can get. Fortunately, deleting and hiding these exchanges is relatively easy to do, and we’ve put together this guide to help.

Read more