Have you ever tried to open a file in Windows, only for the completely wrong application to fire up and start loading it? That’s pretty frustrating, right? Well fortunately, there’s a cool little workaround we’d like to teach you that will prevent this issue from occurring altogether. Your key to success is a setting called file associations, and we’re going to teach you where to access this tool, and how to use it.
If you aren’t sure which file type you want to change the association of, right-click your desired file and click Properties from the resulting menu. Look for Type of File at the top of the window. The three-letter designation next to that is its file type. You can do it on an individual file-type basis or change all of them from one location.
Changing one file type
The quickest method to change a single file type is to do it from the Open With menu. If you want to change more than one file type at a time, skip to the next section.
Step 1: Right-click on a file of the type you wish to change the association for.
Step 2: Select Open With from the resulting menu.

Step 3: Windows will then offer you an app or a list of apps that can act as the default for that file type. If you see the one you want, select it, and Windows will open that file in the app you’ve chosen.
Step 4: If you don’t see your preferred app, then from the menu that appears when you select Open With, either search for one by selecting the Search the Microsoft Store option or click Choose Another App for an expanded list of already-installed applications.
Step 5: When you’ve found the app you want and it has been selected, simply click the gray OK button. You can also tick the box labeled Always Use This App to Open [Type of File] Files before you hit the OK button if you want that app to open all files of that type going forward.

Step 6: From now on, any files of that type will be opened with your chosen application.
Changing any and all
If you want to change a few different file types — or even all of them — then the Settings menu is the best place to go.
Step 1: Press the Windows + X keys and click Settings from the resulting menu. Alternatively, search for Settings in the Windows search bar and click the relevant result.
Step 2: Select Apps from the list of options.
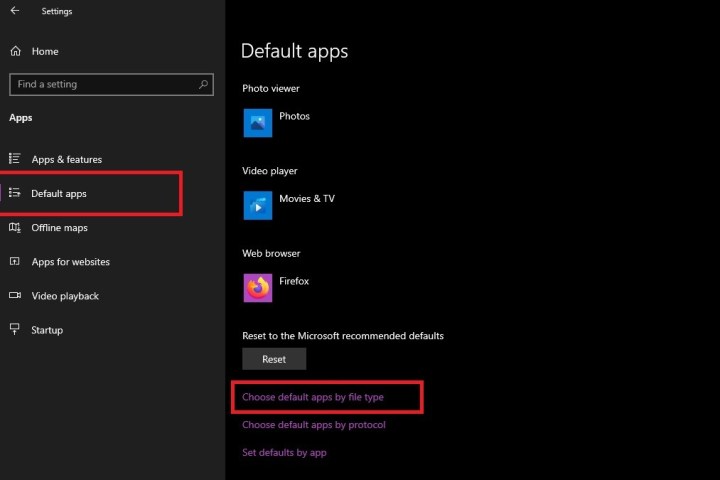
Step 3: Click Default Apps from the left-hand menu.
Step 4: Scroll down if needed, and click Choose Default Apps by File Type.
Step 5: You’ll then be presented with a list of all of the file types Windows 11 supports, with their associated applications on the right-hand side. If a file type doesn’t have a particular application set up to handle it, there will be a gray plus sign (+) icon instead.
Step 6: Scroll through the list to find the file type you want to change the file association for. Click the application or Plus icon to its right.
Step 7: Choose your preferred application from the list that appears and click its corresponding icon. In the case of some file types, there will be multiple options, whereas others may have none.

Alternative options
There are two other avenues available should you not find an offered option. Either download a compatible application from the web or select the Look for an App in the Microsoft Store option, which brings you to the Microsoft Store.
Note: In some cases, the Microsoft Store may not return any results for relevant applications for a particular file type, or it may return search results that aren’t relevant. If this happens to you, you have to decide which app will work with the file type you want to change.
Once you’ve chosen your preferred application, you’re all set. This simple change has successfully reset the default application for your targeted file type; now this program will consistently open when you select a certain type of file.
If you find that you need to change back to the original application, you can use the steps above to get back to the default settings. Alternatively, you can go to the Default Apps section of the Windows 11 Settings menu as we did before, scroll down, and then click on the Reset button located under the phrase Reset to the Microsoft Recommended Defaults.
Editors' Recommendations
- The next big Windows 11 update has a new hardware requirement
- How to check your CPU temperature
- How to disable VBS in Windows 11 to improve gaming
- How to dual boot Linux and Windows
- How to change mouse DPI on Windows and Mac