Are you ready to start dictating your documents and text using just your voice? Instead of offering separated dictation or speech-to-text capabilities, Windows 10 conveniently groups its voice commands under Speech Recognition, which interprets the spoken word across the operating system for various tasks. We’ll teach you how to get everything ready, as well as how to enable speech-to-text in Windows 10, so you can start chatting away to your favorite OS and improve Windows’ “ear” for your voice.
Related Guides
Note: Speech recognition is only currently available in English, French, Italian, Spanish, German, Japanese, Portuguese, Simplified Chinese, and Traditional Chinese.
Finding a mic
Before you start, you must be sure that you have the correct hardware for speech-to-text options. It’s easy to overlook this step as we assume that all devices come with built-in mics these days.
However, the issue here is quality. Built-in mics can work well for simple tasks, like Skype conversations or voice commands, but they can also cause distortion, especially with speech-to-text options. In the past, Microsoft has warned that its speech-recognition features are best suited for headset microphones that interpret sounds with greater clarity and are less susceptible to ambient noise. If you really want to use speech recognition on Windows 10, you should get a quality headset that works well with your computer.
If you’re going to invest in hardware, you should do it as soon as possible. Once you train the speech features, it can be difficult to switch devices. Should you decide to buy a mic, follow these steps to make sure Windows knows that you want it to be your primary microphone, even over previous mics:
Step 1: In the Windows search box, type “speech.” Doing so will bring up an option to go to Speech Recognition in the Control Panel. Select this. When the window opens, select Set Up Microphone to begin.
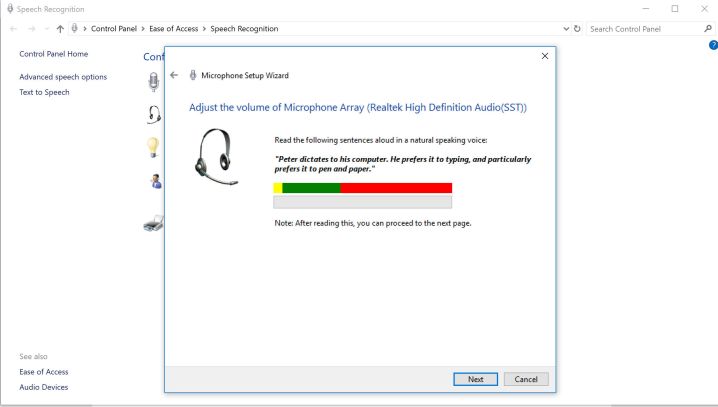
Step 2: Now, choose whether you are using a headset mic or a desktop mic and select Next. Windows will give you some tips on mic placement, then ask you to read a sentence. Read the sentence into your mic, and select Next (there’s no grade or test to pass).
Step 3: If everything worked well, your mic should now be set up. Select Finish to complete the task.
Setting up speech recognition

With your mic ready, it’s time to start configuring your various speech-recognition capabilities. In Windows 10, this is a more seamless process than it has been in the past. These steps and tutorials will affect an array of Windows programs, but you may also want to make sure dictation is enabled in any writing apps that you prefer to use. Begin with the steps below.
Step 1: In the Windows 10 search box, type “speech,” and select Windows Speech Recognition in the results.
Step 2: Select Start Speech Recognition to begin. If Windows 10 still doesn’t recognize your mic, it will have you go through the mic setup steps again at this point, then begin the speech recognition setup.
Step 3: One of the choices in the setup process is whether to enable Document Review or not. This option tells Windows to look at your emails and documents in your search index and look at the words you frequently use. It can help with the recognition software, but it isn’t a necessary step, so choose what you feel comfortable with.
Step 4: Now decide whether you want speech-to-text to be activated with a keyboard or vocal command and click Next. Use the reference sheet to familiarize yourself with commands you can make and continue through the other preferences. While Windows offers to print out the commands for you, you can easily access them on Microsoft’s website by going here.
Step 5: Windows will also ask if you want to start speech recognition every time you start the computer. If you are using speech recognition for accessibility reasons, this may be an excellent mode to enable.
You should now be ready to go. You can enable or disable speech to text by pressing the Ctrl + Windows keys at any time.
Training your computer and more
You’re all set at this point to use speech-to-text with a variety of files within Windows Docs. But first, you might want to take the time to fine-tune Windows’ voice-recognition capabilities. With a little training, Microsoft’s latest software can learn your voice and process it to text with greater accuracy.

Step 1: Go to the Ease of Access menu. Click on Speech Recognition.
Step 2: Select Train Your Computer to Better Understand You.
Step 3: Windows will have you read out extended sequences of text, which will help it learn the particular quirks of your voice and intonation, allowing it to understand your voice better.
Near the bottom of the speech-recognition menu is the Speech Reference Card, which is a helpful tool. It provides a cheat sheet on controlling software programs verbally, for those new to voice commands. You can access the cheats in either a small side screen or a print-out.
Editors' Recommendations
- Windows 11 tips and tricks: 8 hidden settings you need to try
- How to clean a laptop keyboard without damaging the keys
- How to clean a laptop screen without scratching it
- How to convert your VHS tapes to DVD, Blu-ray, or digital
- How to make a GIF from a YouTube video