Over time, it’s not uncommon to build up a large library of music and media on your Mac. If you want to share that content with other people so that, for example, your family members can listen to your music library, it’s a fairly simple process on Apple’s devices.
You can do that through Apple’s Home Sharing feature, or by sharing playlists you’ve created in Apple Music. In this article, we’ll outline both methods for you so that you can get started straightaway.
Speaking of Apple’s Music app, in MacOS Catalina the company split up iTunes into three distinct apps — Music, TV, and Podcasts. If you’re looking to share an iTunes library, you’ll find that’s no longer possible on your Mac. On Windows, however, iTunes lives on. If you want to know how to share a music library in iTunes, we’ve got a guide for you on that topic as well.
Set up Home Sharing
Apple devices have a feature called Home Sharing that’s designed to let you share, stream, and import various media files from up to five devices — be they Mac, PC, iOS, or Apple TV devices — that are connected to your Wi-Fi network.
Step 1: Make sure any device you want to share with is signed in using the same Apple ID and has been authorized to play purchased items on that Apple ID.
Step 2: On your Mac, open System Preferences by clicking the Apple icon, then click System Preferences.
Step 3: Click Sharing, then click Media Sharing in the left-hand sidebar.

Step 4: Tick the checkbox next to Home Sharing.
Step 5: Enter your Apple ID username and password.
Step 6: Click Turn on Home Sharing. You’ll now see a dialog box telling you Home Sharing has been enabled.
Use Home Sharing on a Mac
Now that Home Sharing has been enabled, you’ll want to start sharing your content in Apple Music.
Step 1: Make sure that any device that wants to access or share an Apple Music library is turned on, is not asleep, and is running Apple Music.
Step 2: Open the Music app and sign in with your Apple ID (if you aren’t already).
Step 3: Click the down arrow next to Library in the left-hand sidebar.

Step 4: You’ll see a list of libraries that have been shared with you. Click the one you want to access and you’ll see it loaded into Apple Music. Any playlists that have been created in the shared library will also be shown in the left-hand sidebar.
Use Home Sharing on iOS
Home Sharing can also be accessed from your iOS or iPadOS device. Here’s how.
Step 1: Open the Settings app on iOS, then scroll down to Music and tap it.
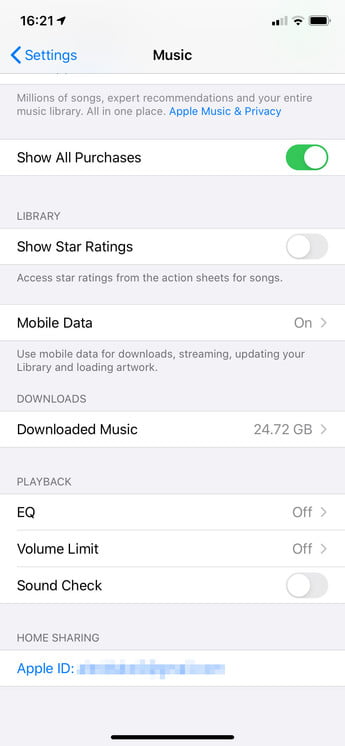
Step 2: At the bottom of the window under Home Sharing, tap Sign In if you aren’t already signed in with your Apple ID. If you are signed in, you’ll see your Apple ID’s email address displayed on your screen.
Step 3: Open the Music app, then tap Library in the bottom toolbar, then Home Sharing.
Step 4: Choose a library and wait for Music to download it to your device. Once that’s done, you can play the shared content.
Share your media with guests
What if you want to share your music library with someone else who has a different Apple ID? Fear not, as that’s just as easy to do.
Step 1: Open System Preferences on your Mac, then click Sharing.
Step 2: Click Media Sharing in the left-hand sidebar.
Step 3: At the bottom of the window, tick the checkbox next to Share Media with Guests.
Step 4: Click Options on the right-hand side.
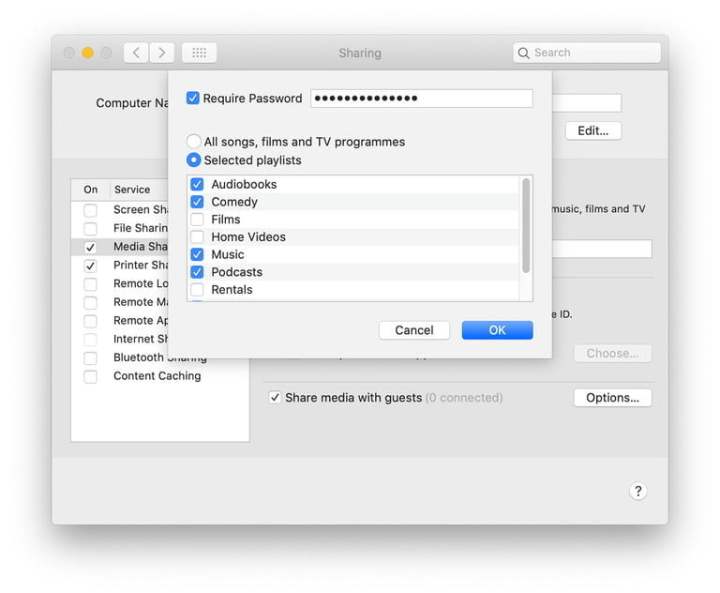
Step 5: To require a password when people try to access your media library, tick the checkbox next to Require Password, then enter a password in the adjacent box.
Step 6: You can choose to either share all your media items or only selected ones. For the latter option, click Selected Playlists, then choose exactly what media types you want to share.
Use Family Sharing
Home Sharing is a great way to sync all the Apple devices in your home, but what about syncing with the people in your life? That’s where Family Sharing comes in.
First, let’s make a quick distinction. Home Sharing is about syncing media between devices, whereas Family Sharing is about sharing purchases between accounts. With Family Sharing, you can sync your purchases on the App Store, Apple TV, and even Apple Music with five other accounts — be they friends or family.
To set up Family Sharing on Apple Music, you will have to switch to the Family Plan. That’s $15 a month, up from the $10 for the individual account. Each person then gets their own profile on Apple Music, where you can send them playlists and songs as well as see what they are listening to.
Show friends what you are listening to
If you and your friends really love music and you want to continually share what you are listening to, Apple Music will let you do that. Users can go to your profile and see what you are listening to at that moment. They can also view any playlists you have made public. You can turn this feature on in macOS and iOS.
To turn the feature on in iOS:
Step 1: Open Apple Music and tap on the For You tab.
Step 2: Tap on the image icon in the top-right corner of the screen.
Step 3: Click Edit beneath your name and picture.

Step 4: Scroll down to the bottom and toggle Listening To on.
Step 5: To turn it on in macOS, open Apple Music and tap on the For You tab.
Step 6: Tap on the image icon in the top-right corner of the screen.
Step 7: Click Edit to the right side of the screen.
Step 8: On the right side, under Choose Who Can Follow Your Activity, select Additional Privacy Settings.
Step 9: Choose Listening To, which will cause a blue checkmark to materialize next to it.

Share an Apple Music playlist
When you share your music through Apple Music, you don’t have to worry about your guilty-pleasure downloads being revealed. Instead, you can select a certain playlist to directly share with someone instead of granting them access to your entire music library.
Before sending your playlist, make sure the recipient can log into their Apple Music account by having an active Apple Music subscription.
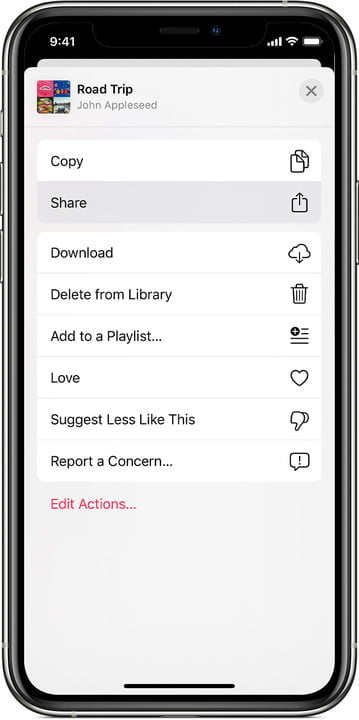
Step 1: With your iPadOS or iOS, find which playlist you’d like to share. There will be three dots below the playlist title that will give you the option to Share when you click on them. You’ll be able to send the playlist in various ways, like text messages, emails, via AirDrop, or even through Facebook.
Step 2: You’ll follow the same initial steps on your Mac — tap the three dots below the playlist you’re trying to share. After clicking that option, choose Share Playlist.
Editors' Recommendations
- How to select multiple files on a Mac
- How to enable picture-in-picture for YouTube on your Mac
- How to use iMessage on Windows
- How to check your Mac’s CPU and GPU temperatures
- How to sync your Outlook calendar with an iPhone or iPad