
Skype is one of the best free internet calling apps there is. If you are an avid Skype user, then you can attest to its greatness. But there are many more additional features to take advantage of other than video chatting.
One of the most useful features of Skype is the ability to share your screen on the app. All it takes is a click of a button, and you can invite multiple family members and friends to the conversation.
How to share your screen on Skype (PC)
You’re most likely using the Classic Desktop software if you’re running an OS that’s anything other than Windows 10. Fortunately, Microsoft gives us a unified experience, even between both versions. They look and act the same, so deciding on one version over the other really just comes down to our personal preferences.
With that in mind, this guide applies to both Skype versions that Windows offers, even though the screenshots included represent classic desktop software.
Step 1: Start your call by selecting a contact on the Recent Chats list and clicking the phone icon in the top-right corner.
Step 2: The next step depends on your video call. With the Recent Chats panel hidden, you’ll see a double-square Share Screen icon on the hideaway toolbar. Click that icon to proceed.
If the Recent Chats panel remains open during your call, click the three-dot More Options icon on the hideaway toolbar. Select the Share Screen option on the pop-up menu.

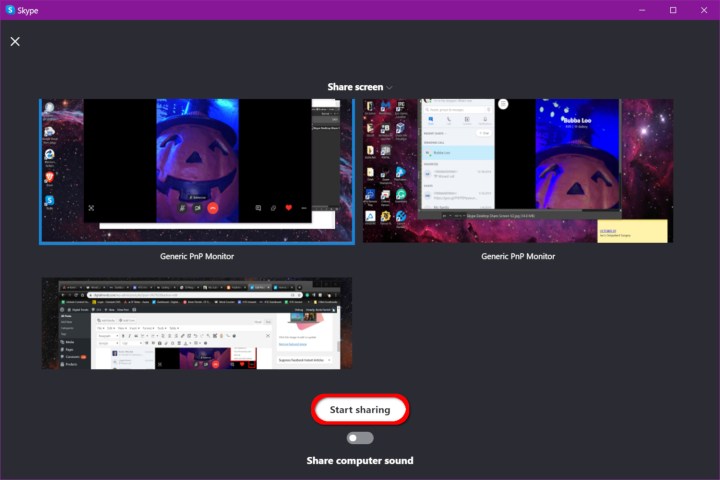
Step 3: The Share Screen interface temporarily replaces your call screen. If you have just one screen, then you’ll likely only see one window. For PCs with two or more screens, click on the screen you want to share and then click the Start Sharing button. You’ll also see a toggle to stream the PC’s sound.
Step 4: You are now sharing your screen! A small red line appears around the bounds of your selected screen, indicating it’s currently streaming to your contact.
For PCs with multiple screens, you can switch between screens. Click the Screen Sharing Options or More Options button — depending on your current view — and then select the Switch Screen or Window entry on the pop-up menu (see the screenshot in Step 5).
Step 5: To stop sharing, click the double-screen icon, and select the Stop Sharing option on the pop-up menu. Use this method during calls with the Recent Chats panel closed.

If the Recent Chats panel remains open during your call, click the three-dot More Options icon and select the Stop Sharing option on the pop-up menu.
How to share your phone screen on Skype
Screen sharing is available on most modern devices, including iPhones, iPads, and Android hardware, but this guide focuses on the screen sharing process using an iPhone X.
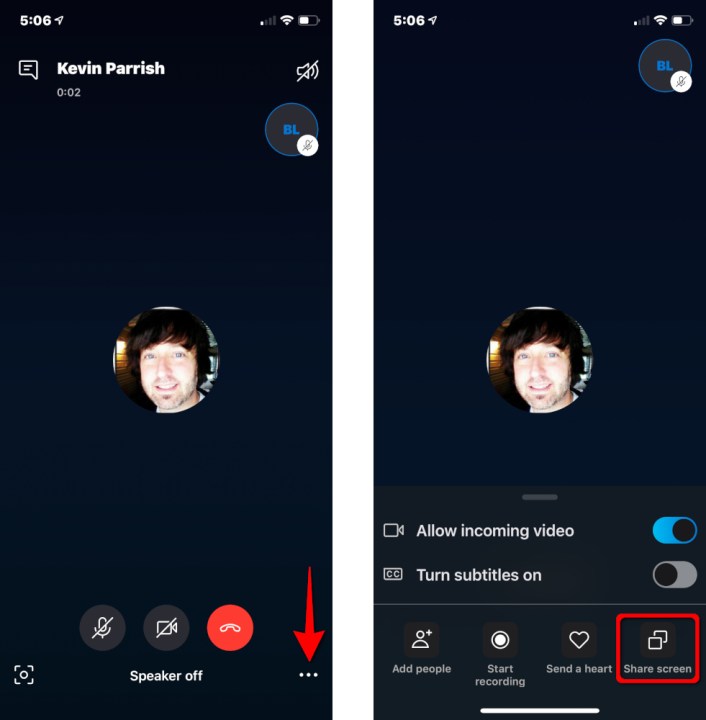
Step 1: Call contact by clicking their name on your contact list. Press the phone icon located at the top right corner of the window.
Step 2: While the call is streaming, tap the screen, and an icon will appear in the screen’s bottom right corner. Tap it, and a menu will open.
Step 3: Select the Share Screen icon from the menu, and a screen will pop up.
Step 4: Tap on the Skype listing, then the Start Broadcast button.
Step 5: Your contact can now see your screen. You can broadcast what you wanted to share by switching to the appropriate app. Open Skype again and tap on Stop Broadcast, and the broadcast will cease.

Once you get a little more comfortable sharing your screen on Skype, you might be interested in learning how to record your favorite calls.
Editors' Recommendations
- How to adjust screen resolution in Windows 11 and older
- How to change your Zoom background on Mac and Windows
- How to convert your VHS tapes to DVD, Blu-ray, or digital
- Update your Apple devices now to fix these dangerous exploits
- The iPhone 15’s chip challenges Intel’s fastest desktop CPU — but there’s a catch


