For most new Mac users — especially if they’re coming from Windows — one of the first questions they need to ask is how to take a screenshot on a Mac? There’s no dedicated Print Screen key like there is on Windows, but there is keyboard shortcut, and if you want something more akin to Microsoft’s Windows Snipping tool, there are some great screenshot apps you can use, too.
- How to take a screenshot using keyboard shortcuts
- How to take a screenshot using the native Mac app
- How to take a screenshot with the screenshot menu
- How to print screen on Mac using Preview
- Where to find screenshots on Mac
- How to add annotations to a screenshot
- Screenshot tips and tricks
- How to take screenshots on other devices
Here’s how to take a screenshot on a Mac in a few different ways.
How to take a screenshot using keyboard shortcuts
MacOS keyboard shortcuts are the quickest ways to take screenshots, whether you’re capturing the entire screen or just a portion. By default, Apple’s methods save your screenshot to the desktop, but if you want to copy the screenshot to the clipboard, there’s a keyboard shortcut you can use instead.
How to capture a selected area
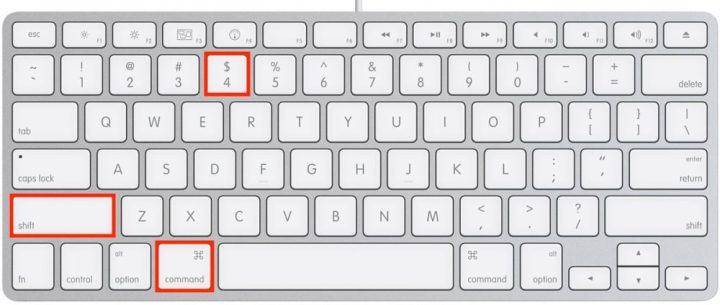
Press the Command + Shift + 4 keys simultaneously. With your pointer now turned into a crosshair, click and drag to draw a box around the region you want captured. When you let go of the mouse button, the screenshot saves to your desktop.
How to capture a single window

Step 1: Press the Command + Shift + 4 keys simultaneously so that your pointer becomes a crosshair.
Step 2: Press the Spacebar. The pointer changes to a camera icon.
Step 3: Any window you hover over is highlighted with a light blue overlay. Click on the window you want to capture, and the image saves to your desktop.
This method doesn’t just capture windows — you can save the desktop, the menu bar, the dock, or even an open menu by itself.
How to capture the entire screen
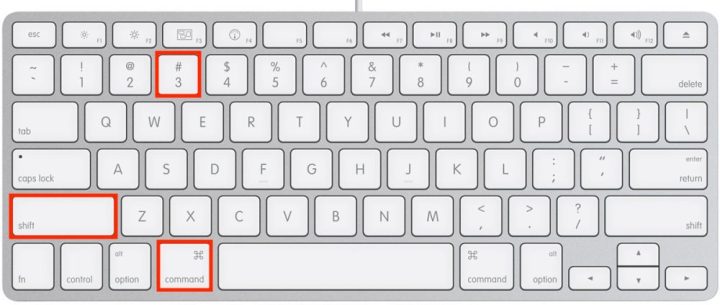
Press and hold Command + Shift + 3 keys simultaneously for an instant capture of your desktop. This will include the Dock, Menu Bar, and everything else on the screen. You’ll hear the screenshot sound and the preview will appear in the bottom-right corner of your screen, giving you quick access to editing tools.
The image you save consists of the window and its shadow against a transparent background (PNG). If you don’t want the shadow, press and hold the Option key (or Alt) as you click to save the image.
How to take a screenshot using the Touch Bar
If you have one of the older MacBook Pro models with a Touch Bar, these options appear on the OLED strip. Another Touch Bar exclusive is taking a screenshot of the Touch Bar display, which can be done by hitting Shift + Command + 6.
How to take a screenshot using the native Mac app

Keyboard shortcuts work well for programmers, but a point-and-click user interface is easy for everyone to use. That’s why Apple also includes a Screenshot app, and it gives you even more control over screenshots. The app also lets you take screenshots after a five-second or 10-second delay, allowing you time to open a menu or do some other setup that might not be possible with the keyboard shortcut before capturing an image on your display. There are three ways (shown in steps 1 to 3 below) to find the Screenshot app.
- Open your Mac’s Launchpad and scroll through or type in the search box at the top to locate the Screenshot app, then double-click to open it.
- You can also hold Command + Spacebar to start a Spotlight Search. Begin typing “Screenshot,” and the app will soon appear in the results. Select Screenshot from the top section of the search results to open the app. If you see Screenshot lower in the results, that will start a web search for “screenshot” as a search term, so make sure to choose a result near the top.
- Open the Finder by choosing the smiling, blue face icon at the bottom-left of the Dock, then select Applications from the left sidebar. Next, open the Utilities folder, scroll down to find the Screenshot app, and open it.
If you think you’ll use the Screenshot app frequently, you can keep it in the Dock by right-clicking the app icon and selecting Keep in dock from the Options menu.
How to take a screenshot with the screenshot menu
The Screenshot app looks like a floating toolbar near the bottom of the screen with buttons that look like the type of screenshot that they capture. At the far left is full-screen capture, then window and partial-screen capture. In the next section, full- and partial-screen recording buttons appear, followed by an Options menu. and a Capture button.
Choose one of the screenshot buttons, then Capture to grab a save of what’s on the screen. The Screenshot toolbar won’t be included in the capture.
If something needs to be set up, such as a menu opened to show its contents in the screenshot, select the 5 seconds or 10 seconds delay from the Options menu.
You can also pick a different default save location for your screenshots or send screenshots to another app like Mail or Messages.
If you want to see the mouse pointer arrow in the screenshot, enable Show mouse pointer in the Options menu.
The Floating Thumbnail option is enabled by default, but when taking multiple screenshots in a row, the thumbnail might be captured in some of the images since it appears on-screen. Switch Floating thumbnail off in the Options menu when you are taking quick screenshots.
How to print screen on Mac using Preview

Step 1: Preview is the default tool that allows you to open everything from photos to PDF files (and here’s how to convert them). It has plenty of lesser-known features, such as annotating documents and images by selecting the Markup icon in the upper-right. Preview captures screenshots, too. Start by opening the image by double-clicking it in the folder or opening it in Preview in Spotlight by using the Command + Space key command.
Step 2: In the Preview app, open the File menu and the Take screenshot submenu, then choose the selection mode depending on your preference.
Step 3: The keyboard shortcut method is far quicker, and the Screenshot app is easier, but Preview lets you name the file before saving it to your preferred location.
Where to find screenshots on Mac
So, you took your screenshot, but now you might be wondering where to find it. Your screenshots are saved, by default, to your desktop, which can be accessed through Finder under Desktop or just by accessing the desktop directly. However, that can lead to a very messy desktop. If you have macOS Mojave or later, the default location of screenshots can be changed in the Screenshot app.
In terms of file format, the default for saved screenshots is PNG. To change this, open up Terminal. Ignoring the quotation marks, type in the following command: “defaults write com.apple.screencapture type” — followed by space and the file format you want, whether that’s JPG, PDF, or some other image format. Finally, hit the Return key.
How to add annotations to a screenshot
The macOS Markup capabilities are built into the Screenshot app. That means you can easily add highlights to text, draw arrows to point out details, make freehand sketches, add your signature, and much more to any screen capture.

Step 1: To see the Markup toolbar, just select the thumbnail that appears in the bottom-right corner after taking a screenshot.
Step 2: After you select the screenshot’s thumbnail, it opens in a window with a Markup toolbar at the top. This is a system utility window that appears above all other windows and lacks the usual maximize, minimize, and sizing options of an app window. There are several drawing tools, a text tool, a signature option that lets you sign on your trackpad or take a photo of an ink and paper signature with a webcam or iPhone, and more.
Step 3: Perfect squares and circles are possible when using the Shapes tool, but the Sketch tool at the top-left is quite helpful at correcting wobbly, hand-drawn shapes, including boxes, stars, triangles, ovals, and arrows.
Step 4: It’s also easy to edit your drawings and annotations — Preview is the best Paint equivalent on macOS. Deselect the current tool so the cursor becomes an arrow and choose any annotation to adjust its size, position, and color. Hit the Delete key to remove that sketch, text, or signature.
Step 5: When you’re satisfied with marking up the screenshot, choose the Done button at the upper right to save the image. You can also use the Share menu to AirDrop and send to another app, or simply trash the screenshot if you’ve decided you don’t want it.
Screenshot tips and tricks
There are a few tricks that use the Mac keyboard to change how a screenshot works. These tips work no matter whether you started the screenshot with a keyboard shortcut, the Screenshot app, or the Preview app.
Press and hold the Control key while capturing a screen grab to copy it to the clipboard instead of saving it as a file. The *=Option key is quite useful for Mac screenshots as well. Hold Option when you’re taking a screenshot of a window to remove the shadow that will otherwise surround the window in the image.
If you hold down Option while changing the dotted outline in a partial screenshot, dragging an edge or corner makes the same movement on the opposite corner or edge. It’s a handy way to keep the center in place while resizing the area of the screen that will be captured.
How to take screenshots on other devices
If you own other Apple devices, you might also be wondering how to take a screenshot on an iPhone. It’s simple enough, though it depends on what generation of device you have. If you have an older iPhone that still has a Home button, it’s as easy as holding the Home button and the Power button at the same time.
On newer devices without a Home button, hold the Volume up button and the Power button at the same time. The same method applies when taking a screenshot on an iPad.
Learning how to take a screenshot on a Windows PC or laptop can be tricky if you’re more familiar with MacOS. There are still a number of keyboard shortcuts involving the Print Screen key that’ll do the trick, as well as the built-in Snipping Windows application. This same method applies when taking a screenshot on a Microsoft Surface device or any other Windows tablet or 2-in-1.
Chromebooks have their own unique way of handling screenshots, too.
Editors' Recommendations
- 9 best 2-in-1 laptops in 2024: tested and reviewed
- The 5 best MacBooks for video editing in 2024
- The best MacBook to buy in 2024
- How Vision Pro tech could come to the Mac
- Does your Mac really need antivirus software? We asked the experts