
Wi-Fi makes it easy to connect your laptop, smartphone, gaming console, and more to the internet without the need for pesky cables. However, folks with large homes that span multiple floors have probably run into reception issues in rooms far away from the router. Wi-Fi routers work best across short distances – meaning far-flung rooms or outdoor locations might not be able to properly connect to the internet.
Thankfully, you can use a second Wi-Fi router to boost your signal throughout your property and eliminate dead zones. Here's a look at how to extend your Wi-Fi range with another router and the DD-WRT router firmware.
Do a 30/30/30 reset
Before we configure everything, let’s make sure your DD-WRT router is using the default settings. To do this, we do what is called a hard reset — or 30/30/30 reset — which removes all configurations from the NVRAM of your router. Here’s how it’s done.
Note: As the DD-WRT Wiki warns, there are situations in which you shouldn’t do a hard reset or 30/30/30 reset. Don’t perform them while the router is upgrading. Don’t do them for Linksys EA series routers (as doing so can brick them). And don’t do them for any ARM routers.
Step 1: With the router plugged into the power supply, hold the Reset button located on the bottom of the router for 30 seconds. Your router will reset, and this is normal. Keep holding the button.
Step 2: Now, while continuing to hold the Reset button, unplug the router. Wait for 30 seconds.
Step 3: Keep holding the* Reset* button, and plug the router in. Keep the Reset button pressed down for 30 seconds.
That’s right: You’re holding the button for 30 seconds with the router on, then 30 seconds with the router off, then 30 seconds with the router on again. When this is done, you’re ready to do some configuring.
Setting up DD-WRT as a wireless repeater
Keep in mind that some router models (especially older routers) do allow you to set up the router as a repeater natively, which means you don’t need to use DD-WRT. Fortunately, many of our steps below can be used with native settings that allow it, even if things look different: Linksys, for example, has a different interface, and the method that Netgear’s Nighthawks use is also a bit different, while the Asus mode differs as well. Look for these options before downloading DD-WRT just to make sure they aren’t available. This can save you some time. Otherwise, you can proceed full steam ahead with DD-WRT.
If the router is currently plugged into any network, unplug it — we don’t need any Ethernet cables for a repeater. Now connect to the router wirelessly. The default SSID will be “dd-wrt,” and you’ll need to set an admin username and password.
Step 1: First, head to the Wireless section and click the Basic Settings tab.

Step 2: Set Wireless Mode to Repeater.
Step 3: Set Wireless Network Mode to match your router. This might require some research on your part, though Mixed is fairly universal.
Step 4: Set the SSID to match your router. We chose Potcasting, because that’s the name of the router we’re hoping to repeat.
Step 5: Under Virtual Interfaces, click Add.
Step 6: Give the new virtual interface a unique SSID. We used Potcasting-Repeat, but you can use whatever name you like. Just don’t use the same name as your primary network.
Step 7: Hit* Save*, but do not hit Apply Settings just yet. You should wait until you’re completely finished.
Step 8: Now let’s head to the Wireless Security section.
Under the Physical Interface section, make sure the settings exactly match those of your primary router. For example, if your primary router uses WPA2 Personal with TKIP encryption, set things the same here, and enter your key as you would if you were connecting from a PC or phone.
Step 9: Under the Virtual Interfaces section, you’ll establish the settings you’ll use to connect to this router. It’s best to make these identical to the settings in the Physical Interface section.
Step 10: Hit* Save*, but again hold off on Apply Settings.
Step 11: Head to the Security section, disable the SPI Firewall, and uncheck everything housed under Block WAN *Requests. Then, hit *Save.

Step 12: In Setup, select* Basic Setup*. Under Network Setup, change the Router IP to a different subnet than that of your primary router. For example, if your main router’s IP is 192.168.1.1, set the repeater’s IP to 192.168.2.1. Don’t change the other number sets (192, 168, etc.) in the address, just this one.

Step 13: With all of this done, go back to every page you configured and make sure all of the settings are correct. When you’re sure everything is right, hit the Apply Settings button. Your router will restart, and eventually, you’ll see the SSID you chose earlier for your repeater. Connect to it, and verify that your internet is working by heading to the Digital Trends website (or any other). If it works, you now have a wireless repeater!
Step 14: When it comes to physically placing it in your home, the repeater depends on receiving a wireless signal from your primary router to do its job, so placing it in a dead zone likely won’t do you much good. Ideally, the repeater should be placed near the dead zone, but close enough to the router to still get a decent signal. Experiment with different locations until you’re happy with the coverage and speed.
Using a Router App
Today’s router apps can help manage more complex systems that involve repeaters. Both the Nighthawk and the Asus apps allow you to set up compatible routers as repeaters. Again, the router has be on and signaling to work, but an Ethernet connection is not required. In the case of Asus, it’s as simple as detecting the router and starting the setup by selecting the repeater option. For the Nighthawk app, you will want to select the router you use as a repeater, then enter the Nighthawk app and let it detect the router once you are connected. Both apps should have options to continue setup as a repeater.
However, this usually only works if your router app natively supports switching to a repeater, and the apps may play better with some routers than others. Note that the process is even easier if you are getting a compatible Wi-fi extender from the same brand, but that means you wouldn’t be able to save by recycling an older router as a repeater.
If the app doesn’t work, you’ll need to make the changes from DD-WRT on a desktop. Many router companies have phased out repeater modes, so they aren’t common on newer routers and their apps. Some router setups, like Google Nest Wifi’s mesh system, aren’t compatible with extension modes at all because of the way they work. That’s why we recommend DD-WRT.
Setting up DD-WRT as a second access point
Make sure that your router is not plugged into anything but the power. Connect wirelessly — the default SSID will be “dd-wrt,” and you’ll have to set an admin username and password.
You’ll start at the Basic Setup page. Some router settings will have an extra mode called AP Mode or Bridge Mode that is specifically for setting up a second access point. If you find this mode, you should certainly try to activate it: Your router may then pick up much of the information listed below automatically, saving you a lot of time. Just be careful you aren’t unintentionally activating a repeater mode instead: These router setting terms can be vague, so it’s always important to study the details of your own router settings page.
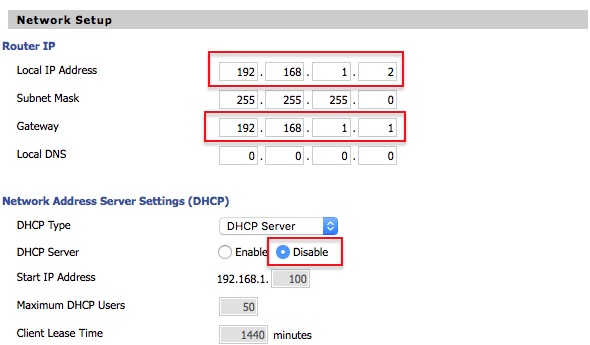
Step 1: Change the local address to something other than what your primary router uses. We used 192.168.1.2. Take note of this IP, because you’ll need it later to configure your access point.
Step 2: Enter the IP address used by your primary router under Gateway. This is typically 192.168.1.1, but check to make sure.
Step 3: Disable the DHCP Server. This will prevent your access point from fighting your router to assign IPs.
Step 4: Assign the WAN port to switch. This isn’t necessary, but it gives you an extra port later if you need it.
Step 5: Hit Save, but don’t click Apply. Your router isn’t ready, and it will misbehave if you apply the new settings too early.
Step 6: Next, head to the Wireless section, and make sure Wireless Mode is set to AP. It should be the default.

Step 7: Choose an SSID. This can be the same as your primary router if you’d like, but if so, ensure that this access point and the router are using different channels. For example, if your primary router is set to Channel 1, set this one to Channel 11 to avoid conflicts. If that’s too complicated, just use two different SSIDs.
Step 8: Hit Save, but not Apply.
Step 9: Now, go to the Wireless Security subsection. If the SSID is the same as your primary router, ensure that your devices switch seamlessly between the two access points by copying the security settings here. If the SSID is different, use whichever security settings you prefer. WPA2 is the setting we recommend if you want to be sure your network’s secure.
Step 10: Disable the firewall by navigating to the Security section. A firewall is unnecessary since the router won’t filter your internet connection, plus it’s a potential source of problems.
Step 11: Take a look at the settings above. If they look good, click Apply Settings and restart your router. Then connect it to the network near a dead zone.
Consider buying a Wi-Fi range extender
If turning your second Wi-Fi router into an extender sounds like a hassle, consider purchasing a new Wi-Fi range extender. These are typically easy to install, allowing you to get your Wi-Fi network extended with just a few button presses. Many are powered by smartphone apps or other software, and once they're plugged in and powered on, you'll have plenty of ways to customize their performance. These gadgets are relatively affordable and are a convenient way to remove dead zones throughout your property.
As long as there’s a wired connection available, you can place the Access Point in the extreme corners of the dead zone. That will give you better coverage where you need it most, but it depends on where you have wired access to the network.
Editors' Recommendations
- The most common Microsoft Teams problems and how to fix them
- The most common GoTo Meeting problems and how to solve them
- How to share your Outlook calendar
- How to schedule an email in Outlook for Mac, Windows, and web
- How to mass-delete all your emails on Gmail at once


