
Just like the Control Center on iPhone and iPad, the Control Center on MacOS Monterey gives you easy access to actions you perform often. You can quickly turn on or off Wi-Fi, Bluetooth, or Focus. You can also adjust your display, turn up the volume, and play or pause your favorite tune.
Let’s take a look at where to find the Control Center, how to use it, and which customizations are available for it on MacOS.

Where is Control Center on Mac?
The Control Center on MacOS resides in your menu bar. On the top-right of your screen, look for the icon that looks like a double toggle. Then, just click to open it.
While you can remove and rearrange some buttons in your menu bar, the Control Center is currently not one of them. But the good news is that it’s always there when you need it.

How to use Control Center on Mac
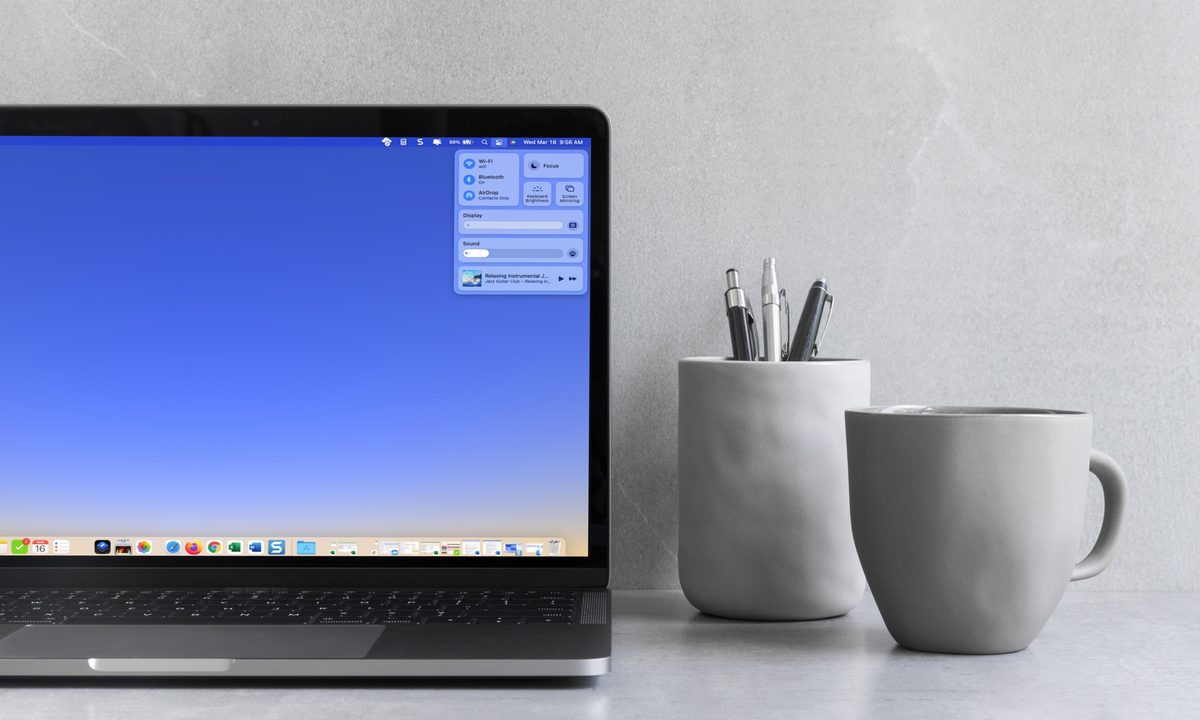
When you open the Control Center on a Mac, you’ll see it neatly laid out in sections. Here are all of the controls you have by default. These cannot be removed from the Control Center.
- Wi-Fi: Turn Wi-Fi on or off, select a network, or open Network Preferences.
- Bluetooth: Turn Bluetooth on or off, view connected accessories, or open Bluetooth Preferences.
- AirDrop: Turn AirDrop on or off and select Contacts Only or Everyone.
- Focus: Turn Do Not Disturb on or off for a certain time period or for Driving or Sleep. You can also open Focus Preferences.
- Keyboard Brightness: Adjust the Keyboard Brightness or open Keyboard Preferences.
- Screen Mirroring: Select a connected device for Screen Mirroring, or open Display Preferences.
- Display: Adjust the display brightness; turn Dark Mode, Night Shift, and True Tone on or off; connect to another device (using sidecar), or open Display Preferences.
- Sound: Adjust the volume, AirPlay to a connected device, or open Sound Preferences.
- Music (Playing Now): Play, pause, or move forward to the next song in the Apple Music app.
How to customize Control Center on Mac
As mentioned, you cannot remove any of the above actions from Control Center on Mac. However, you can include a few additional ones if you like.
Step 1: Open System Preferences using the icon in your Dock or the Apple icon in the menu bar.
Step 2: Select Dock & Menu Bar.
Step 3: On the left, scroll down to Other Modules.
You’ll see Accessibility Shortcuts, Battery, and Fast User Switching. Select one, and then mark the option on the right for Show in Control Center.

Step 4: You can then close the Dock & Menu Bar preferences.
If you add any of these three options, it will display at the bottom of the Control Center. Here are the actions you can take with them.
- Accessibility Shortcuts: View Accessibility Shortcuts for vision (i.e., make the screen easier to read) and physical and motor skills; open Keyboard Shortcuts or Accessibility Preferences.
- Battery: View the battery level and percentage, power source, and time to a full charge. Charge to full immediately, see which apps are using significant energy, or open Battery Preferences.
- Fast User Switching: Switch users or open the login window or Users & Groups Preferences.

The Control Center on Mac gives you a fast way to take care of actions or open the corresponding section in System Preferences, so be sure to take advantage of this handy MacOS tool.
For help with other actions, take a look at how to force quit an app on Mac.


