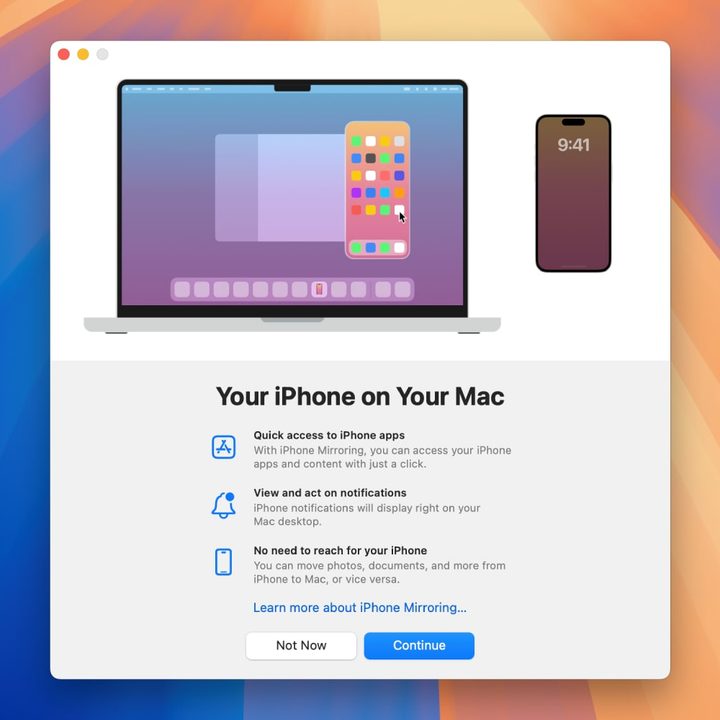
In 2024, Apple introduced iPhne Mirroring. This macOS Sequoia feature puts a mirrored version of your iPhone right on your Mac’s desktop, enabling you to interact with your iPhone without ever needing to have it in your hands. You can open iOS apps, send emails, change settings, and much more, all from the comfort of your Mac.
Note that you can’t access your iPhone’s camera and microphone while you’re using iPhone Mirroring, and opening any app that uses these features on your Mac will prompt a warning that the camera or microphone is unavailable. You can also only use one Continuity feature at a time, so you can’t use iPhone Mirroring and Continuity Camera simultaneously, for example.
If you’ve been wondering how to get started with iPhone Mirroring, or just want to learn a few handy tricks for this great feature, you’re in the right place. Our comprehensive guide will take you through everything you need to know about iPhone Mirroring, letting you use it like a pro in just a few minutes.
How to set up iPhone Mirroring
Getting started with iPhone Mirroring is pretty straightforward and just requires following a few onscreen prompts on your Mac and iPhone.
Step 1: Select the iPhone Mirroring icon in your Mac’s Dock or open it from the Launchpad or the Applications folder in Finder. In the window that appears, select Continue.
Step 2: Next, unlock your iPhone. Back on your Mac, you’ll be asked to allow notifications from your iPhone to appear on your Mac. You can allow or disallow these. You can change this setting later by opening the System Settings app and heading to Notifications > Allow notifications from iPhone.
Step 3: Once you’ve made your choice about iPhone notifications, select Get Started.
Step 4: Now, enter your Mac’s passcode or use its Touch ID button to unlock iPhone Mirroring in macOS.

Step 5: Your Mac may ask you if you want to require your Mac’s passcode or Touch ID to log in to iPhone Mirroring every time, or if you want it to automatically authenticate if your Mac is already unlocked. You can change this setting later by going to iPhone Mirroring in your Mac’s menu bar and selecting Settings.
Step 6: Your iPhone should now appear unlocked on your Mac’s desktop.
Step 7: Note that if you pick up your physical iPhone and unlock it, you’ll get a message in iPhone Mirroring on your Mac saying that the iPhone is in use and that iPhone Mirroring will be paused until you lock your phone again.
Step 8: If you have more than one iPhone signed in with your Apple Account, you can choose which one mirrors onto your Mac. To do this, open the System Settings app on your Mac and go to Desktop & Dock, then pick your iPhone from the pop-up menu underneath Use iPhone widgets.
How to use iPhone apps on your Mac in iPhone Mirroring
One of the main attractions of iPhone Mirroring is being able to use iPhone apps on your Mac. Once iPhone Mirroring is opened and unlocked on your Mac, you can interact with all of your iPhone’s apps and settings as you would if you were holding the actual device. Here’s how it’s done.
Step 1: With iPhone Mirroring unlocked, click an app icon on your iPhone’s Home Screen. You can swipe through the app by gesturing on your trackpad or using your mouse’s scroll wheel.
Step 2: For anything that you’d interact with in iOS by tapping on it, you can do so by clicking it in iPhone Mirroring. For instance, a button on a webpage that would normally be tapped in iOS can be clicked in macOS. If you’d tap and hold it in iOS, you can click and hold it in iPhone Mirroring, or just right-click it if you’re using a mouse.
Step 3: That same principle extends to text boxes and text apps. In any app that can take text input, you can start typing on your Mac’s keyboard to begin writing. You can do this in Notes, Safari, third-party apps like WhatsApp and X (formerly Twitter), and more. Keyboard shortcuts also work -- try copying and pasting some text by pressing Command-C > Command-V.

Step 4: To return to your iPhone’s Home Screen, you just need to click the black bar at the bottom of the screen (rather than clicking and dragging it up -- doing this mimics the iOS swipe gesture, but it doesn’t actually work like that in iPhone Mirroring). Alternatively, you can hover your mouse pointer at the top of the iPhone Mirroring window, then press the grid icon in the top-right corner (hover over it and it says Home Screen). You can also press the Command-1 keyboard shortcut to do the same thing.
Step 5: Next to the Home Screen button is the App Switcher icon. Click this to see the iOS App Switcher, or press Command-2. You can swipe between apps using your trackpad or by clicking and dragging through the app windows with your mouse.
Step 6: There are a few ways to open Spotlight in iPhone Mirroring. You can click the Search box at the bottom of your Home Screen, or press Command-3 on your keyboard. Another option is to swipe downwards with two fingers on the iOS Home Screen, or you can scroll downwards on your mouse’s scroll wheel (we found this last method to be a little finicky in our testing).
Step 7: When you’re using iPhone Mirroring, any audio from your iPhone plays through your Mac’s speakers. You can control the volume using your Mac’s volume keys, if you like.
Step 8: If you are watching a landscape video and select the full-screen playback button, the iPhone Mirroring app will automatically switch into landscape mode for the video. When you exit full-screen mode, it will revert back to landscape orientation. This also works for landscape games and any other apps that require this orientation.

How to transfer files between your iPhone and Mac using iPhone Mirroring
One of the best iPhone Mirroring features is its ability to transfer files from your Mac to your iPhone and vice versa, all by simply dragging and dropping the file into place. This saves you the time and hassle of having to share the item in other, more convoluted ways. You can drop the item directly into an app (such as onto a video-editing app’s timeline) or into a storage app like Files.
Step 1: To move a file from your Mac onto your iPhone, first open the app you want to send the item to in iPhone Mirroring. Next, open a Finder folder containing the file on your Mac and simply drag the item from Finder and onto the app in iPhone Mirroring. Before you release the file, you’ll see a green plus (+) appear next to your mouse pointer to indicate that the item can be added to the app you have open.
Step 2: To move a file the other way (from your iPhone onto your Mac), it’s simply a case of doing the reverse. Open the file location in iPhone Mirroring, then click and drag it out of the iPhone Mirroring app and onto a location on your Mac. This can be directly onto your desktop, into a Finder window, or into a different app.
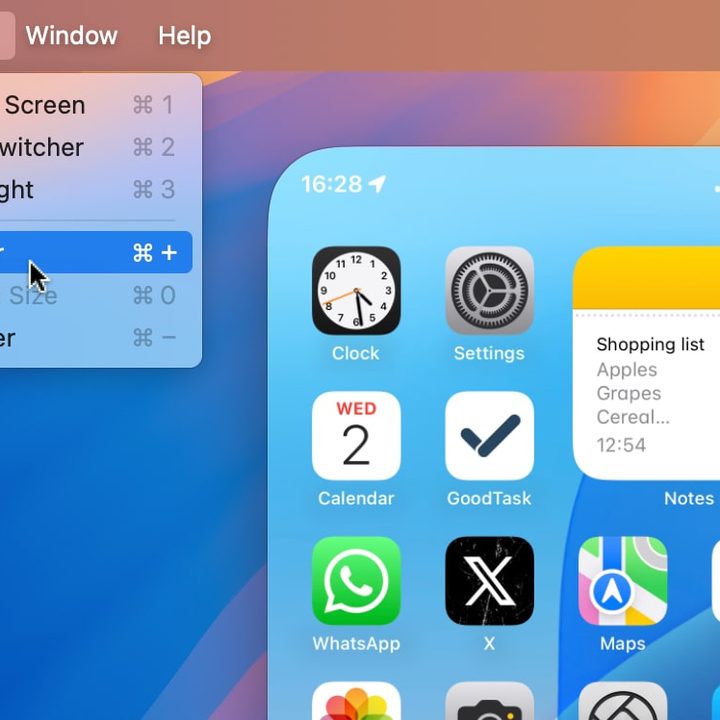
How to move and resize the iPhone Mirroring window
The iPhone Mirroring app doesn’t have to be a static thing -- its size and position can be adjusted very easily.
Step 1: You can move the iPhone Mirroring app around on your Mac’s desktop. When iPhone Mirroring is connected, move your mouse pointer to just above the iPhone Mirroring window and a bar will appear with the usual traffic light buttons to close or minimize iPhone Mirroring (you can’t make it full screen). Click and drag anywhere in this bar to move the iPhone Mirroring app window. When iPhone Mirroring is paused or disconnected, you can click anywhere in the app window (not just its top bar) to move it.
Step 2: It’s also possible to resize the iPhone Mirroring window, although your options are quite limited. Pick the View option in the menu bar, then select either Larger or Smaller (or press Command and the plus key or minus key, respectively). There’s only one “larger” size and one “smaller” option, though. To restore the app to its normal size, choose Actual Size from the View menu, or press Command-0.

How to manage notifications in iPhone Mirroring
Getting iOS notifications on your Mac enables you to address new alerts without having to switch devices. Notifications from your iPhone will appear in the top-right corner of your Mac’s display (just like regular macOS notifications), and they’ll have an iPhone badge in the corner of the app icon to help identify them.
Step 1: Once iPhone Mirroring has connected to your Mac, you’ll start seeing iOS notifications in macOS. If your iPhone is nearby, you can click an iOS notification on your Mac and the relevant app will open in iPhone Mirroring.
Step 2: After you’ve set up iPhone Mirroring, you can continue to receive iOS notifications on your Mac, even if you’re not currently using iPhone Mirroring.
Step 3: You can turn off iOS notifications in a couple of different ways. On your Mac, open the System Settings app and go to Notifications > Allow notifications from iPhone, then disable the toggle next to Allow notifications from iPhone. Alternatively, you can switch off notifications for individual apps in the list below. On your iPhone, open the Settings app, navigate to Notifications, then pick an app from the list. From there, you can either stop notifications for that app altogether by disabling the Allow Notifications toggle (this turns them off on your iPhone and Mac) or switch off the toggle next to Show on Mac.

How to turn off iPhone Mirroring
If you decide that you want to turn off iPhone Mirroring, it’s a very quick process from start to finish.
Step 1: On your iPhone, open the Settings app and go to General > AirPlay & Continuity > iPhone Mirroring. Here, you can see which Macs have been linked to your iPhone using iPhone Mirroring.
Step 2: To disconnect your iPhone from your Mac, select Edit or swipe the Mac name from right to left, select the red delete button, then choose Delete.
Step 3: To reenable iPhone Mirroring, just open the iPhone Mirroring app and follow the steps at the beginning of this guide.
Apple’s iPhone Mirroring app is a very handy way to share files between your devices, use iOS apps when your iPhone isn’t right next to you, and more. It’s easy to use and is surprisingly feature-rich considering its simple premise. Once you’ve mastered it, you might find yourself using it on a very regular basis.
Want to get more out of your Mac and improve your productivity? Learn how to use Quick Actions on MacOS.