Microsoft's Paint application is iconic, but while it's been a mainstay of Windows for decades, there is no direct equivalent on macOS. Fortunately, there are some built-in applications that can do many of the same tasks as you can in Paint, and if you need a more robust image editor, there are third-party solutions, too.
Apple's Preview is the best Paint alternative on Mac, even if it's not quite as capable. Preview doesn't allow you to create new artwork from scratch like Microsoft's Paint -- there's no blank canvas. These tools are more for annotating and highlighting photos and other files rather than creating new pieces of artwork.
Read on to find out how to enable the paint features hidden on your Mac. We’ll also go over how to use the built-in tools, and if you’re looking for something simpler, we’ll go over one-for-one Paint replacements you can download.
Note: The screenshots provided below are based on MacOS Big Sur. All the functions are still the same, but the presentation is slightly different. We also used MacOS in Dark Mode.
Finding the hidden tools in Preview
Use Finder to locate the image you want to edit in Preview.
Step 1: If the image only appears in the Photos app, right-click on the photo, select Edit With on the pop-up menu, then click Preview.
Step 2: With the Preview app open, click the Markup button resembling the tip of a pen inside a circle. As shown below, it’s located immediately left of the search field. This button displays the Markup Toolbar.

Step 3: If all you want is to quickly draw on your image, click the Pencil icon and get to it. Changes are saved as you go, so if you want to keep the original image intact, consider making a copy of the image to edit before diving in.
Cursor tools
The other tools should be fairly obvious if you’ve ever used an image-editing app. However, read on for a quick rundown of each tool, starting from the left.
Step 1: Selection Tools is the first tool on the left. It controls what mode your cursor is in, with four individual options. Here, you can select a portion of the image to move or edit. There’s the standard rectangle for selecting an area, along with an elliptical selection tool. Two additional lasso tools cling to shapes as you select an area.

Step 2: Next, the Instant Alpha tool lets you click an area of the image to “magically” select an entire region of a similar color.
Step 3: The Sketch tool allows you to draw freehand. If all you want is to quickly draw something on top of your existing image, Sketch is what you want. Preview will even automatically tidy up your sketch.
For example, if you attempt to freehand a circle, the application automatically smooths the curve. A rough circle like the image below ...

Step 4: … quickly becomes smooth, as shown below. If you don’t like the correction, an option to eradicate it appears in the bottom-left corner.

Step 5: Keep in mind that Sketch is different than Draw in that it automatically corrects lines unless you select otherwise — Draw doesn’t do that. Sketch also doesn’t register varying line widths. Draw, on the other hand, relies on a Force Touch trackpad to capture various stroke widths.
Insert shape and edit tools
The next button group mostly relates to adding specific shapes and text. It also includes the ability to resize photos.
Step 1: The Shapes tool lets you add shapes — rectangles, circles, speech bubbles, and stars — directly to an image.

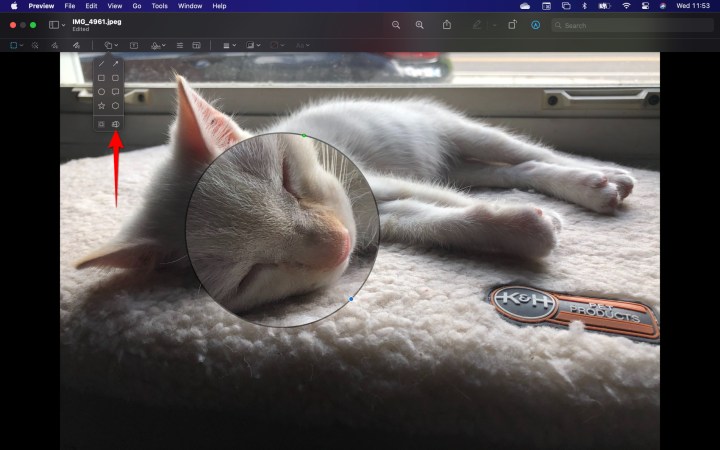
Step 2: There’s also a magnifying feature called Loupe to zoom in on something specific. Adjust the overall size using the blue handle and the magnification using the green handle.
Step 3: The Text tool inserts a text box to the center of your image. You can type whatever you want, then move the text box to its desired location. Font and color choices are handled with the Text Style tool on the right-hand side of the toolbar. You can set the font, size, color, and alignment of the current text box or the next text box.

Step 4: The Signature tool lets you insert a previously-saved signature.
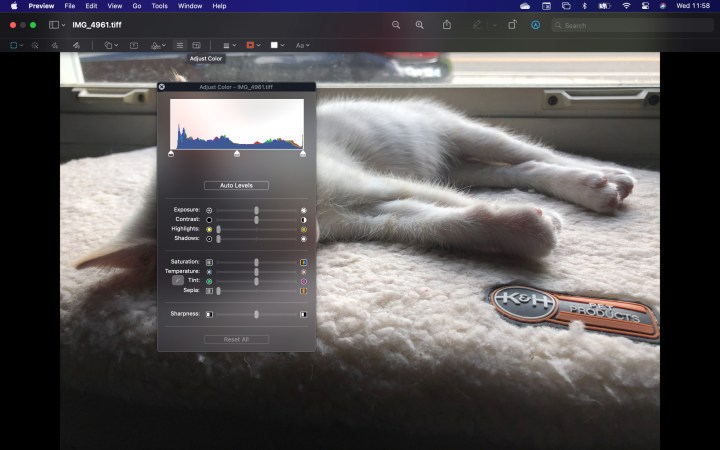
Step 5: The Adjust Color tool brings up a panel to change the contrast, saturation levels, and so on. Experienced designers will know what to do here, but everyone else could do worse than hitting Auto Levels and seeing if they like the results.
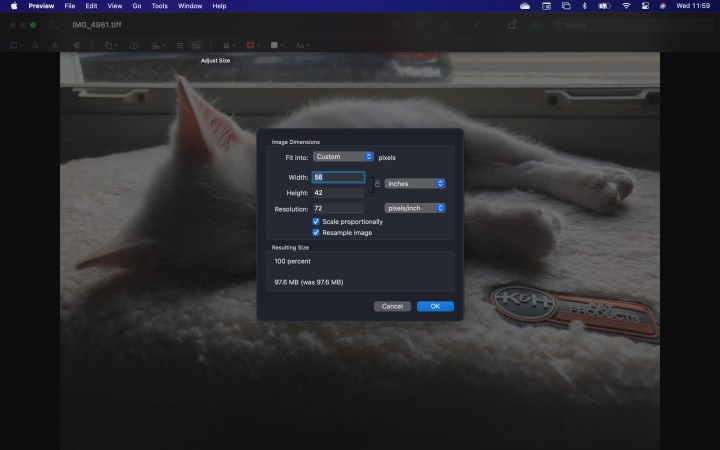
Step 6: The Adjust Size tool lets you change the size of the image using a menu.
Style and color toggles
The final section of the toolbar lets you set the thickness, colors, and fonts used by the tools we previously outlined. These tools are used before or while editing sketches and shapes.
Step 1: The Shape Style tool lets you choose the thickness of lines created by other tools. You can also use it to add a variety of textures and add a drop shadow.

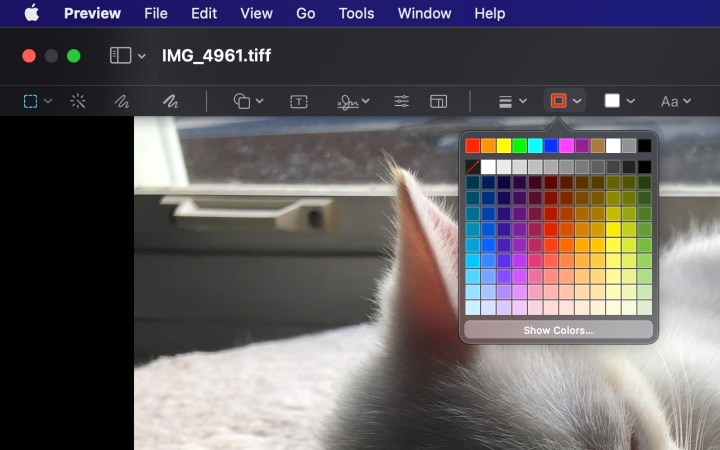
Step 2: The Border Color tool, shown below, lets you set an outline color for the current shape or the next shape you create.
Step 3: The Fill Color tool, set to the right of the Border Color tool, lets you set a shade for the inside of your current shape or the next one you create.

Menu bar
That’s it for the Markup Toolbar. You’ll notice a few features are missing, such as options that allow you to crop and rotate an image.
You can find these options by clicking Tools on the menu bar. You’ll also see most of the Markup Toolbar functions listed under Annotate on the Tools drop-down menu.
Paint alternatives for Mac
If you truly desire a stripped-down version of Paint, we recommend taking a look at Paintbrush. This simplistic editor shares the same abilities as Paint and performs them in about the same fashion.
Patina is a great Paint alternative if you don’t mind spending three dollars to receive comparable features paired with a wider scope. For what you get out of the app, the cost is just a drop in the bucket, so we think it’s a fair price for Patina.
Paintbrush and Patina are extremely similar to Microsoft’s classic Paint application. Both apps will take some practice before you’ll be able to use them effortlessly. We compare the learning time to the functions in Preview, which becomes easy to use once you give each tool a try.
Paint alternatives for Mac FAQ
Is there anything similar to Paint on Mac?
The Preview application within macOS itself offers a number of the same functions as the traditional Microsoft Paint application. It's a little overcomplicated compared to Paint, but it can do most of what you might want to use Paint for. It's also great for taking screenshots, and for splitting and combining PDFs.
Alternatively, Paintbrush and Patina are great Paint alternatives, as is Seashore, a native Mac application with an expanded feature set for more advances image and photo editing functions.
Does Mac have a Paint option?
Unfortunately macOS does not have a default photo and image manipulation tool quite like Paint. There are built-in tools and a number of comparable third-party alternatives you can use, which we list above.
No matter what app you decide to play around with, you’ll be able to learn it quickly and find it to be a fun way to be creative. Whether you recently switched to a Mac computer or laptop, or you’ve been reminiscing about your childhood Paint adventures, you can’t go wrong with any of these creative apps.
Before you spend any money on a different type of Paint app, we suggest that you give Preview a try because though it seems like a simple app, it has a lot to offer. Preview includes a great variety of features that might help you do all of the creative work you want.
Editors' Recommendations
- How to take a screenshot on a Mac
- How to change the default apps on a Mac
- This one feature could prevent motion sickness, but the Vision Pro doesn’t have it
- How to delete a user on your Mac and free up disk space
- I’m a VR enthusiast. Here’s why the Vision Pro doesn’t excite me