“The iDevices system works well, but doesn’t live up to the promise of a HomeKit-ready experience.”
- Works well when you’re home
- Customizable
- No hub necessary
- HomeKit connections are hit or miss
- Some app features are inconsistent
- Only works with iOS devices
You know that commercial where people can control their homes with their phones while on a date? That’s the idea behind the iDevices products. They let you control electronics in your home with your phone. The key is that they all need to be on the same Wi-Fi network. We found the iDevices work much better when you’re actually in the house. Still, with these products you can use your iPhone to do things like turn up the heat on the thermostat before leaving the comfort of your bed and turn on a light downstairs before you arrive home.
To see how well they worked separately and together, we tested a trio of iDevices: Thermostat, Switch, and Outdoor Switch.
Setting it all up
These products are connected via the Wi-Fi network in your home, so as long as that’s working well, you shouldn’t have an issue with the actual iDevices. The thermostat is a little barebones on features, but it’s got the basics covered and manages both heat and air conditioning. We should note that if you’re familiar with changing thermostats, it’s pretty straightforward. However, if this is your first time you might want to have a handy man standing by to help out. There’s a bit of colored wire matching required that can seem daunting for novices.

The Switch devices were the easiest to setup since you’re essentially just plugging it into an outlet and then plugging your lamp, stereo, outdoor lights, and so on into the plug. If you decide to move the Switch to another room or attach a different electronic, first delete it from the previous room and re-identify (similar to pairing) it in the iDevices app.
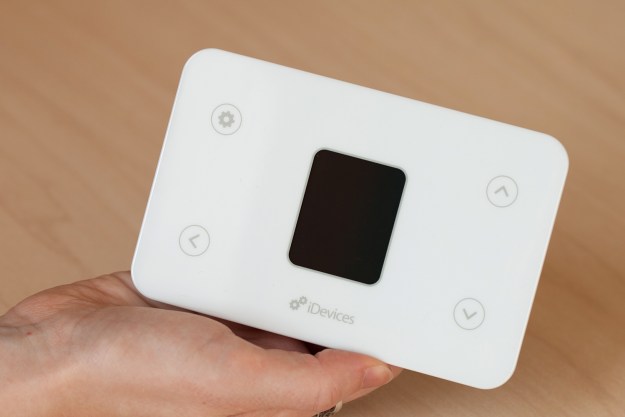
The first thing you need to do is download the free iDevices Connected app from the iTunes store. Once you have the app installed on your phone, you can start pairing devices and customizing your app. It sounds easy, but if you haven’t taken the time to set up your iCloud Keychain, you’ll probably end up scratching your head a lot. Thankfully, it’s easy to set up, but there’s no mention of this step in the included directions.
You might want to have a handy man standing by to help out when setting up the Thermostat.
After that, all you need to do is select “Add a Product” in the app and follow the prompts, which include identifying it (similar to pairing), entering the product code (included in the box), naming it, and assigning it a room. During this process, you can also take a picture to associate with the product. While the app offers sample names for things such as living room and dining room, you can also create your own, such as man cave. In fact, you can customize just about everything in the app, including products, Zones, and Scenes. You’ll see how much this comes in handy when you’re telling Siri which products to control in the home.
At this point, you can either turn on/off electronics in the home using the app or by asking Siri to do it for you: “Siri, turn on lava lamp in the man cave.” Voila! Siri lets you know the light is on. In our tests, all three products worked flawlessly in this area. Things didn’t work out so well when we wanted them to work in harmony with each other.
After you get the Thermostat installed, you’ll be able to control it from your phone, but it’s lacking some of the smart features of its competitors, like a geofencing option. This would alert the Thermostat that you’re in the area (or leaving it), so it could adjust the temperature accordingly.
Getting in the Zone
You can use the iDevices Connected app to set up Scenes and Zones. These are commands to manage a collection of rooms in the home or control multiple products with a single command, respectively. For example, say when you wake up in the morning at 8:00 am, you want the stereo to start playing, the thermostat to raise the heat to 72 degrees, and the outside lights to turn off. You can set up a Scene to do this, where you specify the day of the week and time that these events should occur.
Sounds awesome! After all, that’s the promise of how this connected home stuff should work. While it’s easy enough to setup in the app, it just wouldn’t work unless we hit the “Play Scene” option. Occasionally, it would only turn on or off a couple of items instead of all three, and there really was no telling which items it would be.

Zones, on the other hand, let you group rooms together, so you can control the devices in those rooms with just one command. This is fairly easy and straightforward to setup. Unfortunately, Siri couldn’t get this feature to work. It was clear that she understood the command because the response was “Sorry, I wasn’t able to find any devices at this time.”
If you have more than one Switch device, and you’re using them for a group of lights in the home, you can set up a Service Group. With a Service Group, you can have one word or a phrase like “party time,” and it will turn on all the lights assigned to the Service Group. This action feels similar to Scenes and Zones, but doesn’t rely on rooms or timetables to work. The good news is this feature worked well for us.
Occasionally, the app would only turn on or off a couple of items instead of all three.
These devices are HomeKit compatible, so we tried them out with a fourth-generation Apple TV. The idea is that once the Apple TV is on the same home network as the iDevices, you should be able to control those devices, using your iPhone when you’re away from home. Apple TV doesn’t use the iCloud Keychain, but you can log in to your iCloud account and then whiz, bam, boom it should all work.
We tried this multiple times and we were able to only once get the Switch to work from outside of the home. We should also point out that it would only work over Wi-Fi. So if you’re away from home, and you want to use your phone’s data to turn on the light at home, it doesn’t work. You have to connect to a Wi-Fi network.
The Switch app also offers a nice little bonus of giving you some insight into your energy usage, if you’re interested in that kind of thing.
Conclusion
All in all, if you don’t want to do too much with them, the iDevices are fun to use around the home. The Thermostat is definitely cheaper than its competition; we found it for about $77 on Amazon, while Nest (which did just update its features to make it even smarter about knowing when you’re home) is $249. However, it’s not as smart, and you might not see some of the same energy savings you might with others. The $46 Switch and $80 Outdoor Switch are easy to set up and use. Unlike some smart-home systems, the iDevices products don’t require a hub, so they can give you a simple and somewhat low-cost taste of an automated house. We just wouldn’t recommend using them to control your home while you’re away.
Editors' Recommendations
- iRobot Roomba Combo j9+ vs. iRobot Roomba Combo Essential: Which is better for you?
- The 4 best smart thermostats in 2024
- The best smart home devices for 2023
- iRobot Roomba Combo j9+ vs. Roomba Combo j7+: which is the best robot vacuum?
- iRobot Roomba Combo j9+ robot vacuum and mop is perfect for high-pile carpet