The Resident Evil series has always featured intricate puzzles for players to solve. Most of the time, these puzzles reward players with the hidden keys they need to progress. Other times, these puzzles reward them with valuable items to sell in-game. This guide will focus on the puzzles of Resident Evil Village, specifically the ones that require some thought and riddle-solving. Be sure to check out our safe codes guide and our treasure locations guide for more helpful information.
Warning! Massive spoilers ahead!
- The Resident Evil games, ranked from best to worst
- Everything you need to know before playing Resident Evil Village
- How to get every weapon in Resident Evil Village
The Maiden and Demon Crests

Ethan has it on good authority that baby Rose is in Castle Dimitrescu. However, he’ll have to solve the first puzzle thrown at him in Resident Evil Village to open the gateway. Ethan needs to find the Maiden and Demon Crests hidden in the village. Thankfully, the Maiden Crest is in plain sight.
On his way to Luiza’s house, Ethan will find a church with a typewriter inside. On the altar, surrounded by pictures of Mother Miranda and the Four Lords, is the Maiden Crest. Pick it up to add it to your inventory.

Once players make it to Luiza’s house, they’ll find the Demon Crest locked in a small box and are prompted to find a screwdriver to open the box. Progress through Luiza’s house until Ethan and Elena have escaped into the garage. From here, Ethan will need to find the Truck Key.
The Truck Key is in a drawer left of the sink in Luiza’s kitchen. Examine the Truck Key to find the screwdriver. Once Ethan escapes Luiza’s house for good, he’ll be able to use the screwdriver to obtain the Demon Crest.

Take both crests back to the door leading to Castle Dimitrescu and arrange them in their proper slots. The doors will open, and Ethan can continue the hunt for Rose.
Hall of Ablution


After finding the Courtyard Key, Ethan will follow Lady Dimitrescu up to her chambers. However, the door is locked, and Ethan will have to find another way around. He’ll stumble upon the Hall of Ablution and will have to find a way to drain the blood from the center of the room. There are four statues in each corner and a riddle reading, “Women are blind to male advances, but the poor shall take their chances to give their Lord their bounty sown, so that soon the wine may flow.”
Unfortunately, this riddle isn’t very helpful, and many players ended up resorting to guessing the proper arrangement of the statues. To solve the Hall of Ablution Puzzle:
- The two women must face each other.
- The horseman must face the woman with the wine bottle.
- The three poor men must face the horseman.
Once Ethan arranges these statues properly, the blood will drain, and a pathway will open. Proceed through to be one step close to obtaining Lady Dimitrescu’s Key.
The piano puzzle

In the Opera Hall, Ethan will find a piano ready to be played. Those with a knack for music theory can read the sheet music provided and play all the right notes. Those without a shroud of musical talent can hammer away at different keys until they inevitably play all the right notes.
You’ll see a red dot appear on the sheet music corresponding with the key you just played. Use that red dot to find the right notes. Once you play the right note, it locks in place, and you can move onto the next one.
Once solved, a secret drawer will open, and Ethan will find the Iron Insignia Key. This key is crucial to progressing the game and unlocking secret doors.
The five bells
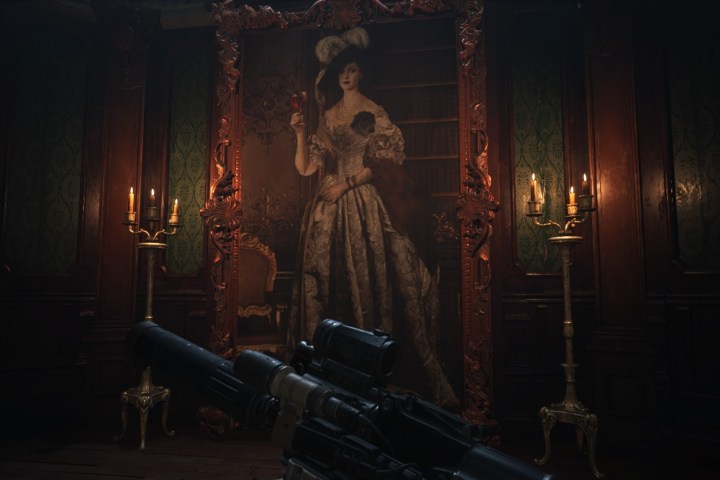
The Bells Puzzle has got players scratching their heads, especially when finding the fifth bell. Ethan will find a massive portrait of Lady Dimitrescu in a small room. In front of the portrait is an easel, and on the easel is a note reading, “Let the five bells of this hall ring out.” Here’s where to find the five bells:
- Bell 1: The first bell is to the left of the easel in plain sight. Melee this one to save ammo. You’ll have to shoot the rest.
- Bell 2: The second bell is hidden atop the Wardrobe across from the easel.
- Bell 3: You’ll see some holes in the wall behind the easel. Swinging between them is another bell. Place your crosshairs where the bell passes the hole. A well-timed shot will ring it. This one is easiest to hit from the top of the stairs in the room.
- Bell 4: While on top of those stairs, you’ll find the fourth bell on the chandelier hanging over the room. Shoot the chandelier to get a clean shot on the bell.
- Bell 5: The final bell is set off in the distance and can be seen through a window over Lady Dimitrescue’s head. You’ll need to shoot once to break the glass and again to ring the bell.
You’ll know a bell has been rung once a tiny flame appears above it. Ringing all five will reveal a secret door hidden behind the Lady Dimitrescu portrait.
The Azure Eye puzzle

After finding his way into the attic area of Castle Dimitrescu, Ethan will learn of a secret treasure locked in the dungeons below. Now, with the Iron Insignia key in hand, he can find this hidden treasure: The Azure Eye.
Head back down to the dungeon and unlock the Iron Insignia door. You’ll find enough explosives to blow the castle sky-high. However, you only need enough to destroy the cracked wall on the left side of the room. Doing so will expose a tall post with a lit flame on top.
You’ll remember a similar mechanic of lighting the swinging torches from early in Ethan’s castle adventure. However, these torches don’t light very willingly. Instead, shoot the torch on the left toward the flame. This will make it go higher than Ethan can physically push it. Then, shoot the other torch to make it swing, and when it comes back, push the lit torch towards it. This may take a few tries, but it’s doable.
Before the Dimitrescu boss fight, Ethan will find a silver ring to combine with the Azure Eye. It’s in plain sight and is very hard to miss. You’ll find it in a drawer while exploring the Hall of Pleasure. Combine the two and sell the new item to the Duke for a big reward.
The four angel busts

These busts are Ethan’s ticket out of Castle Dimitrescu. However, he’ll have to scour every inch of the castle to find them. Players will come across the masks naturally as this portion of the game plays out. The only one they might accidentally miss is the Mask of Rage.
Once on the roof, players will be prompted to take an elevator — don’t. Instead, explore the roof until you find a zipline. Ride the zipline to find the Mask of Rage. Then take the elevator.
With all the masks in hand, head back to the busts and arrange them in the following order. This order goes clockwise from the left-front statue:
- Mask of Sorrow
- Mask of Pleasure
- Mask of Joy
- Mask of Rage
If done correctly, the door in front of you will open, and you’ll soon begin the Lady Dimitrescu boss fight.
House Beneviento

Now that you’ve escaped the clutches of Lady Dimitrescu, it’s time to head up to House Beneviento. If you’re not one for creepy dolls and hallucinations, turn back. House Beneviento itself is one big puzzle from start to finish, and it all revolves around an unsettling effigy of Ethan’s presumably dead wife, Mia.
The Mia doll

Interacting with different parts of the Mia Doll will reveal clues and keys needed to escape House Beneviento. Approach each of the following parts and interact with it to find the corresponding item:
- Right shoulder: Interacting with the doll’s right shoulder will reveal the Silver Key. This key opens the locked door in the room.
- Right arm: Ethan will remove the doll’s right arms to find a symbol — three closed eyes arranged in a triangle. This is important later on.
- Left leg: If you interact with the music box at the very beginning of the game, you’ll recognize this key. You’ll also be clued in on a much-needed hint later on in House Beneviento.
- Left hand: Attached to the doll’s finger is Mia’s wedding ring. However, it’s covered in blood.
- Mouth: Inside the doll’s mouth is a film reel. However, Ethan can’t grab it with his fingers and needs the tweezers to grab it.
- Left eye: Moving the doll’s right eye will reveal another symbol. This time, it’s over a bird. This symbol corresponds with the three-eye symbol found on the right arm.
The door code

The way Ethan entered is now locked. He’ll need a passcode to unlock it and can find that code after cleaning the blood of Mia’s ring. Use the Silver Key to open the other locked door in the doll room and head over to the sink. Wash off the blood and examine the ring in your inventory. You’ll see the numbers 5, 29, and 11. Use this code to open the locked door.
Music box puzzle

Head back down the hallway until you see a door pop open. Inside, Ethan will find the music box from his and Mia’s home. You’ll have to arrange the pieces in the right order to play the box. Pay close attention to the scratches on each piece, especially on the far right and far left. Use these as a starting point and arrange the pieces accordingly. The image above is the correct order for the music box.
Use the winding key to play the music box. If done correctly, it will play a short song before opening a secret door. Inside the door is a pair of tweezers.
The projector puzzle

With the tweezers in hand, head back to the Mia Doll — open its mouth and grab the film. Head back out to the elevator and turn right. Ethan will find a room with a projector pointed toward a screen. A note on the desktop offers clues to playing the projector. Here are the clues and the corresponding film reels. Arrange them in the following order:
- Rose’s best friend in the whole wide world: The monkey toy
- She really likes this fairy tale: Village of Shadows book
- The most important thing in the world to us: Baby Rose
- A wedding gift from grandma: The music box
- Proof of Ethan’s everlasting love: Their wedding rings
Once the pieces are arranged in the correct order, the screen will fall, and a door will open. Through the door is a crawl space where Ethan will find a pair of scissors. Use the scissors to cut the bandages off the Mia Doll to find the Brass Medallion.
With the medallion in hand, head through the third door in the doll room and down the hallway. You’ll find a door with three turning dials. Place the Brass Medallion in the empty slot. Then, match the other two slots to the symbols shown on the Mia Doll. Refer to the image above for the correct arrangement.
Head down the hallway and climb into the creepy well. At the bottom, you’ll find the breaker box key. From here, House Beneviento isn’t much of a puzzle. We won’t spoil what’s to come.
The Four Lords’ Labyrinth Puzzles

Each of the Four Lords of the Village has a customized Labyrinth puzzle in their specific areas. You’ll need to find a ball depicting their personal insignias to operate the puzzles and retrieve the prize. Here are all their locations:
Lady Dimitrescu’s Labyrinth Puzzle
The puzzle itself is right next to the Duke in Castle Dimitrescu. You must open the puzzle before beginning the Lady Dimitrescu boss fight. Once she’s defeated, there is no way of getting back into the castle.
The ball to operate her puzzle is located above the Opera Hall. There’s a balcony above the main room. Head left when you first enter the area to find a tiny room tucked away. Be careful for the Moroaica asleep on the floor. The ball is in a box in the corner of the room.
Return to the Duke’s room in Castle Dimitrescu and use the ball to operate the Puzzle. Be patient with these puzzles as you maneuver the ball through. You have unlimited tries if the ball falls off. Learn where the holes are and guide the ball to the finish line.
Beneviento Labyrinth Puzzle
You won’t be able to complete the Beneviento Puzzle until after you defeat her and escape the house. On your way back to the village, you’ll be able to explore the area. The ball is in a tiny box on the ground next to a small garden. It’s near a house and the covered path leading back to the village.
Beneviento’s Labyrinth Puzzle is in the same house where you’ll inevitably find the Mistro’s Key. It’s located just up the path. You won’t have to travel too far to find both objects.
Moreau Labyrinth Puzzle
Again, players will have to complete Moreau’s area before they’re able to complete his Labyrinth Puzzle. Once you make it back to the beginning, use the crank to open the locked door. Head up the path until you find a small wooden hutch, identical to the one you found the Demon Crest in at the beginning of the game.
Moreau’s Labyrinth Puzzle is back at the beginning. Head back down the path and turn left. You’ll see a small wooden shack with the puzzle inside.
Heisenberg Labyrinth Puzzle
After you’ve shot the lights to stop the giant spinning fan, head up to the next level and climb the stairs. Here, you’ll find a map of the factory along with a movable cart. Move the cart and head through the crawl space. You’ll find the Ball Mold in the suitcase.
You’ll have to return to the foundry to make Heisenberg’s Key, so wait until you’re prompted to head back to make the ball, too.
The Puzzle itself is located right next to the Duke’s shop on level B4. Look at the Duke and turn right. You’ll see a double door straight ahead. Head through to find Heisenburg’s Labyrinth Puzzle.
Editors' Recommendations
- All cross-platform games (PS5, Xbox Series X, PS4, Xbox One, Switch, PC)
- You can play as Resident Evil 4’s Leon Kennedy in Tekken 8 … sort of
- All status effects in Lies of P and how to cure them
- All Faded Plaque puzzle solutions in Diablo 4
- The bestselling consoles of all time