
Presage is the new Exotic quest for Destiny 2‘s Season of the Chosen. It’s a mysterious journey through a semi-abandoned Cabal ship that rewards you with the Dead Man’s Tale Exotic scout rifle. You’ll need to find all 15 Presage clues to unlock find the Ghost you’re searching for and uncover the secrets of the Glykon.
Below, we’ve listed every scannable object in Presage and how to find them all. In addition to more lore and some additional dialogue, you’ll complete the Captain’s Log weekly challenge and two triumphs for finding all of the clues, as well as unlock the Gilgamesh Exotic Ghost shell.
You can start on the first batch of clues during your first playthrough. That said, we recommend using our Presage Exotic quest guide to run through the quest at least once. You need to run the quest multiple times anyway, and getting your bearings with a full run will make it much easier to track down the scannable objects you need.
More Destiny 2
- Destiny 2: How to unlock the Salvager’s Salvo ritual weapon
- Destiny 2 Battlegrounds guide: Tips and tricks for Season of the Chosen
- Destiny 2: How to unlock and upgrade the Hammer of Proving
Captain’s Log weekly challenge
There are 15 Presage clues in total, but you can’t find them all at once. You’ll uncover all of them over three runs, and you have to find all of the objects from one section before continuing on to the next. This first set will earn you the Captain’s Log weekly challenge for Season of the Chosen and unlock the triumph for the next set of clues.
Clue 1: Cabal bodies

The first scannable object stares you right in the face, so it’s tough to miss. Progress through the first section of the Glykon until you reach the point where you unlock the door to the ship’s ramp where you start the mission. Through the next door, you’ll find multiple Cabal troops suspended by overgrown plants. The scannable object is the first body you see, proudly displayed in the center of the room.
Clue 2: Scorn helmets
The Scorn helmets are located right at the start of the electric fence puzzle. For the first section, you would normally shoot some spores before jumping across the gap to make it through a spore gate. Ignore that for now and instead jump across the gap. Look in the darkness beside the spore gate for the helmets. This object is a little tricky to spot, so use Ghost to scan if you’re having trouble.
Guardian jump ship

The next object comes much later in the mission. There’s a big fight in the Glykon’s hangar that climaxes with two Abomination Majors. After everyone’s gone, head toward the back corner of the room where you would normally jump across to the next hangar. The clue is the ship sitting right next to the platforms you use to exit.
Dark Ether Canisters

After the big fight in the hangar, you’ll reach a room with an electric fence above you. This puzzle involves exposing an electrical coil that you have to destroy to temporarily disable the fence and jump through to the other side. Once you’re on the other side, go to the room to your left to activate a switch. You’ll find the scannable object to the right of that switch. Like the second clue, this one is tough to find. Scan the area with Ghost if you’re having trouble.
Calus’s Message

The final clue comes after you defeat the Locus of Communion. After taking down the final boss, you have to travel through a door in the floor and follow a series of vents to find the Dead Man’s Tale Exotic scout rifle. Fall through the door in the floor but don’t follow the linear path through the vents. Instead, turn around and jump over a small obstacle. You’ll find the clue on the other side.
Another Link in the Chain triumph
You’ll unlock the Another Link in the Chain triumph after you find the first five clues, which unlocks an additional six clues aboard the Glykon. Unlocking this triumph unlocks the next, earning you some lore and getting you one step closer to unlocking the Gilgamesh Exotic Ghost shell. According to online reports, you may need to wait until reset happens (every Tuesday during Season of the Chosen) to unlock the triumph. You won’t be able to scan the objects you need until you have the triumph available in the Triumphs screen.
Computer panel

The first clue for this step comes shortly after the first clue for the last step. Continue through the mission until you reach the room with suspended Cabal bodies. Use the pipes to platform up into the next room. Directly inside, you’ll see a computer panel and hear some new dialogue. Scan the panel for the next clue.
Scorpius turret

The second scannable object comes during the electric fence puzzle. Continue through the puzzle until you’re in the middle section with fences on either side of you. Normally, you need to jump across the gap and shoot a coil to fall through a door in the floor. Before jumping, look to your left to find the dismantled turret.
Flamethrower tank

After the big hangar fight, use the platforms outside the Glykon to jump across into another hangar. Instead of jumping on the ship and continuing forward, check the space right below the ship. The scannable object is a lone flamethrower tank sitting against the left wall.
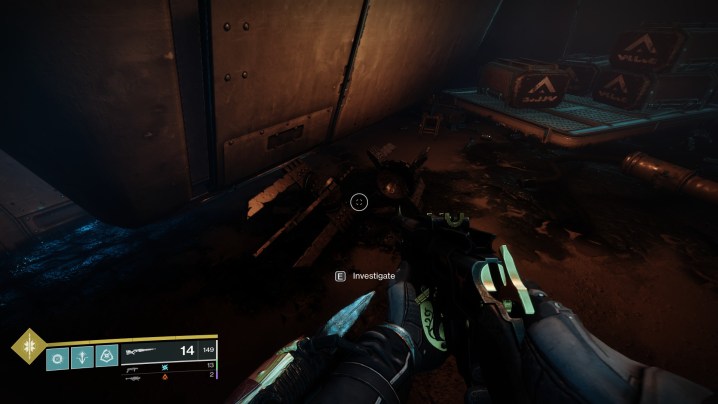
Dead Scorn

This clue comes almost immediately after the last. Use the ship to jump up to a vent shaft and pass through to enter an overgrown room. In the center, you’ll see a Scorn soldier lying on a circular table. Scan it to continue.
Dead Ghost

This clue comes shortly after the last, and it’s easy to pick up. Continue through the mission until you reach a room with two rotating platforms. You may have noticed a small ledge to the right of the second platform on previous runs, and that’s where you need to go. At the end of the ledge, you’ll find a dead Ghost on the ground. Scan it for the fifth clue of this section.
Gold pile

You can find the last clue after the boss fight with the Locus of Communion. After taking him down, fall through the floor to the room below where you find the Dead Man’s Tale rifle wrapped up in vile plant life. Instead of continuing to it, hop off the catwalk and turn around to find Calus’s gold. Scan it for the final clue of this section.
All the Scattered Pieces triumph
After finding the previous six items, you can return to Presage once again for more clues, more dialogue, and more lore. The final four clues are tied to the All the Scattered Pieces triumph. Just like the last one, you may need to wait until reset for this triumph to become available (you can check in the Triumphs page). After picking up the last clues, you’ll unlock the the Gilgamesh Exotic Ghost shell and finally uncover the mystery on the Glykon.
Robotic frame

The first clue for this third leg comes right after your first enemy encounter (a group of corrupted Screebs). The scannable object is in the room where you encounter them. After dealing with them, check the platform to the left of where they attacked you to find a robotic body lying on the floor. That’s the first clue.
Antennas

The next clue comes right after the big fight in the hangar. After the fight, continue outside using the platforms but don’t go into the next hangar. On the first platform in space, look up to spot another platform. Jump up to it and scan the series of antennas for this clue.
Computer panel

You don’t have to go far for the next clue. Head out of the first hangar using the platforms and go into the second one. To the left of the ship you need to jump on, you’ll see a raised platform. Jump on it and head to the end closest to space. There, you’ll find a computer with a bright yellow screen lying on the ground, which is the next scannable object.
Imperial gear

Right before the Locus of Communion boss, you’ll come to a small room with a canister bearing the Season of the Chosen logo and a spot to plant your clan’s flag. The scannable object is the tarp lying next to the canister. Scan it, and you’ll complete the All the Scattered Pieces triumph and unlock the Gilgamesh Ghost shell. Congrats!
Editors' Recommendations
- Destiny 2: The Final Shape’s new subclass combines light and dark
- What is dragonsplague in Dragon’s Dogma 2 and how is it cured?
- How long is Dragon’s Dogma 2?
- Helldivers 2: all Boosters and how to get them
- Bungie plots Destiny 2: The Final Shape overhaul in wake of mass layoffs


