Hidden throughout the Destiny 2 expansion, Warmind, are a bunch of strange little colored lights. It’s not immediately apparent what these little guys are, but with some investigation, you’ll find that the lights are vulnerable to bullets. Check the map when you venture to the Hellas Basin on Mars, and you’ll find that these are the 45 nodes it tracks.
The 45 test nodes on Mars are well-hidden, and their colors designate what kind of gun you need to use to destroy them: Orange for solar weapons, blue for arc, purple for void, white for kinetic, and red for the new weapon available in Warmind: the Valkyrie javelin. Destroying them unlocks two special weapons caches hidden on Mars, from which you can grab the Exotic Worldline Zero sword and the G-335 Anseris Overdrive Exotic sparrow. Here’s where to find each of the test nodes in Warmind to unlock your Exotic sword and sparrow.
Further reading
- How to get the Sleeper Simulant in Destiny 2: Warmind
- The best weapons in Destiny 2, and where to find them
- Dominate multiplayer with our Destiny 2 Crucible guide
Braytech Futurscape — 10 nodes
Rasputin model
You’ll find this one right in front of the Rasputin model, right outside of the big atrium where you’ll find Ana Bray.

Broken elevator door
Head to the alley of Braytech just beside the atrium where Ana is set up. You’ll find it full of Hive. Look for a door that’s been wedged open. You can’t go through it, but you can shoot through it to hit the test node inside.


On a tank
Find this one against a wall near the docks, where the Injection Rig Public Event takes place. You’ll need the Valkyrie javelin to destroy this one — get it during the Witches’ Ritual or by activating one of the Escalation Protocols in the area.


By the pipes
Head to the docks, near the spot where the Injection Rig public event happens, and climb up on the platform covered in tanks and pipes. If you look out across the gap to the wall beyond, you’ll find the node hidden there.


Building’s edge
Look up at the lip of the building to the right of where you spawn into the Braytech Futurescape area. You’ll find the node over on the right side.

Dam side
Head to the dam, the path that leads from Braytech Futurescape down to Glacial Drift. Hop up on the wall on the right side (if Braytech is at your back) and look at the wall to find the node on a small pipe.


In the Hive’s alley
To the side of the building where Ana Bray is posted up, you’ll find an alley the Hive have taken over. Look up on the wall to the left to spot the node.


Inside Clovis Bray
Head into the building where Ana Bray is waiting. With Ana behind you, look down the stairs for a pile of crates with a node on it.


Unreachable on the dam wall
Back on the dam, look down the path toward Glacial Drift and turn your attention to the pipes and so on atop the left side of the wall. The white node is tough to spot among the pipes, and you can’t get close to it, as there’s an invisible wall that prevents you from getting there. You can shoot at it from a distance, though.


Beneath the stairs
Not far from where the Cabal enemies spawn in the Futurescape, you’ll find a staircase that runs on the side wall of a building, near the edge of the dam. You can jump under the stairs to land on a pipe, where you’ll find the test node hiding.


Glacial Drift — 12 nodes
At the transmat point
When you first beam down in Glacial Drift, turn left and look at the bridge across a short gap that leads toward Olympus Descent. From the cliff’s edge, you should be able to see the node peeking out from one of the gaps in the side of the bridge. If you can’t hit it at a distance, you can jump to the shelf to get closer to it.

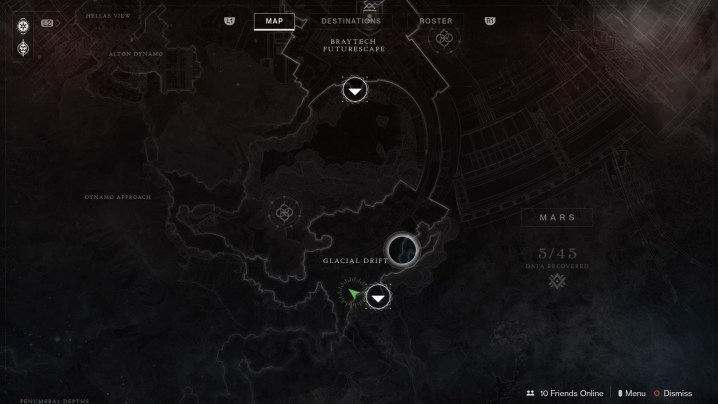
In the elevator room
Head to the beginning of the big bridge that crosses Glacial Drift, on the side closest to Dynamo Approach. You’ll find a room you can enter on that side, near an elevator shaft. Beside the door to enter it is a shelf full of junk, with a node in a small plastic container.


On the cliff wall
On the east side of Glacial Drift, face south toward where the Witches’ Ritual Public Event takes place. There’s an orange node up on the cliff wall that can be tough to spot thanks to the color.


Inside the garage
At the far end of the bridge in Glacial Drift is the path back to Braytech Futurescape, and a building beside it. Head into the big, high-ceiling garage and look up to find the node secreted on the wall above.


Above the elevator building
Standing in front of the building that houses the elevator shaft and where you found the node in the plastic container, look up at the wall. You’ll see the node above the lip there.


Beneath the bridge
Go under the bridge where the Warsat Public Event takes place and head to the side closer to the Witches’ Ritual Public Event. You’ll see the node just under the bridge. You’ll need a Valkyrie to destroy it, which you can get by activating the nearby Escalation Protocol event or waiting for the Warsat event to kick off.


Above the path to Braytech Futurescape
Looking at the big building that has the garage room and the path back toward Braytech Futurescape. There’s a balcony set high in the wall. You’ll need to climb up onto the towers on the bridge to get an angle to spot it and shoot it, and you’ll need a long-range weapon to hit it.


Hidden in a tree
Near the spot where you transmat into Glacial Drift, you’ll find a big dead tree just ahead, near where the Warsat Public Event takes place. Look up into the tree to find a red test node hidden in it. Wait for the Public Event or start an Escalation Protocol to get a javelin to destroy it.

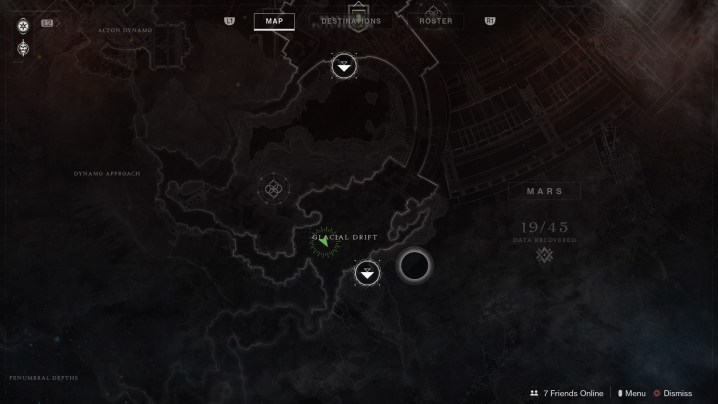
Ice cliff wall
Look up at the icy wall beside the path that leads toward Olympus Descent. There’s a node tucked away that can blend in with the white color there.


Cliffside near the Lost Sector
Head up to the north end of Glacial Drift, then turn and face south toward the big orange cliff wall. There’s a white node secreted in a divot that can be tough to hit.

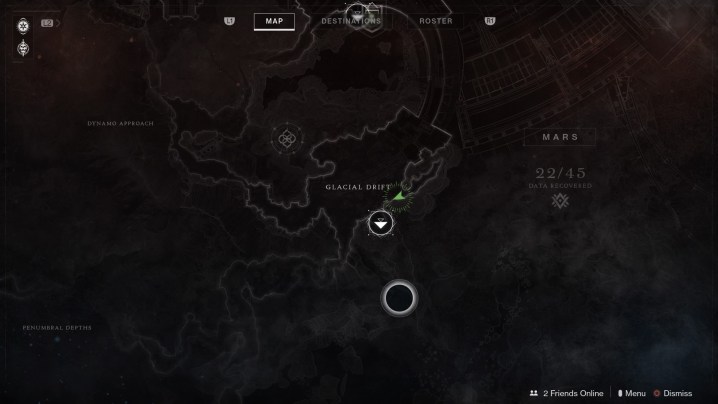
Above the garage
Face the garage at the end of the bridge and look above it, where there’s an overhang above the building’s opening. The right side has a node hidden among the lights there.


In the tunnel to Braytech Futurescape
Right inside the exit from Glacial Drift to Braytech, check the wall of the tunnel for a ventilation fan and the node on it.


Dynamo Approach — 1 node
Atop the antenna tower
Look up on the path from Glacial Drift to Dynamo Approach. There’s an antenna tower up on the rocks. On one side of the tower (the right, if you’re looking at the tower with the path to Alton Dynamo behind you) is an orange node that’s tough to spot. Look for the glimmer of the node to aim your shot.


Alton Dynamo — 9 nodes
Ice Tunnel
You’ll follow an icy tunnel through the glacier to reach the Dynamo facility. Turn around when you reach the end and backtrack to find a node that you passed on your way in.


Entry pathway
Before you hit the first door into the deeper Alton Dynamo facility, head to the edge of the platform where you can look out at the glacier beyond. There’s a node hidden on one of the struts at the edge of the platform.


Server room
Head into the Dynamo area and into the hallway where you’ll find a T-junction. Left is deeper into the Dynamo, but to the right is a big, diamond-shaped room filled with server towers (and some Hive bad guys). Turn right and follow the wall until you hit a corner. The server tower there has a node on the back side of it.


The broken door
This one’s complicated. First, start in the small room full of Hive guys that connects two larger rooms full of enemies. On the wall to the right as you enter the room are pipes, and above them a ventilation shaft. Shoot the grate covering the vent and you can climb inside. Follow the path into a hidden room, where you’ll find a computer terminal you can activate.


Now backtrack out of the vent and continue through the Dynamo, past the Hive and Cabal in the next few rooms. Continue until you hit a hallway with a computer terminal in it. You’ll see a door ahead and one to the right, the lights on which are red to indicate that it’s locked. Get close and the door will activate thanks to the computer terminal you turned on. The door will only open part-way, but you can shoot through it to destroy a node inside.


Rasputin vent room
Past the smaller room with the ventilation shaft you could climb into, you’ll enter a larger room full of Hive. In the center of it, there’s one of those Rasputin vents you have to shoot into during the Will of the Thousands Strike and the last mission of the Warmind story missions. Once you’ve cleared it, look up to spot a node in the ceiling, but behind glass. To reach it, climb the tower that you shoot to overload Rasputin during the Strike to find a way up on top of the glass, where you can shoot the node.


Off the side of the Dynamo
The next big room is full of Cabal baddies. From the door, turn left and head to the wall, where you can jump up and look off into a big cavern beyond. On the wall of the cavern, you’ll spot the node.


In the cavern room ceiling
In the same room where you just looked over the wall, look up at the ceiling high above. You’ll see icicles above and a set of pipes running across it, with a node on top.


Outside the forge room
You’ll move into another hallway with a computer console in it, with the node sitting beside it in plain sight.


Inside the forge room
Enter the room where you forge the Valkyrie to fight the worm god Xol. Clear it out, and while facing the forge in the center of the room, look up and to the left. There’s a tough-to-spot node in the ceiling. To get an angle on it, head to the other side of the room on one of the elevated platforms, and climb up on top of the cylindrical tank there.

Aurora Reach — 1 node
Starting at Braytech Futurescape and the building where you find Ana Bray, take the hallway on the left side of the building to head into Aurora Reach, toward the Rasputin Mindlab. Keep moving through the small round tube you have to duck to pass through, then follow the catwalk around to the right. You’ll find a test node resting on top of a spool.


Mindlab — 5 nodes
Outside the main lab
Look for a metal staircase as you enter the Mindlab area. Duck down and look to the left of the stairs to see a node you can’t get to, but should be able to shoot from a distance.


Behind glass in the Warsat room
As you enter the Mindlab area proper, you’ll start in a big room where you’ll stand on a Warsat, suspended up above the floor below. Straight across from the platform you’re on is a glass wall, and behind that wall is an orange test node. To get to it, look for a vent you can jump across to from the platform, which will let you creep into the area behind the glass to destroy the node.


Outside the elevator to the core
Next, you’ll drop down onto the platform right outside the climb up to the Rasputin core. In front of the diamond-shaped door going forward, head to the right side and look down to find a pipe on the other side of the railing. Jump down onto the pipe and follow it a ways until you can step to your right onto one of the struts holding it up. Look up and ahead to spot the node among the other struts above.


Below the core entrance
Keep moving until you’re in the outdoor area with staircases leading up to the door to Rasputin’s core. You’ll find more Hive here, and during other missions that have brought you to the Mindlab, you’ll have fought bad guys with the help of the Valkyrie here. Before you head up the stairs, look for a sealed glass door beside them. Go close to the door and turn left to find the node hidden inside the alcove.


In the Rasputin core
Up the stairs, you’ll find the door that leads to Rasputin’s core, which you’ve visited before in different missions. You’ll have to kill all the Hive in this area — not just the ones just outside the door, but in the area surrounding the core — to get the door to unlock. Once it does, go inside and look to the left from the catwalk to spot a distant node in the space between the outer wall and inner core room.


Olympus Descent — 3 nodes
Warsat chasm
Take the path from Glacial Drift toward Olympus Descent and keep moving until you find a Warsat on the edge of an icy cliff. Go past it and look at the side of the satellite that’s hanging over the side of the cliff. You’ll find the node on that side.


Ice chasm
Keep moving until you hit a room with a big pit in the ice in the center. It’s the one that also includes the room through which you’ll travel in order to get to the battle with Nokris in the Strange Terrain Strike as part of the Warmind story. Look down over the side of the chasm to find the node hidden among the ice.


Glacier cliff
Keep moving until you get back outside, to the spot where you first entered Hellas Basin when you kicked off the Warmind story campaign. Right before you get to the end of the cliff side where you can’t go any further, look up at the ice wall on your right side. Hidden in a nook is a tough-to-spot node. Look at the top of the wall, near where the ice forms a V.


Ma’adim Subterrane — 2 nodes
Down in the hole
Head to Glacial Drift and find the cave in the northeast corner of the map that leads to the Ma’adim Subterrane Lost Sector. Follow the path down until you reach the first big room, which is filled with Cabal. To the right of the entrance is a crashed ship that you can scan with Ghost. Look over the side of the path, down into the pit below, to spot a node on the wall.


Crashed ship
Follow the path down and to the right so that you can turn back and look over the pit back toward the entrance and the crashed ship you passed on your way in. There’s a node stuck beneath the ship.


Core Terminus Lost Sector — 2 nodes
Behind the lab door
The last two nodes are a bit tricky to get, thanks to some slightly strange requirements. Firstly, you’ll need to leave some enemies alive in order to get the second node; if you kill them all, the door you need to open will lock.
Head down to the first room in Core Terminus where Hive enemies are waiting for you. Look for a computer terminal you can activate, which will cause the Clovis Bray A.I. to explain some stuff to you. Continue to the room just outside where the Lost Sector treasure chest is found, and you’ll find another computer beside a door. Activate it then return to the first computer and you’ll now be able to open the door next to it. Shoot through it to get the node


Behind the broken door
The second node requires you to leave some enemies alive in order to reach it. This door is in the room that contains the Lost Sector chest, set in the right wall when you first enter. If you’ve accessed both computers and left enemies alive, this one will open and close intermittently, allowing you to shoot through.


The two caches
Core Terminus
The first of the two caches can be found in Core Terminus, in the first area of the Lost Sector that contains lab equipment and computers (before all the Hive corruption). Look for it along the left wall if the entrance to the Lost Sector is behind you.

You can open this cache once you’ve destroyed 35 test nodes. Inside is the Worldline Zero Exotic sword.

Olympus Descent
The second cache is in Olympus Descent and is easy to get to from the transmat location in Glacial Drift. Head into the glacier tunnel toward Olympus until you get to the room with the Warsat in it. Look over the edge of the cliff near the satellite and you’ll see ledges beneath you to which you can drop down. Jump down and kill the Hive Knight that guards the cache.

Inside, you’ll find an Exotic sparrow, the G-335 Anseris Overdrive.

Editors' Recommendations
- The best cozy games
- PlayStation Portal 2: 8 features we want in Sony’s next-gen handheld
- Dragon’s Dogma 2’s first updates will tackle its PC performance issues
- When will Final Fantasy 7 Rebirth be on PC?
- PlayStation VR2 production reportedly paused by Sony