Of all the many collectibles in God of War, the largest group and often the toughest to find are Odin’s ravens. These spectral green birds hide across the realms to keep tabs on Kratos, and often locating all 51 of them to hit them with your ax and take away the Allfather’s sight is a tough undertaking. While their green appearance can make them tough to pick out from God of War‘s lush backgrounds, though, they make a distinct tinkling sound when they’re near — and that is usually the clue needed to help find them.
If you’re struggling to find the ravens, though, fear not. We scoured Midgard and beyond to locate every single one of Odin’s ravens to help you. Here’s a compendium of every one of the ravens with images to show their locations, laid out in the order you will be able to find them as you work through God of War‘s story.
The Riverlands
Raven No. 1: As you follow the path out of the building where you fought the reavers, you will walk along a cliffside as you head back outside. The raven will be right in front of you as you exit, and right afterward, you meet Brok.
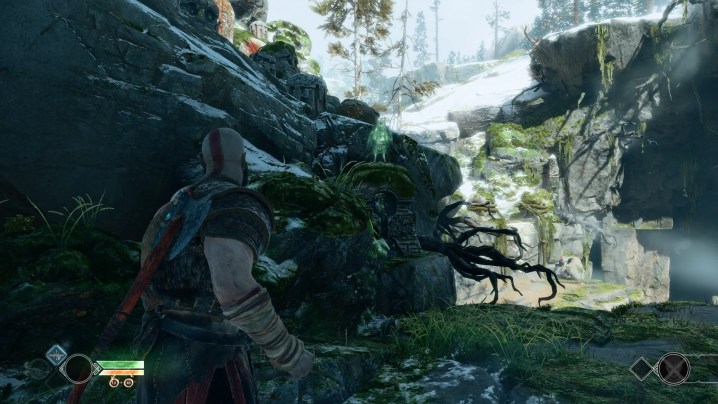
Raven No. 2
After you and Atreus solve the riddle of the runes on the revolving disc-shaped door, you enter a cave passageway. Look for a break in the rocks above as the path corners, where sunlight streams in. You will hear the raven before you see it and it’s tough to spot in the sunlight, but it’s up on the lip of the cave.

Raven No. 3
Exiting the tunnel, you enter a big area where a Fire Troll will attack. Look up at the huge, arcing rib bones lining the area. On the right side, perched on top of one, is your next raven.

Raven No. 4
A burned-out village is next on the path through the Riverlands. The first hut you see on the right has the raven perched on its roof.

Lake of Nine
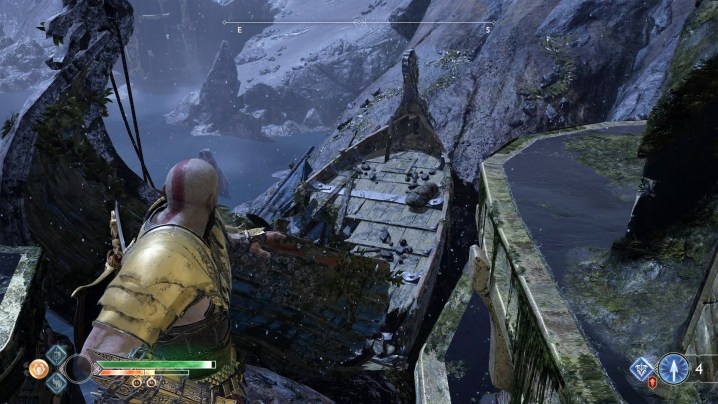
Raven No. 5: Niflheim Tower
Once the level of lake water has dropped, make for the statue of Thor and the Niflheim Tower beside it. Make your way up to the statue and look off the side to the shipwreck below, where a raven is perched.
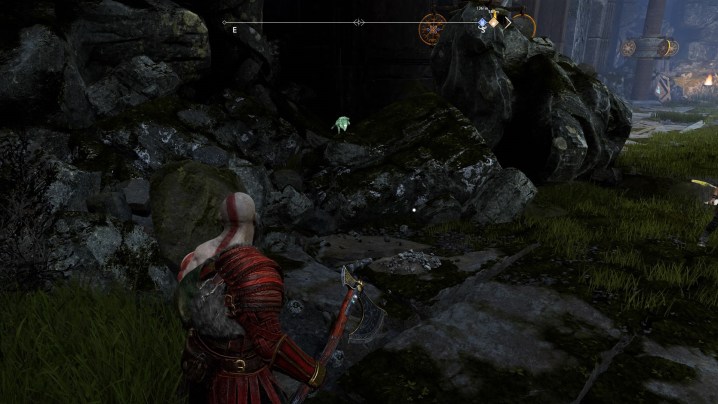
Raven No. 6: Forgotten Caverns
Land at the dock of Forgotten Caverns and head onto the beach. On it, you will find a Nornir chest to the left of where you can dock on the beach. Look up to the left of the chest to find the three rune chimes to hit on a pillar (one is at the back of the pillar), as well as a raven to take out on top of the pillar.

Raven No. 7: Veithurgard — Statue of Thor
Head to the northern end of the island and find the gold gates that led to the passage to Veithurgard. When you hit the lake on the far side of the ravine, head north to the small island with the Thor statue on it. You will find a raven circling the statue when you land.

Raven No. 8: Veithurgard, beneath the dragon
On the Veithurgard mainland, climb the stairs toward the dragon until you reach the magical pedestal binding it. Look up at the cliff beneath it for several wooden walls you can break with your ax. Behind one is a hidden raven.

Raven No. 9: Veithurgard Stronghold entrance
Work your way around to the front gate of the Veithurgard castle. When facing the door, move to the left to see around the fallen head of one of the statues that flanks the doors. The raven is just behind it.
Raven No. 1o: Volunder Mines
Back at the Lake of Nine, row east past frozen icebergs to find a pass that will take you to Volunder Mines. When you land the boat, look up to find a raven circling overhead.

Raven No. 11: Lookout Tower
Land at the dock east of the Vanaheim Tower. Look up above you to find a raven circling overhead.

Alfheim
Raven No. 12: Alfheim Lake of Light
Back on the water, head north and west along the shore until you hit Light Elf Shore. Beach the boat and look to the east toward the water. You will see one of Odin’s Ravens on a pillar beside the big root. You can hit it from the beach with your ax.

Lake of Nine
Raven No. 13: Fafnir’s Ravine elevator
Near the beach where you land, look up to the wooden scaffolding above. If you visit Fafnir’s Ravine later, this will be at the top of the elevator you take from the beach below. You will see one of Odin’s ravens perched on it.

Raven No. 14: Fafnir’s Ravine — Sindri’s Shop
After the water has been lowered the second time, you will be able to reach new locations on the Lake of Nine. Head into Fafnir’s Ravine in your boat and land at the beach. Follow the path until you find Sindri’s stand. Look up above it for one of Odin’s ravens circling.

Raven No. 15: Fafnir’s Storeroom
As you enter the forest path, Kratos will remark on Reavers in the area. Look up and left of the path, near a waterfall, to find one of Odin’s ravens perched on a tree branch.

Raven No. 16: Fafnir’s Storeroom Entrance
Head toward the opening of Fafnir’s Storeroom, which is a stone archway marked with two statues in front. Check the top of the entrance to the storeroom for a hard-to-spot raven perched overhead.

Raven No. 17: Inside Fafnir’s Storeroom
Continue into Fafnir’s Storeroom into the central hub room, where you can plug in the entry key you received. Look up above to find the raven circling.

The Mountain
Raven No. 18: Sindri’s Gondola
Return to the top of the mountain using Sindri’s gondola. At the top, look at the peak to your right to find one of Odin’s ravens.

Raven No. 19: Entry passages
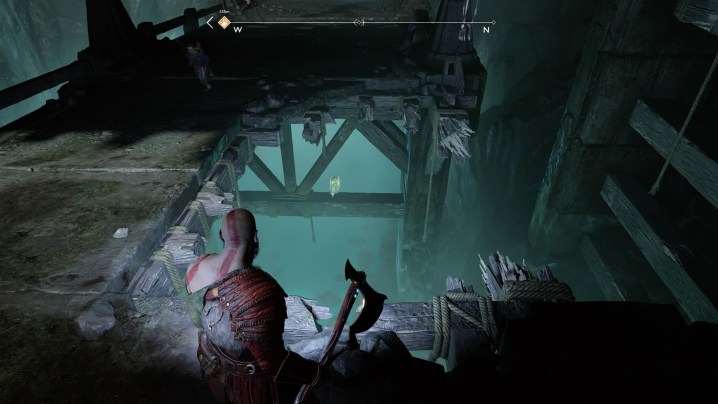
Once you pass where the Black Breath blocked the path, you will enter the dark mountain passages beyond. Eventually, you will hit a large cavern with a wooden bridge and Draugr and and a Revanant to fight. As you cross the wooden bridge, turn around and look through the hole to see a raven perched below.
Raven No. 20: Heart of the Mountain
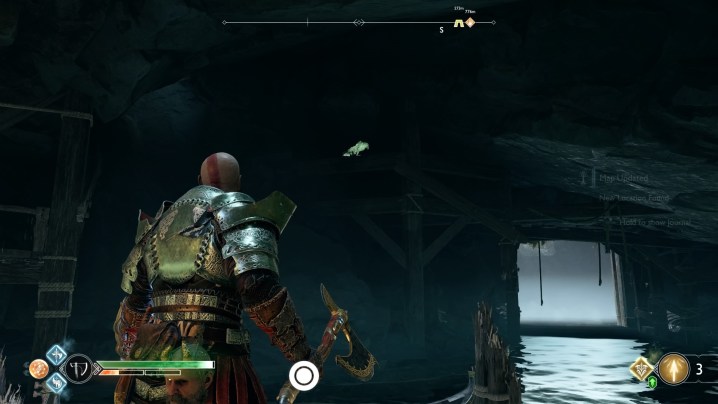
After the room with the claw, head through the torch-lit tunnel and you will pass Brok’s shop. Look up for a raven circling the nearby pit

Raven No. 21: Path to the summit
After using the cart to make a path in the next room, instead of going further down the tunnel, cross the drawbridges until you hit the northern corner of the room. Look across the pit for one of Odin’s ravens, which becomes visible if you light the nearby crystal.

Witch’s House
Raven No. 22: Front Yard
Your next trip to the Witch’s Cave will find the door to her house closed, and you need to climb up a wall path to get outside through a well. Once you’re outside, follow the path down to where the turtle is standing and look for a lore marker. Next to the lore marker is a chain you can climb. Clear the draugr and then look up and left on the path ahead to find one of Odin’s ravens. This counts as the fifth raven in the Riverlands’ raven count.

Raven No. 23: Forgotten Caverns
From Light Elf Outpost, you can now head into a cave on the east side of Forgotten caverns. Dock on the beach inside the cave near the Yggdrasil’s dew branch and climb the wall. At the top, turn around and look back down to spot one of Odin’s ravens just off the side of the cliff.

Raven No. 24: Isle of Death
With the lower water level, you can dock at the Island of Death with much more of the island exposed. After landing on the northern beach, look south for a gap in the rocks ahead, to the left of the barrier you need to blow up to continue forward, to find one of Odin’s ravens perched at eye level.

Raven No. 25: Iron Cove
From the top of the Isle of Death, you can take a zipline down into the neighboring Iron Cove. Clear the poison with the fire bottle and climb up. Look up for a fire bottle to clear the barrier ahead, where you will fight a Wulver.

Raven No. 26: Stone Falls pillar
Land at the Stone Falls beach and climb up to the area of Stone Falls that you previously visited. Stand on the western edge of the island, facing toward the waterfall. You will see one of Odin’s ravens circling a pillar of rock in the distance.

Raven No. 27: Stone Falls waterfall
From the previous raven, head back northeast toward the raised gate and hop across at the drawbridge. Look up behind you to catch sight of another raven perched above.

Raven No. 28: Landsuther Mine
East and south of the Nifelheim Tower is a cave you can now row into. Talk to Brok before you go to access a new Favor, “Deus Ex Malachite.” At the end, you will land at Landsuther Mine. As you head in, you will reach a spot where you can drop down in front of some wood scaffolding. Look for a raven perched on top of it.

Raven No. 29: Landsuther Mines elevator
Continue through the mines until you reach a control to raise an elevator out of your way in the next room, which is full of wood scaffolding. When you reach it, look up to the north to spot one of Odin’s ravens.

Raven No. 30: The Mason Channel — Njord’s Oarsmen statue
On your adventures in and around the Mason Channel, you have probably spotted the raven perched on the nose of one of the Njord’s Oarsmen’s ship statues. The best place to get it from is the eastern side of the channel, from the tower there.

Thamur’s Corpse
Raven No. 31
The story eventually takes you to Thamur’s Corpse to find the Giant’s Chisel. As soon as you land at the dock in the region, turn immediately left so you’re facing north. On the rocky wall up ahead is one of the ravens.

Raven No. 32: Hidden chamber of Odin
Once you have the Giant’s Chisel, you will exit from under Thamur’s Corpse and immediately come across one of the Hidden Chambers, where you can try the chisel out. Once you have opened the chamber, take the elevator down and go into the main chamber with the Valkyrie. Look up to find a raven perched in the tree above.

Lake of Nine
Raven No. 33: Northri Stronghold landing
Once you have the “Family Business” Favor from Sindri, head to the north end of the Lake of Nine and make your way to the Northri Stronghold. When you dock, turn around and face south to spot an Odin’s raven.
Raven No. 34: Northri Stronghold — Reaver ship
From the bow of the Reaver ship, look up a the iron grate covering the wall to the west. The raven sits above you on the grate.

(Stop! From here on out, this guide contains unavoidable story spoilers! Don’t read on until you’ve reached Helheim!)
Helheim
Raven No. 35
When you start out in Helheim, head forward along the bridge from Tyr’s Temple until you hit the spot with the ring structure above you (in Midgard, this is where you call to the World Serpent). The way ahead will be blocked.

Raven No. 36
You will soon hit a gate you cannot open and the path will take you to the left, shimming through an ice wall. Keep moving until you climb down a pair of big stone pillars to the icy floor below. As you fight some Draugr, the floor will drop. Climb the wall on the north side of the area to find the solution to getting out, and a raven on the north wall.

Raven No. 37
You will break a stone pillar to make a step that will allow you to climb out of the area where the ice floor dropped. As you walk the path, you will have a chasm to your right. Look over the side to spot the next raven below you.

After Helheim, you have everything you need to find the rest of the ravens in the game. The final 15 are largely located in the Hidden Chambers of Odin you discovered and can now open with the Giant’s Chisel, and in a few locations you might not have visited yet.
The Riverlands
Raven No. 38: Witch’s Cave — Hidden chamber
The last raven in the Riverlands region is inside the Witch’s Cave. Your exploits in the cave after the water was lowered should have helped you discover the door to a Hidden Chamber of Odin behind a red World Tree Sap barrier. Head inside and take the elevator down to the Valkyrie room. Look toward the southern wall to find the raven perched on a statue.

Wildwoods
Raven No. 39: Hidden Chamber
The only Wildwoods raven is in its Hidden Chamber of Odin. The quickest way there is from Kratos’ home; at the back of the area is a ladder covered in brambles you can now clear to backtrack quickly to the Hidden Chamber. Take the elevator down to the anteroom outside of where the Valkyrie is normally found (in this chamber, it’s a Realm Tear instead). Look up and to the right of the door in the main chamber to find one of Odin’s Ravens circling.

Foothills
Raven No. 40: Hidden chamber
Back in the Foothills, above Sindri’s shop and the gondola you once were able to ride back to the Mountain, you will find the path through the Foothills forks at a spot with one of the poisonous braziers. Head up to the right to find the Hidden Chamber secreted at the end of a tunnel. Once you’re inside the Hidden Chamber, take the elevator to the bottom and turn around as you exit that room to see the raven above you.
The Mountain
Raven No. 41: Hidden chamber
You will find the Hidden Chamber of Odin’s door in the room that formerly held the big claw you used to ride to the Heart of the Mountain. Inside, the raven is located on the left wall in the Valkyrie’s chamber.

Lake of Nine
Raven No. 42: Konunsgard Stronghold wall
Once you have the Dwarves’ Favor, “Hail to the King,” head to King’s Hollow and open the way to Konunsgard. When you reach the stronghold area, follow the path up until you can head south, toward a poison brazier. Clear it to find a chest beyond and an enemy hiding inside the room. Look west past the chest for one of Odin’s Ravens on the rocks beyond.

Raven No. 43: Konunsgard path to the dragon
From the front door of the castle, turn right and follow the path south. You will pass an ogre, then go over a creek. Climb up and jump the gaps to find a chest. From there, hop down and them climb the little ledge to the south. Look straight south toward a crag of rock that stick up among the cliffs to find a tough-to-spot Odin’s raven hopping around.

Raven No. 44: Konunsgard — Through the rune-sealed door
West of the dragon is a door sealed by runes. First, shoot the explosive crystal on the right to clear the sap that covers the first bell. Then grab a crystal from the tree stump and throw it at the bell on the left, behind the grate. The explosion should rock both the other two bells, allowing you to hit the third and open the door. Follow the path beyond until you hit a drawbridge, then look off the side to find one of Odin’s ravens.

Raven No. 45: Konunsgard dragon altar
You will eventually circle back to the altar that magically binds the dragon. Look east past the altar to the cliff wall over the chasm beyond. You will see an iron gate and one of Odin’s ravens in front of it.

Raven No. 46: Inside Konunsgard Stronghold
After you find the third entry key, you will finally open the door into Konunsgard Stronghold. You will climb stairs as you enter; turn right as you head up to find a Giant Shrine. Turn west from the shrine and climb up to find a chest. Look above it toward the sunlight to spot a raven.

Helheim
Raven No. 47: Bridge of the Damned
After your second return to Helheim, you will be free to revisit from the Realm Travel Room in Tyr’s Temple with Atreus. Start by heading to the big gate at the end of the bridge; your first time here, you had to go around this by shimmying through a crack in the ice down to the left. Once you’re through, look for a spot where you can climb up onto the walkway crossing the bridge, which has the Winds of Hel gate set in it. Turn right to find a World Tree Sap barrier you can blow up with a lightning arrow.

Raven No. 48: Hidden chamber entrance
Return to the Bridge of the Damned and continue forward to the second walkway by opening the gates. Climb up and head left to find another World Tree Sap barrier. Beyond is the door to a hidden chamber, but right inside the room in front of it is a statue with a raven perched above it.

Raven No. 49: Inside the hidden chamber
Open the door to the hidden chamber and take the elevator down. At the bottom, walk up the stairs, rather than going into the Valkyrie’s room, to find a chest and a raven just above it.

Alfheim
Raven No. 50: Lake of Light hidden chamber
Return to Alfheim when you can to visit its hidden chamber, located on the northern beach of the Lake of Light. Head inside and down the elevator. Inside the Valkyrie’s chamber, look up to the left — south — to spot one of Odin’s ravens on the lip of the wall.

Lake of Nine
Raven No. 51: Cliffs of the Raven
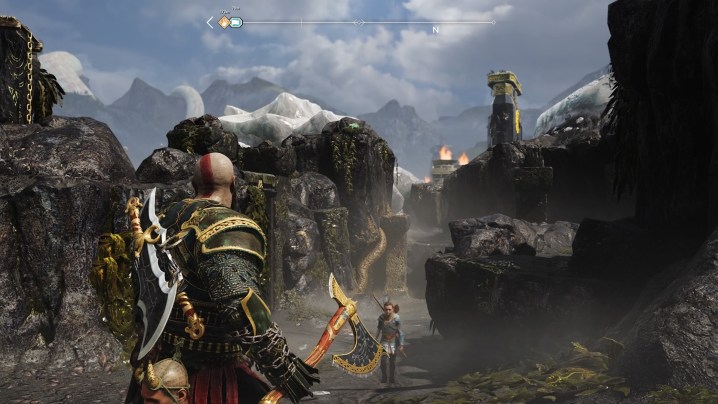
Come back to the Cliffs of the Raven on the Lake of Nine once you’ve returned from Helheim. Work your way south from the beach until you get to the troll’s body, then go around it and head down the path leading north toward a gate. Look up at the cliff on the left to spot the raven.
Editors' Recommendations
- Best Amulet Enchantments and Relics in God of War Ragnarok: Valhalla
- God of War TV show officially ordered to series by Amazon
- The best armor sets in God of War Ragnarok
- God of War Ragnarok: all Ratatasks and rewards
- How long is God of War Ragnarok?