
The Apex Predator mission in Hitman 3 is a true return to form for the franchise. Berlin takes an old-school approach to the Hitman formula and builds on it, removing story missions from the level entirely while upping the needed body count. You need to kill a certain number of ICA agents to end the mission, but these agents don’t show up on your map. To help you make it to the end, here’s how to find all the ICA agents in Berlin.
Further reading
- How to solve the Dartmoor murder mystery in Hitman 3
- Hitman 3 beginner’s guide
- How to import Hitman 1 and 2 levels into Hitman 3
How many ICA agents do you need to eliminate in Berlin?

Berlin has a total of 11 ICA agents, but you only need to eliminate five to complete the mission. As you take out ICA agents, their radio chatter will grow more and more frantic, and after you take out five of them, the remaining agents will evacuate. This could be a good thing depending on what you’re doing. The Drive It Home challenge actually tasks you with eliminating the remaining ICA agents as they’re evacuating.
The tricky bit is that none of the agents are marked on your map, you have to spy on them to identify them, and the Berlin level doesn’t feature story missions (so you’re completely on your own). Taking out every agent is tricky enough, let alone identifying them. Below, we’ve rounded up all the ICA agent locations in Berlin, as well as some tips for taking them out.
Most agents drop a useful item for the rest of the mission, so although you don’t have to follow the order we have them listed, it’ll make getting through the level easier.
How to find all the ICA agents in Berlin
Agent Price

Challenging gameplay is no excuse for good level design, and that’s the purpose Price serves. After the lengthy intro, you’ll need to travel through the woods before reaching the club where most of the Berlin mission takes place. On your way down, just after the watchtower, you’ll spot Price patrolling. There isn’t anyone else up here, so deal with him however you want. There’s a rock just above where he’s patrolling that you can hide behind.
Agent Swan

Agent Swan patrols the Chill Out and Juice Bar areas on level 0. Both of the areas are filled with people, so it’s hard to get Agent Swan alone. Instead, we recommend dressing up as a bartender and giving him some poison. First, the disguise. In the back of the Chill Out bar, you can climb through the window into a small, private area. There, you’ll find some poison, as well as convenient spot for subduing a bar worker for the disguise (there’s also just a bartender disguise sitting on the floor in this area).
Head back out and go over to the Juice Bar. Circle around the right side (by the water), and you’ll spot two bikers standing in front of a door with a camera. Go past them, and you’ll notice some bushes. Go in through the bushes, quickly throwing objects at the bikers to knock them out. Then, hide their bodies in the bushes, avoiding the camera.
Go through the door and enter the Juice Bar. After waiting a few seconds, you’ll get the option to serve drinks. Wait until Agent Swan comes up, poison his drink before serving, and follow him to the bathroom for the kill (if you’re not using lethal poison). He drops the Electric Lock Hack.
Agent Davenport

The next agent is close by and very easy to take out. Davenport patrols between the wardrobe and the Chill Out bar. At the Chill Out bar, he’ll stop at the table nearest the door to the club and take a drink. Still dressed as a bartender, go up and poison his drink before he arrives. Then, follow him to the bathroom and take him out if you didn’t use lethal poison. He’ll drop a lockpick, which will be very useful later on.
Agent Thames

Agent Thames is another easy target. Head back outside the club and go around the side to the west. Keep the bartender disguise here, which allows you to bypass the two guard positions on the way. On the side, you’ll spot a crane holding a concrete tube, two normal club staff members standing around, and Agent Thames. The easiest way to deal with him is to wait until Thames gets on the radio and sneak up behind to take him out. The distance is far enough from the other guards that they won’t notice. Dispatch his body in the nearby bushes.
If you’re looking for a more interesting kill, pick up a fuse somewhere in the level and put it in the electrical panel below the crane. Then, when Thames walks by, drop the concrete tube on him to get the kill and complete a challenge. No matter how you deal with Thames, he’ll drop the Remote Audio Distraction Mk3.
Agent Banner

Agent Banner is easy to take out, but getting him in the right spot is tough. You can find Banner on level –1 on the gangway over the dance floor. He stands there and doesn’t move, but there are two employees standing nearby. Take them out using the many distractions available around the area and hide their bodies. Also, be sure to pick up one of their disguises (you’ll need one in the area).
As for Banner, you can push him over the rail if you want to cause a stir on the dance floor, or just snap his neck and hide his body. He’ll drop a Lethal Syringe.
Agent Chamberlain

Agent Chamberlain is a little tricky to get alone if you don’t know what to do. He patrols the dance floor on level –2, going between the dance floor itself and a security room to the side. The easiest way to deal with him is to head to the biker garage near the back of the level and pick up a brick of cocaine. Then, head back to the dance floor and wait for Chamberlain to pass through the dancers (this is part of his cycle). When he’s on the dance floor, toss the cocaine brick into one of the fans near the front of the dance floor.
Cocaine will blow across the floor, and Chamberlain will get sick. Follow him back to the bathroom in the security room to drown him. When you do, he’ll drop the Semtex Demo Block.
Agent Montgomery

Agent Montgomery is tough to find and even tougher to kill. He has a long cycle, patrolling between the Projection Bar on level –1 to the dance floor gangway to the security room on level –2. To make matters worse, he has a body guard with him at all times. We had the best luck waiting for him to come down to the security room on level –2. He’ll wait in a back area near the stairs and chat on his radio. Use either the vents above to throw something lethal or sneak up behind him once he comes down the stairs.
Agent Green

Agent Green looks a lot more difficult to eliminate than he is. You’ll find him on the level 2 roof above the club, patrolling back and forth between two other guards sitting in chairs. Although he’s in line of sight of both guards, you can subdue Agent Green in the middle of his patrol without being spotted. Once you take him out, he’ll drop a knife and the radio tower key.
Agent Tremaine

Agent Tremaine is one of three agents scattered throughout the biker’s hideout. To find him, head to the second level of the biker hideout and go to the room farthest west. There, you’ll spot Agent Temaine in the corner near a sniper rifle, as well as another biker patrolling the area. Wait for the biker to move to a private area (he will as part of his cycle) and subdue him. Then, take care of Agent Tremaine in the corner.
There’s a challenge for shooting Tremaine with his own rifle. To do this, subdue him and pick up the rifle, then shoot him once he’s unconscious.
Agent Lowenthal
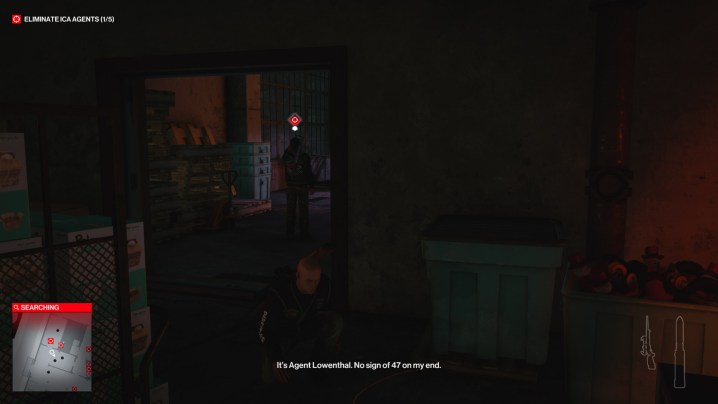
Agent Lowenthal is the next biker agent, and you can find him on level 0 of the biker hideout, patrolling between the garage and the drug packaging room. Between them is a hallway where another biker is shoveling something into a furnace. Wait outside this hallway on the drug packaging end until Lowenthal starts going down the hall. Follow behind him until he reaches the end, at which point he’ll get on his radio and reveal himself. Deal with him here — the person shoveling items in the furnace won’t see — and use the empty furnace to dispatch his body (this also completes a challenge).
Agent Rhodes

Agent Rhodes patrols between the grow house and a security room on level 1 of the biker hideout. He’ll jump on the radio in the grow room, so post there until you see him enter, and wait until he identifies himself.
There are a couple of ways to deal with him depending on how you want to do it. In the grow house, there’s a corner toward the west where you can lure Rhodes and take him out silently. There are other guards in the room, so make sure to save beforehand.
Alternatively, you can pick up one of the many lethal throwables around the biker hideout and wait by the security room. There’s an open window in the room where you can wait. Rhodes will eventually come and wait by the window, allowing you to use your lethal throwable without being spotted.
Editors' Recommendations
- All companions in Baldur’s Gate 3 and how to get them
- Persona 3 Reload leads a surprisingly strong batch of Xbox Game Pass additions
- How to rank up fast in Modern Warfare 3: best ways to farm XP
- Where to find Benryn and Mirileth’s dowry in Baldur’s Gate 3
- How to change your appearance in Baldur’s Gate 3


