Minecraft has changed significantly since its inception, but one thing certainly hasn’t: Crafting worlds with friends and family is just plain fun. With only a few clicks of a mouse or controller button, players can design their own persistent worlds with space for others to gather and create.
Whether you’re hosting a server for a few friends or launching a massive effort to recreate your favorite TV show’s world, there are several different options for hosting a Minecraft server. Here are a few ways you can create your own private Minecraft multiplayer oasis. And if you don’t already have the game, here’s how to get Minecraft for free.
Minecraft Realms
Mojang discontinued Minecraft Realms in December 2019. It was a single-subscription service that allowed one player to host a world on a cloud-based server. In its place are now two separate subscription models: Realms Plus for all editions with Minecraft Marketplace (mobile, Windows 10, Xbox One, Nintendo Switch) and the remains of the old subscription service rebranded as Realms for Minecraft: Java Edition.
Here are the details for both:
| Realms Plus | Realms for Java Edition |
| $7.99 per month | $7.99 per month |
| Instant access to more than 50 Marketplace items | Supports user-made content |
| Supports 2 or 10 players simultaneously | Supports two or 10 players simultaneously |
| Supports only one world per subscription | Supports only one world per subscription |
| Requires Xbox Live and Switch online services (consoles) | Not compatible with non-Java versions |
For gamers on mobile, console, and Windows 10, Realms Plus is your best bet for cheap and simple hosting. It’s a fast and easy way to both create and manage a persistent Minecraft world without any prior knowledge of hosting. Realms Plus subscribers are essentially renting a space on a Microsoft Azure cloud server, so there is a reduced degree of freedom should you choose to opt for Mojang’s hosting solution.
With more than 50 Marketplace items and new content added each month, there will always be something to explore beyond your own Realm. Your world and add-ons are stored securely in the cloud, so your friends are free to hop into the world even if you aren’t available.
Here’s how to create a Minecraft Realms Plus world:
Step 1: Select Play.
Step 2: Select Create New.
Step 3: Select Create New World.
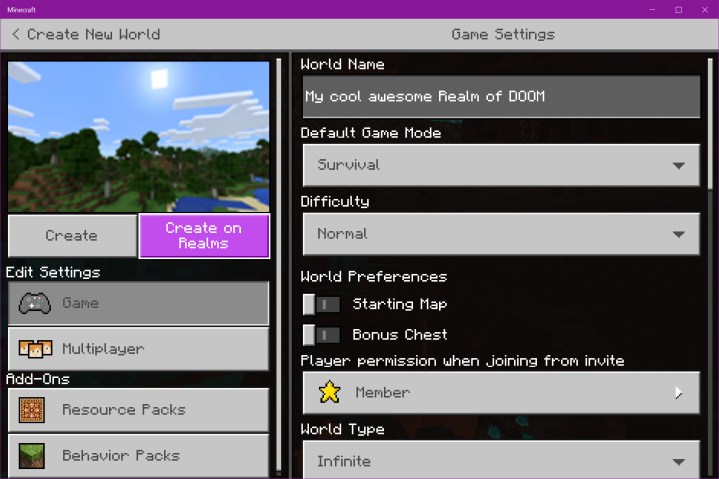
Step 4: Configure the world.
Step 5: Select Create on Realms.
Step 6: Select a 10-player or two-player Realm.
Step 7: Set up the Realms Plus subscription.
To modify the Realm, do the following:

Step 1: Select Play.
Step 2: Select the Pencil icon next to the Realm.
Step 3: Select Game to rename the world, change the difficulty, change the mode, and activate cheats.
Step 4: Select Members to add friends, send a join request, and change the user status. For the latter, users can be a Visitor, Member, or Operator.
Step 5: Select Resource Packs and/or Behavior Packs to enable and disable add-ons.
Be the host!
If you’d rather not have a subscription, the next best way to share a world with friends is to set up a PC to serve as a host.
Mobile, console, and Windows 10
For the mobile, console, and Windows 10 versions of Minecraft, multiplayer is enabled by default when creating a new world. If you initially disabled multiplayer but now want to play with friends, here’s how to turn it back on:
Step 1: Select Play.
Step 2: Select the Pencil icon next to your world.
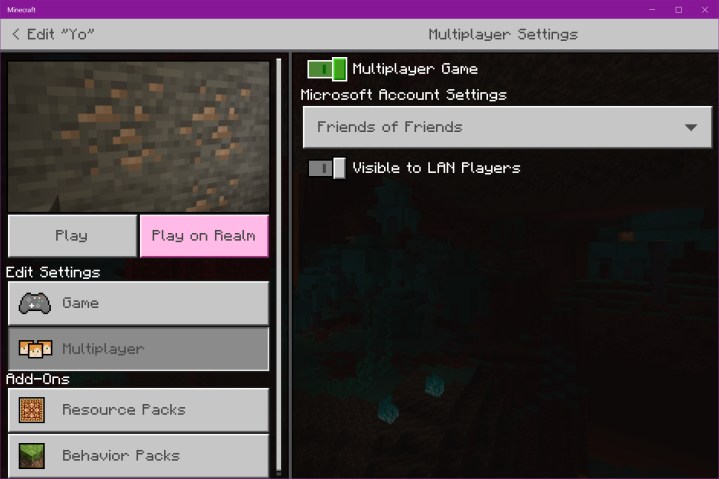
Step 3: Select Multiplayer listed on the left.
Step 4: Select the Toggle next to Multiplayer Game.
Step 5: Select the Toggle next to Visible for LAN Players for local multiplayer support.
Because this version of Minecraft uses Xbox Live, you can play with anyone logged in to their Microsoft Account. You can also change the multiplayer settings to Invite Only, allow Only Friends to connect, or allow Friends of Friends to connect.
Minecraft: Java Edition — LAN play

Playing multiplayer on this version isn’t quite so cut and dry. You can host a world on a local network using the integrated multiplayer component. For online multiplayer, however, you’ll need Mojang’s standalone server software.
Here’s how to enable multiplayer within Minecraft: Java Edition:
Step 1: Select Singleplayer.
Step 2: Create a new world or open an existing world.
Step 3: Press the Esc key.
Step 4: Select Open to LAN on the menu.
Step 5: Select the game mode, enable or disable cheats, and then select Start LAN World.
Other players on the network can now select Multiplayer and join your world. However, keep in mind that you need a decent PC to host a multiplayer Minecraft world. Not only is the game rendering the world on your screen, but it’s sending the world to all other players and synchronizing all player input. This can be taxing on PCs with low hardware specs.
Minecraft: Java Edition — online play
If you’d rather create a dedicated server, there are three options provided by Mojang:
- Minecraft: Java Edition Server
- Windows Server Software for Windows (alpha)
- Ubuntu Server Software for Ubuntu
Here we’ll use the Java Edition version on Windows. Before starting, make sure you have the latest version of Java installed on your PC.
Step 1: Download the Server.jar file from Mojang to a dedicated folder, as you’ll be required to extract files.
Step 2: Right-click on the Server.jar file and select Open to extract a few files.

Step 3: Open the EULA file, change the eula=false line to eula=true, and then save the file. The server won’t run without agreeing to the terms.
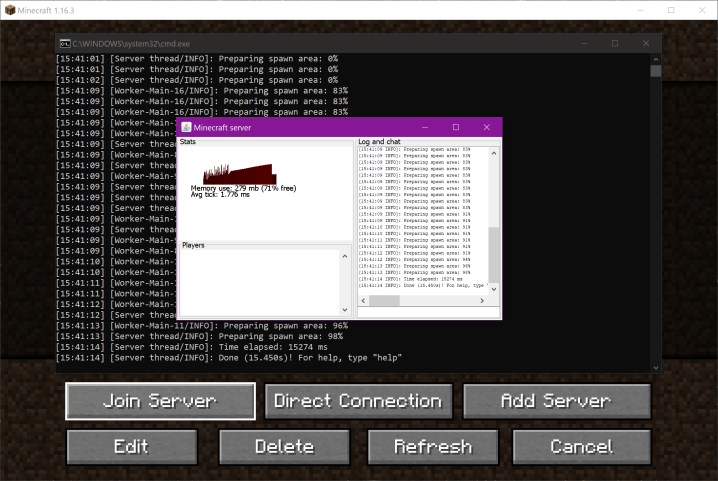
Step 4: Right-click on the Server.jar file and select Open on the pop-up menu. Additional files will extract to your folder as the Minecraft Server window appears on the screen.
Step 5: To modify the world’s properties, right-click on the server.properties file and select Open With on the pop-up menu, followed by Notepad.
With this file open, you can change the maximum number of players, the game mode, enable player-versus-player, set the maximum world size, and more. Restart the server if you made any changes while it’s running.
With the server portion configured, you need to create a direct path.
Minecraft: Java Edition — enable remote play
Keep in mind that for remote gamers to connect to your server, you’ll need to know two things: Your public-facing IP address assigned to your modem and the IP address of the local PC running your server. For the latter, we suggest going into the router and assigning a static IP address so the PC’s address never changes.
You will also need to use port forwarding so the Minecraft packets know exactly where to go. Again, the ideal scenario is to assign a static IP address to the server PC. The port Minecraft requires is: 25565.
Essentially, the path will look something like this: incoming > modem > router > static IP address via port 25565.
Here are a few guides to help you along:
How to launch the Java Edition server
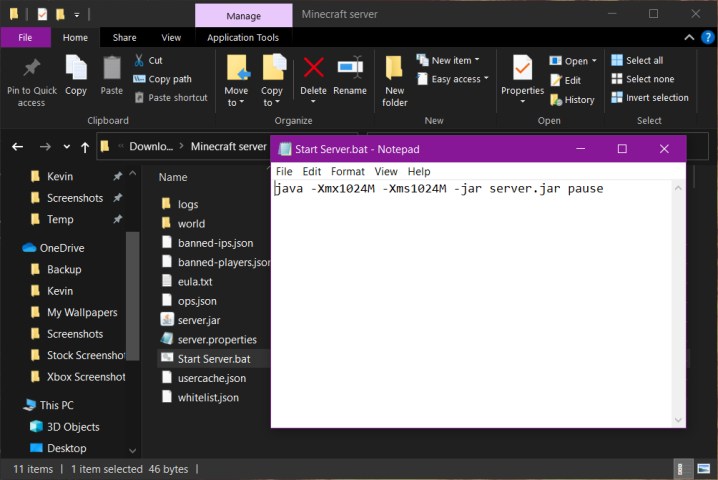
Instead of right-clicking on the sever.jar file to launch the server, we can create a BAT file and insert a modified command to help the server run more smoothly.
Step 1: Right-click within the folder and select New followed by Text Document on the pop-up menus.
Step 2: Rename the file so you can recognize it later.
Step 3: Open the file and enter the following command: java -Xmx1024M -Xms1024M -jar server.jar pause
The first two numbers allocate memory to the server, while “pause” keeps the server window open.
Step 4: Save the file and then rename its extension to “.bat” (short for batch file).
Step 5: Double-click the new BAT file to launch the server.
Connect to the server and create a world
Playing Minecraft on the same machine running your server isn’t a good idea given the resources needed to run both. Doing so will likely create a laggy experience for everyone. We suggest running Minecraft on another PC if possible.
Step 1: Select Multiplayer.
Step 2: Check the box next to Do Not Show This Screen Again, and then select Proceed if this is the first time you’re nagged about multiplayer.
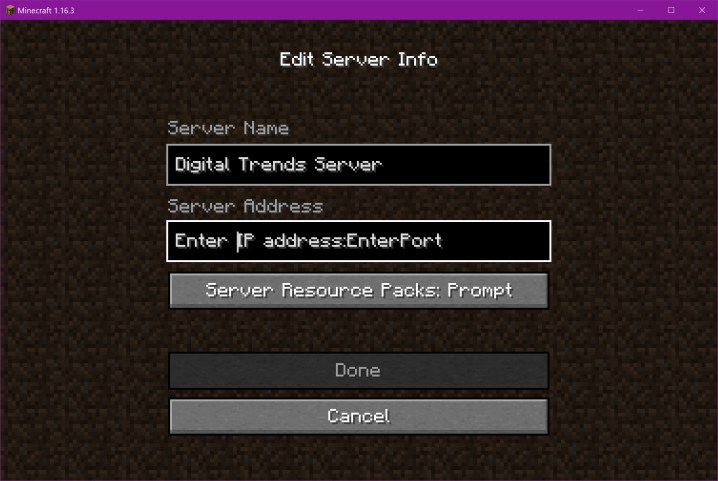
Step 3: Select Add Server.
Step 4: Enter the server name.
Step 5: To allow remote players, enter the public-facing address assigned to your modem, along with the port. For example, the IP address would be something like 177.98.119.228:25565.
For local network play, enter the server PC’s network address. You likely don’t need to add the port.
Step 6: Select Done to complete.
Craftbukkit

Craftbukkit is a modified version of Mojang’s “vanilla” server software for Minecraft: Java Edition to run Bukkit plugins. It sets up just like Mojang’s version: Extract the files, agree to the EULA, modify the server.properties file, create the world, and so on. Follow the directions listed above or consult the Bukkit wiki. However, note that the BAT file command should read as follows: java -Xms1024M -Xmx1024M -jar craftbukkit.jar -o true pause
Bukkit maintains a forum of user-created plugins designed specifically for Craftbukkit, providing a solution for managing the effects of many plugins together in-game, without causing conflicts or reducing performance. There are 17 categories in all, including admin tools, chat-related tools, role-playing elements, world generators, and so much more.
To use a plugin, the JAR file(s) must be placed in a specific directory. Unlike Mojang’s server software, extracting the craftbukkit.jar file creates a plugins folder. This is where all downloaded plugins must reside. Note that the server must be restarted each time a plugin is added to the plugins directory.
Connecting to a Bukkit server is similar to connecting to a standard server — clients do not need to install the mods running host-side. Ideally, you would run Bukkit or the regular Minecraft server software on a second PC to cut down on latency.
Additional paid server options

Other third-party, subscription-based, and free options are available if you’d rather not take the Realms route.
There are many benefits to using a third-party server, including easy setup, consistent access, and technical support. There are more paid services available than the free offerings, however, and a lot of them can be found on the Minecraft forums starting at under $5 a month, with rates increasing for use of extra server software and for more allowed connections.
While setting up your own server can be complicated and require some networking knowledge, most of the paid services designed specifically for Minecraft automate the process. Setup is usually as simple as picking the number of players, deciding the type of world, then hitting go. Configuring and restarting the server is also easy thanks to web interfaces that deal with configuration files and parameters in more robust ways than a user might if they were just editing the files themselves.
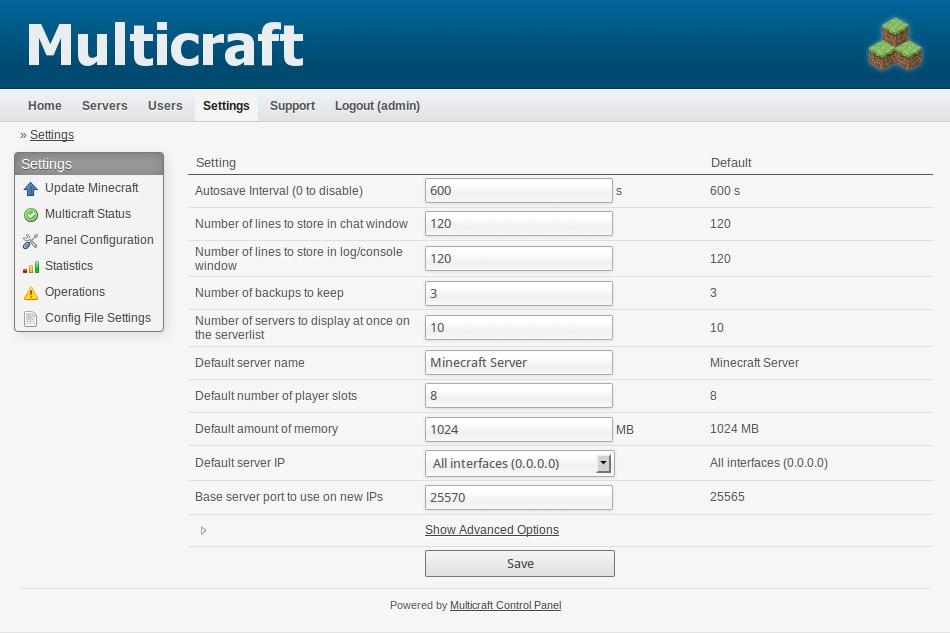
Some systems like Multicraft (pictured below) are implemented by hosting companies to allow users to access the controls to their servers in limited ways while leaving some configuration decisions in the hands of the host.
The port and IP addresses will be listed on the administration page for the server, allowing players to easily join the game. Using a server like this also gives players a fair amount of freedom because they can ban other users or reboot the server when needed.
Any service that has servers with a reasonable amount of RAM can be used with Minecraft or Craftbukkit when an FTP client uploads with it. This makes them ideal for those looking for custom DIY solutions. You can get an acceptable server from Amazon or other online retailers at reasonable prices or pay a little more to increase the memory for smoother gameplay.
If you need to have freedom with settings and files and don’t mind going without web-based control software, this type of setup will do the trick. Using your server to play the games will allow you more freedom to change the settings to your liking.
Editors' Recommendations
- All Fallout 4 cheats and console commands
- Is Call of Duty: Modern Warfare 3 cross-platform?
- All items in Content Warning: gadgets, lights, and more
- Every character confirmed in Marvel Rivals
- Where to find the Unmaking Arrow in Dragon’s Dogma 2