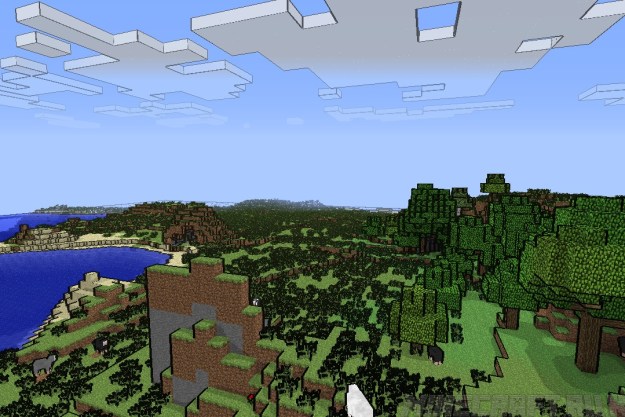
If you’re playing Minecraft in Survival Mode, potions can come in handy. You can drink a brew that enhances your melee attacks, your speed, or allows you to breathe underwater. This guide shows you how to make potions in Minecraft — even those you can throw at enemies.
Gamers playing in Creative Mode don’t really need potions. Still, they’re fun to create, though the road to obtaining every ingredient manually can be quite long. Your journey includes taking a trip into the Nether, fishing, hunting rabbits, and more.
Related guides

Gather your materials
The list of materials you need is rather long, and five of them reside in the Nether. That means you need to build a portal, enter the underworld, defeat monsters, and find a Nether Fortress without getting lost.
Remember, each block traveled in the Nether equals eight blocks traveled in the Overworld. You may want to consider leaving markers, like torches, that lead you back to the portal. Switching to “Peaceful” mode probably wouldn’t be a bad idea either — at least until you return home.
Step 1: Build a portal to the Netherworld.
Step 2: Enter the Netherworld and find a Nether Fortress.
Step 3: Gather the Nether ingredients:
- Blaze Rods — Dropped by Blazes in Nether Fortresses that are used to craft Blaze Powder.
- Ghast Tear — Dropped by Ghasts that hover over lava.
- Magma Cream — Dropped by Magma Cubes or crafted from one (1) Blaze Powder and one (1) Slimeball.
- Nether Wart — Located in Nether Fortresses growing in Soul Sand.
- Soul Sand — Used to grow more Nether Wart in the Overworld (optional).
Step 4: Return to the Overworld to continue gathering ingredients:
- Dragon’s Breath — Dropped by an Ender Dragon.
- Glistering Melon — Crafted using one (1) Melon and eight (8) Gold Nuggets.
- Golden Carrot — Crafted using one (1) Carrot and eight (8) Gold Nuggets.
- Phantom Membranes — Dropped by Phantoms.
- Pufferfish — Use a Water Bucket or Fishing Rod to catch.
- Rabbit’s Foot — Dropped by slain Rabbits.
- Spider Eye — Dropped by slain Spiders and Witches.
- Sugar — Crafted using one (1) Sugar Cane.
- Turtle Shell — Crafted using five (5) Scutes that are dropped by Baby Turtles.
Step 5: Gather Overworld potion modifiers:
- Fermented Spider Eye — Crafted from one (1) Spider Eye, one (1) Brown Mushroom, and one (1) Sugar.
- Glowstone Dust — Mined from Glowstones.
- Gunpowder — Dropped by Creepers, Ghasts, and Witches; also found in chests.
- Redstone — Mined from Redstone Ore.
Craft a Brewing Stand
You can’t make a potion without this required contraption.
Step 1: Open your Crafting Table.
Step 2: Place one (1) Cobblestone each in the three bottom squares in the crafting grid.
Step 3: Place one (1) Blaze Rod in the middle square.
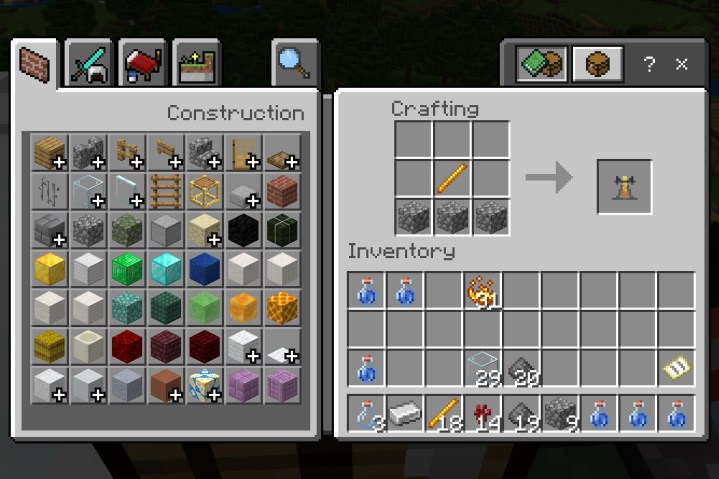
Step 4: Drag the Brewing Stand down into your Hotbar.
Step 5: Select the Brewing Stand and perform the following:
- PC — Right-click on the destination.
- Console — Target the destination and press the Left Trigger button.
- Mobile — Tap on the destination.
Craft a Cauldron (optional)
You’ll need water — why not add a little pool next to your Brewing Stand?
Step 1: Open your Crafting Table.
Step 2: Add seven (7) Iron Ingots to the crafting grid in a “U” formation: Three in the left column, one in the middle column’s bottom square, and three in the right column.
Step 3: Drag the resulting Cauldron down into your Hotbar.
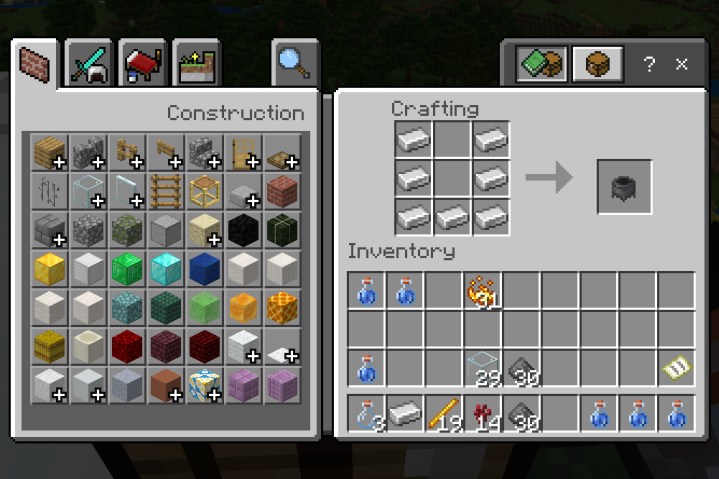
Step 4: Select the Cauldron and perform the following:
- PC — Right-click on the destination.
- Console — Target the destination and press the Left Trigger button.
- Mobile — Tap on the destination.
Craft and fill Glass Bottles
You need something to contain your brewed liquids.
Step 1: Open your Crafting Table.
Step 2: On the crafting grid’s middle row, place one (1) Glass Block each in the first and third squares.
Step 3: On the crafting grid’s bottom row, place one (1) Glass Block in the second square.
Step 4: Drag the resulting three (3) Glass Bottles down into your Hotbar.
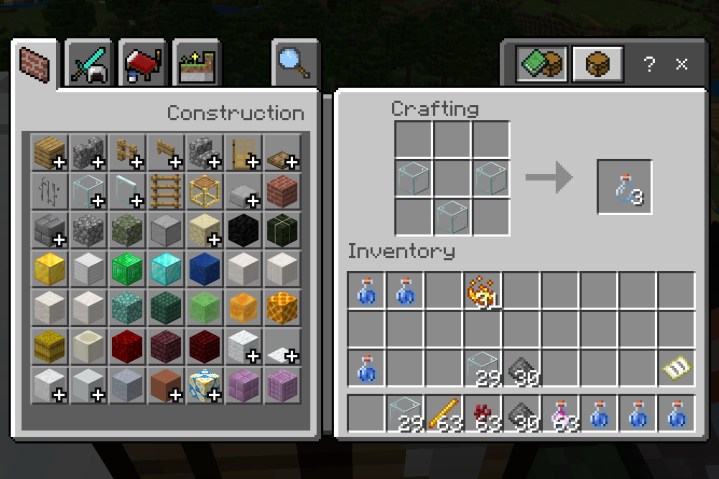
Step 5: Equip a Glass Bottle and do the following next to a body of water:
- PC — Right-click on the water.
- Console — Target the water and press the Left Trigger button.
- Mobile — Tap the water.
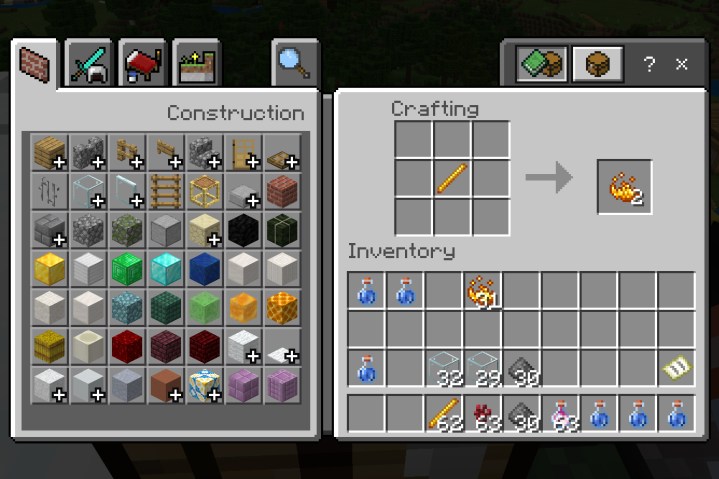
Craft Blaze Powder
Your Brewing Stand needs fuel!
Step 1: Open your Crafting Table.
Step 2: Place a Blaze Rod into any crafting grid square.
Step 3: Drag the resulting Blaze Powder (two total) down into your inventory.
Brew an Awkward Potion
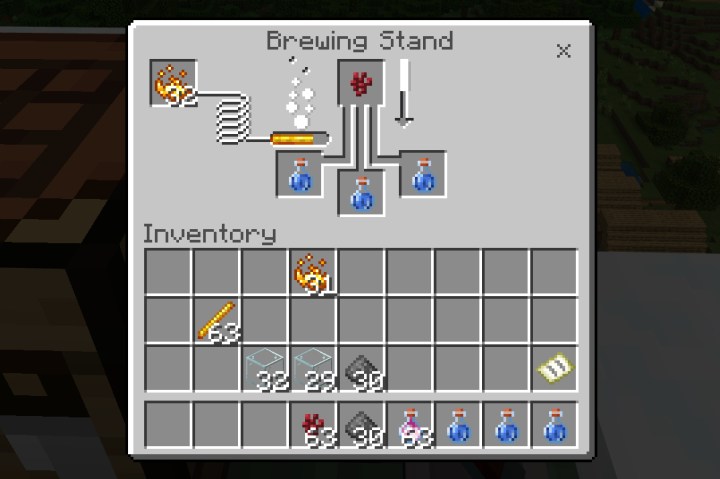
First, you need to brew a “foundation” called an Awkward Potion. It’s like the carbonated water in your favorite cola: Without it, you just have a glass of syrup.
Step 1: Open the Brewing Stand.
Step 2: Place one (1) filled Glass Bottle each into the lower three squares designated with a “bottle” icon.
Step 3: Place one (1) Nether Wart into the top square.
Step 4: Place one (1) Blaze Powder in the square in the top-left corner designated with a “fire” icon.
This process converts all three Water Bottles into Awkward Potions. Now you need to add other ingredients to make these Awkward Potions usable. After that, you can add modifiers to make the effects last longer and more powerful.
Potion types
With the Awkward Potions in hand, now comes the awkward puzzle of crafting usable potions.
The list is long, however, so we broke them down into three categories: Positive, Negative, and Mixed. Remember, all potions start with the Awkward Potion you just created. Next to each potion type, we list its main ingredients and overall effects. We also list the modifiers you need to enhance or extend its potency.
For example, you can create a Potion of Fire Resistance by combining an Awkward Potion with Magma Creme in the Brewing Stand. After that, you can place the Potion of Fire Resistance back into the Brewing Stand and add Redstone Dust, thereby extending its duration from three minutes to eight minutes.
Positive effects
Potion (effect and duration) — Ingredients
Fire Resistance (3:00) — Awkward Potion, Magma Cream
Fire Resistance+ (8:00) — Fire Resistance Potion, Redstone Dust
Healing (Four health points) — Awkward Potion, Glistering Melon
Invisibility (3:00) — Night Vision Potion, Fermented Spider Eye
Invisibility+ (8:00) — Invisibility Potion, Redstone Dust
Leaping (+0.50 for 3:00) — Awkward Potion, Rabbit’s Foot
Leaping II (+0.50 for 8:00) — Leaping Potion, Glowstone Dust
Leaping+ (+1.25 for 1:30) — Leaping Potion, Redstone Dust
Night Vision (3:00) — Awkward Potion, Golden Carrot
Night Vision+ (8:00) — Night Vision Potion, Redstone Dust
Regeneration (+1 health point per 2.5 seconds for 0:45) — Awkward Potion, Ghast Tear
Regeneration II (+1 health point per 2.5 seconds for 1:30) — Regeneration Potion, Glowstone Dust
Regeneration+ (+1 health point per 1.2 seconds for 0:22) — Regeneration Potion, Redstone Dust
Slow Falling (1:30) — Awkward Potion, Phantom Membrane
Slow Falling+ (4:00) — Slow Falling Potion, Redstone Dust
Strength (+3 melee damage for 3:00) — Awkward Potion, Blaze Powder
Strength II (+3 melee damage for 8:00) — Strength Potion, Glowstone Dust
Strength+ (+6 melee damage for 1:30) — Strength Potion, Redstone Dust
Swiftness (+20% movement speed for 3:00) — Awkward Potion, Sugar
Swiftness II (40% movement speed for 1:30) — Swiftness Potion, Glowstone Dust
Swiftness+ (+20% movement speed for 8:00) — Swiftness Potion, Redstone Dust
Water Breathing (3:00) — Awkward Potion, Pufferfish
Water Breathing+ (8:00) — Water Breathing Potion, Redstone Dust
Overall, these potions should be drinkable and not used as throwable potions. But there are cases, like the Splash Potion of Healing, where a throwable comes in handy. It’s merely the Potion of Healing combined with a filled Splash Water Bottle that, ultimately, you can throw at friends with low health.
We provide instructions on how to create throwables later.
Negative effects
Potion (effect and duration) — Ingredients
Harming (Damages six points) — Healing or Poison Potion, Fermented Spider Eye
Harming II (Damages 12 point) — Harming Potion Glowstone Dust
Poison (-1 health point per 2.5 seconds for 0:45) — Awkward Potion, Spider Eye
Poison II (1 health point per 1.2 seconds for 0:21 ) — Poison Potion, Glowstone Dust
Poison+ (-1 health point per 2.5 seconds for 1:30) — Poison Potion, Redstone Dust
Slowness (-15% speed for 1:30) — Leaping or Swiftness Potion, Fermented Spider Eye
Slowness II (-15% speed for 4:00) — Slowness Potion, Glowstone Dust
Slowness+ (-60% speed for 0:20) — Slowness Potion, Redstone Dust
Weakness (Reduced melee damage by four for 1:30) — Awkward Potion, Fermented Spider Eye
Weakness+ (Reduced melee damage by four for 4:00) — Weakness Potion, Redstone Dust
Courtesy of the Awkward potion base, you can make these potions drinkable, but many are more suited as throwables. In the following section, we guide you through the production of mixed effects potions.
Mixed effects
Potion (effect and duration) — Ingredients
Turtle Master (Slowness IV and Resistance III for 0:20) — Awkward Potion, Turtle Shell
Turtle Master II (Slowness IV and Resistance III for 0:40) — Turtle Master Potion, Glowstone Dust
Turtle Master+ (Slowness IV and Resistance IV for 0:20) — Turtle Master Potion, Redstone Dust
Brew a splash potion
You’re obviously out to hurt your enemies, so any kind of combat requires a harmful concoction ready for launching at encroaching attackers. We like using slowness or poison. Not all potions are bad, of course, and many of them bestow curative and fortifying powers. But you should reserve those potions for yourself and not your enemies.
Step 1: Open the Brewing Stand.
Step 2: Place one (1) regular potion each into the three bottom squares. In this example, we use potions of poison.
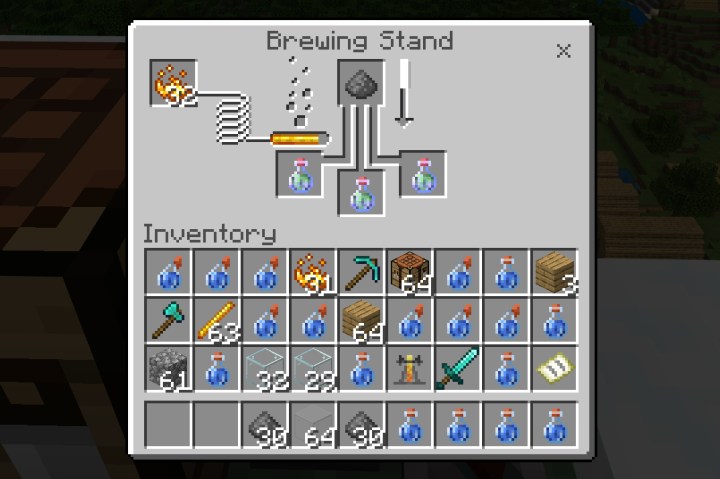
Step 3: Place one (1) Gunpowder into the top square.
Step 4: Place one (1) Blaze Powder in the square in the top-left corner designated with a “fire” icon.
Step 5: Drag the new splash potions down into your inventory.
Brew a lingering splash potion
The effects of this recipe will haunt its victims long after you dispatch the splash, making this potion optimal for defeating a constant flow of enemies bombarding your space.
Step 1: Open the Brewing Stand.
Step 2: Place one (1) Splash Potion in one of the three bottom squares. In this example, we use the Splash Potion of Poison.
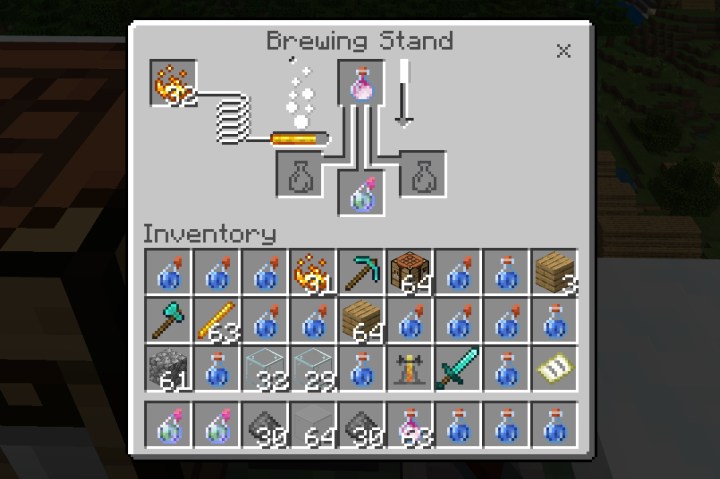
Step 3: Place one (1) Dragon’s Breath in the top square.
Step 4: Place one (1) Blaze Powder in the square in the top-left corner designated with a “fire” icon.
Step 5: Drag the new lingering splash potion down into your inventory.
Editors' Recommendations
- How to fix Helldivers 2 matchmaking issues
- How to get pets in Sea of Thieves
- How to make money fast in Content Warning
- Dustborn’s stylish action and political edge make it a breath of fresh air
- How to sign up for the Marvel Rivals playtest


