Recording and sharing gameplay on a PlayStation 4 is a lot easier than you might think. Sure, capture cards are the best way to record and stream your gameplay, but you can capture your PS4 gameplay right from the console, too, with no extra hardware required.
Even better, you don’t have to trigger the recording beforehand on your favorite PS4 games, so no matter if you score a win in Warzone or stumble upon one of the many twists and turns in The Last of Us Part II, you can put it on the record.
In this guide, we’re going to show you how to record and share gameplay on the PlayStation 4, from adjusting your video settings to saving the final product. We’ll also show you how to edit and upload your clip directly to social media or, if you’re looking for a little higher production quality, how to export the file to your computer.
Recommended reading
Adjust your video settings
First, hold down the Share button on your PlayStation 4 controller to open up the Share menu (here’s how to sync a PS4 controller).
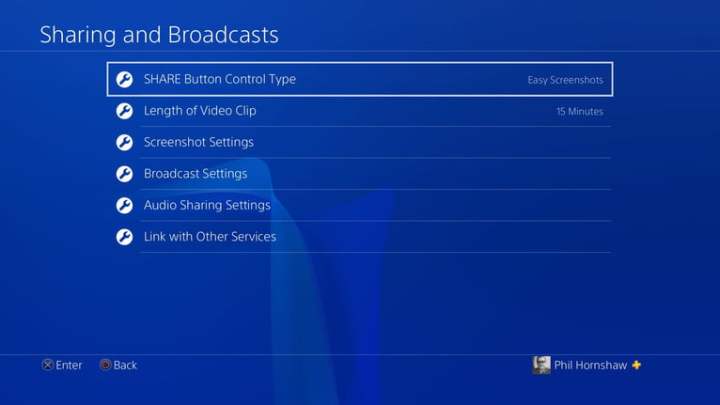
Step 1: From here, you’ll be able to change a bunch of different settings for how you share content you create on your PS4, including video. You’ll need to use these settings later to upload your video, but for now, you want to prep the PS4 to record the exact length of your clips.
Step 2: To do this, go to the Set Video Length menu.
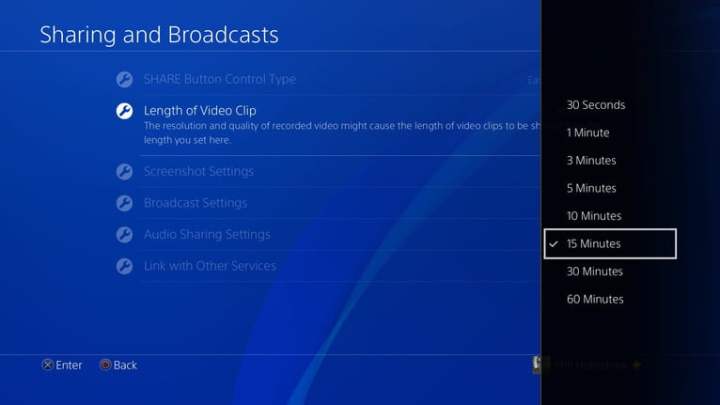
Here, you can determine how long the PlayStation 4 will record when you press the share button. The PS4 can automatically record for as long as an hour or as short as 30 seconds, but the default time is 15 minutes.
Fire up your game
The actual recording part is very simple. Start playing a game and you’ll have two options. First, you can start a new recording by using the Share button, which will record for the period you specified in the settings, or until you hit the Share button again.
The second option is to capture a video of something that just happened. Your PlayStation 4 automatically saves the last 15 minutes of gameplay from your current play session. If you encounter an amazing gameplay moment that you didn’t see coming, you can still capture it on video even if you didn’t think to hit the Share button. We’ll explain how to do both kinds of recording — the controls are similar but vary slightly in each case.
Start a new recording
Step 1: If you want to record a video by basically pressing Record on your PS4 before you start playing, press the Share button twice, just like you’re double-clicking a mouse, to start rolling.

Step 2: The PS4 will record for the length of time you’ve set starting when you double-press the Share button, and you can stop the recording at any time by double-pressing the Share button again.
Step 3: When the recording is complete, your clip will be saved in the Capture Gallery folder on your PlayStation 4’s home screen.
Make sure that the game you’re recording doesn’t automatically disable recording features. Certain titles — Metal Gear Solid V: The Phantom Pain is an infamous example, as well as the Ratchet & Clank reboot — will temporarily stop the capture feature from working in order to preserve story spoilers. To get around this, you’ll have to use a capture card rather than the built-in share features on the console, but very few games make use of it more than a few times.
Save the last 15 minutes of video
When something great happens in a game and you want to record it, but you didn’t previously hit the Share button to start a video, you aren’t out of luck. Your PS4 is always recording video -- it just doesn’t save that video unless you tell it to. The last 15 minutes of your gameplay session is always saved in the PS4’s video cache. So if you just got through a tough boss fight or pulled off a sweet headshot, you can still save the video from the cache.
Here’s the thing: If you want to save the last 15 minutes of your gameplay, do not double-press the Share button! That’ll start a new video recording from the moment you push the button onward. Starting a new recording will delete the cached video.
Step 1: To save the last 15 minutes of gameplay footage, simply press the Share button once to access the Share menu.
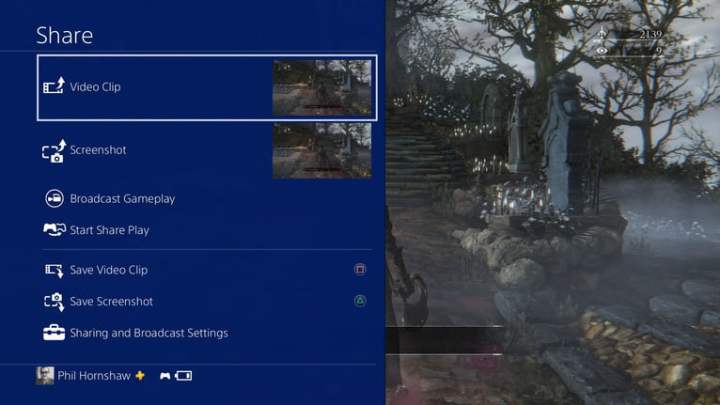
Step 2: From there, select Save Video Clip, or hit the Square button. That will save the video to the Capture Gallery, where you can mess with it at your leisure or share it.
Step 3: You can also use the Share menu to immediately share the video clip on social media, which will also save it to the Capture Gallery, but will take you to the social media interface next.
Trim your clip
Now you’re ready to edit your video clip and get it into shareable shape. In most cases, you’ll want to trim your video to get it ready for public consumption. Some social platforms require videos to be short — Twitter clips, for example, must be less than two minutes. Even if you don’t need to shorten your clip, you might want to remove the boring stuff at the beginning and/or end of your video and get to the good part.
Step 1: The Trim option is available in two places. In the Capture Gallery, highlight your video, and push the Options button on your controller to pull up a menu that includes the Trim option.
Step 2: You can also choose Share Video Clip from the Share menu, and you’ll access a screen with a list of social networks and video services.
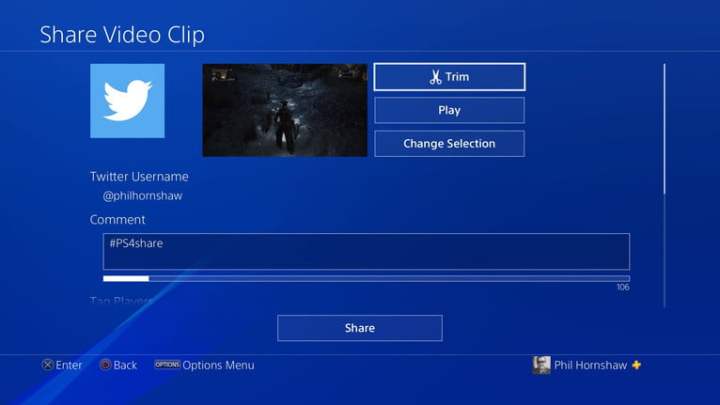
Step 3: Pick the one you want to use to share your video, and you’ll be taken to the Share screen, where you can write a Facebook update or a Tweet, add a description of your video, and so on. You’ll find the Trim button at the top of the screen.
Step 4: Selecting Trim allows you to remove some of the footage from your video file to shorten it.
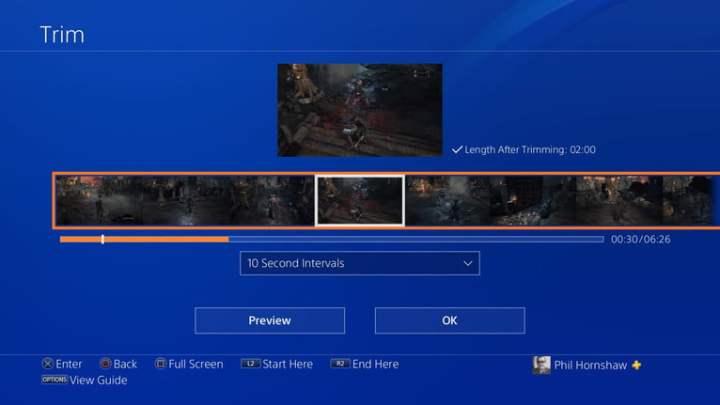
Step 5: First, find the spot in the video where you want it to start by using the Directional Pad on your controller to scroll through a macro view of the video’s timeline.
The timeline shows screencaps that represent small snippets of the video: You can increase or decrease the size of these snippets, changing how much of the video you skip over each time you hit the D-Pad.
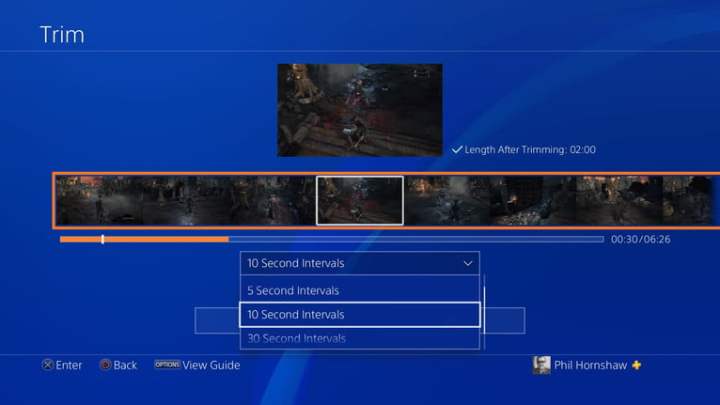
Step 6: To change the length of the timeline, select the dropdown menu that reads “10 Second Intervals.” As you might have guessed, the default timeline will cause every press of the D-Pad to skip 10 seconds of video, but you can increase that to 60 seconds, or bring it down to one second to be more precise.
Step 7: When you find the spot where you want your new, shortened video to start, hit L2 to set the start point.
Step 8: From there, scroll forward along the timeline to find your endpoint and hit R2. An orange box will highlight the portion of the timeline that will become your new video. The other sections will be deleted when you finalize the edit.
Step 9: For more precise edits, you can watch the video to find the right spot to start or stop by pressing the Preview button below the video timeline. As the video plays, you’ll see a timer running on the right side of the screen and a cursor moving over the timeline, both of which can help you pinpoint when to start and stop your clip.
Step 10: Complete the trim, and your video will be saved to the Capture Gallery with the rest of your videos.
Share your video
Once your video is trimmed to the right length, it’s time to put it out on the internet. You’ll need to connect your PlayStation 4 to your social media accounts to do it.
Step 1: Selecting a social network from the Share Video Clip menu will give you on-screen instructions for signing in. Once you’ve got your social networks set, it’s just a matter of picking your video, and writing your tweet, status update, description, and so on.

Step 2: Some social platforms offer additional controls for you to customize privacy settings for your video. When uploading to Facebook or YouTube, for instance, you can use the controls to set who can see the video. On YouTube, you can also publish your videos as “unlisted” so they aren’t private, but they don’t show up in searches. You can also set the privacy controls for who can see the video on your PlayStation Network account’s social activity.
Getting your video on your computer
If you don’t want to share your video online just yet, you can also transfer the video from your PS4 to an external hard drive or flash drive, then upload it to a computer.
Step 1: Plug your drive into one of the USB ports on the front of your PlayStation and navigate to the Capture Gallery.
Step 2: Select the video you want to transfer, then push the Options button.

Step 3: Using the menu that appears on the right side of the screen, select Copy to USB Storage Device.

Step 4: You’ll be taken back to the grid view of the Capture Gallery. You can select which items you want to copy to your USB drive by pressing X. The images and videos you select will be marked with a large check in a tick box above each item.
Step 5: Once you’ve selected everything you want to transfer, move to the right-side menu and select Copy.

Step 6: Hit OK on the next screen and everything you’ve selected will be transferred to your external drive.
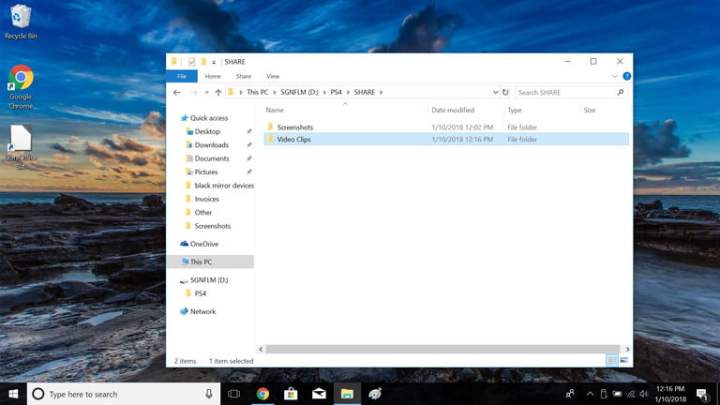
Step 7: Once you successfully transfer your videos to the external drive, take the USB drive out of your PS4. You can swap your video recording files to your computer simply by plugging your external drive into the USB port. You’ll see a folder named PS4 pop up in your My Computer folder if you’re using a Windows device. And if you’re using a Mac, you’ll see it in Finder.
Step 8: If you need something in your PS4 folder, you can access it by simply clicking on it. Keep in mind that you might have to go through a few folders to find it. As you’re hunting for it, be sure to look for the Share folder, as this contains the Video Clips folder.
Step 9: If you want to watch old game recordings, select the Video Clips folder and search through the different folders of footage. You’ll notice that each file will be formatted in .mp4. All you need to do is find and click on your desired video and download it to your computer.
Once you’re done with all of these steps, you’ll have the opportunity to share the recordings with others and edit them if necessary. Because they are in a simple .mp4 file format, you can edit them using standard video-editing software.
Editors' Recommendations
- Best PlayStation Plus Deals: Save on Essential, Plus and Premium
- PlayStation 6: release date speculation, price, specs, and more
- How to start the Nuka-World DLC in Fallout 4
- PlayStation has a secret weapon up its sleeve: the Hero Project
- PlayStation trophies are finally coming to PC with new overlay