It’s incredibly easy to snag a screen grab with the Nintendo Switch, thanks to a dedicated button on the left Joy-Con controller. Taking pictures, however, is just the beginning. Thanks to a function that lets you easily adjust images and overlay text, the Switch effectively offers a built-in meme maker. Here is everything you need to know about taking screenshots with the Switch and turning them hilariously viral.
Further reading
- The best Nintendo Switch exclusives
- The most common Nintendo Switch problems, and how to fix them
- The best Nintendo Switch tips, tricks, and hacks
Step 1: Set up your social media connections
Before you take a screenshot, let’s make sure you’re ready to do something with it. If your Switch is connected to a Wi-Fi network, you can link your Switch user profile to your Twitter and Facebook accounts. To set up your Twitter and

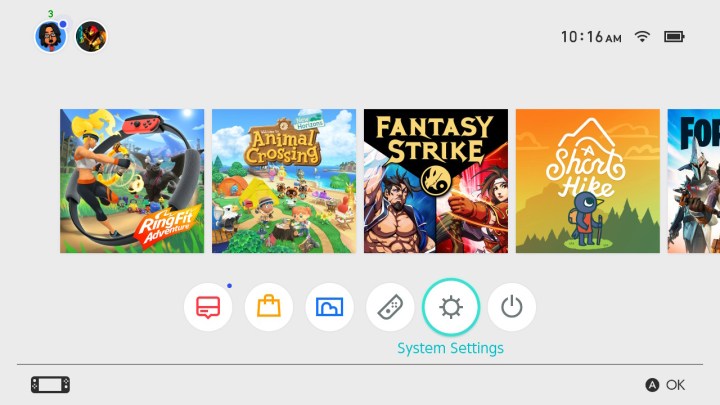
On the Systems Settings menu, head down to Users, and then choose your user account. From there, select Posting to Social Media. That menu will offer prompts to connect your social accounts. Enter your usernames and passwords, and you’re set to share.
Once you’re ready, you can tell the Switch to upload your shots to the internet straight from the Album application without having to transfer the images anywhere else, such as to a computer.
Step 2: Grab your shot
The easiest step in taking a screenshot is actually capturing an image. While you’re playing any game, you can instantly capture a screenshot of whatever you’re doing by hitting the Square button on the left Joy-Con (right below the bottom arrow of the directional pad). Hit it, and the Switch automatically saves a capture of whatever is on the screen.
While you can capture any game, Nintendo has blocked players from taking screenshots of many of the Switch’s menus and within certain applications. (Our favorite example: You can’t take a screenshot of your screenshot album!) For the most part, though, you should be able to snag an image of anything from a game you’re playing. The screenshots are automatically saved to the Switch’s internal memory (or a microSD card if you have one installed).
Step 3: Head to the album
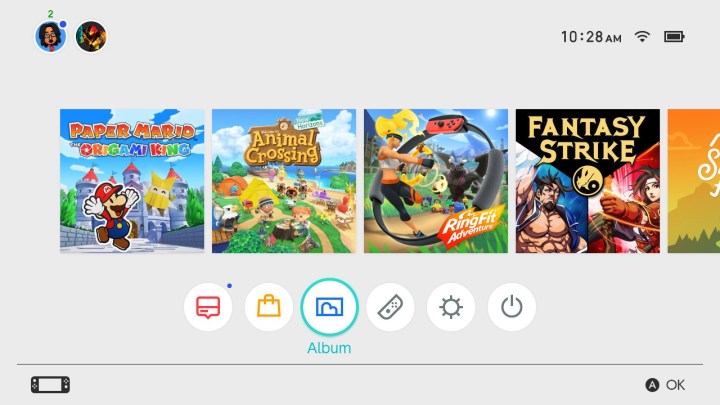
Now that you are linked up and ready to send your screenshots to the internet, you need to go find the one you want to share. The Album application is also on the home screen’s lower menu near where you found System Settings. It’s the Blue Square icon that looks kind of like a photograph, next to the yellow bag icon for the Nintendo eShop.
In the album, you can sort your images and videos with the filter function by hitting the Y button. Using the filter function lets you alter what you see in the album to focus on just images, just video, or things you’ve saved from a particular game, all of which makes searching easier. To delete images you don’t want, press the X button.
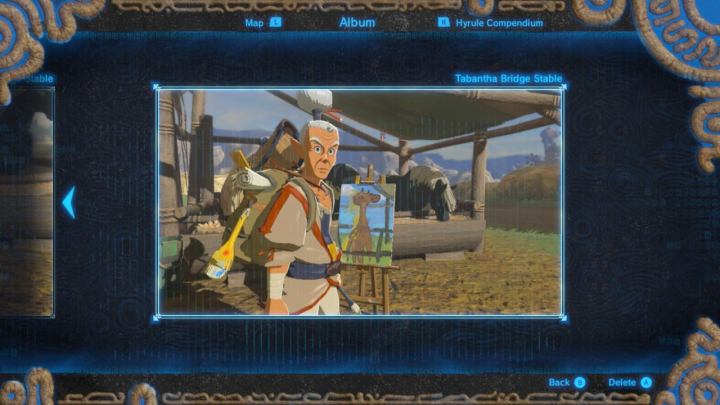
Highlight the image you want to share and hit the A button to pull it up to full-screen size. From here, select Editing and Posting by hitting A. To look at the image without any user interface elements to block your view, press the Plus (+) button on the right Joy-Con.
Step 4: Editing

Here’s the fun part. Once you select Editing and Posting, you gain access to three new options: Post, Add Text, and Copy. The Copy function allows you to create a copy of the screenshot. Saving a copy allows you to move your image to a microSD card, which you can use to upload the image to another device (more on that later). We recommend saving a copy before editing an image no matter what, though, in case you want to make multiple images from a single screenshot.
You can also do some light editing with the Switch itself using the Add Text option. This is how you can turn your images into memes. When you hit Add Text, you will be prompted to copy your image so that you keep the original, unedited version in addition to the one you add text to. The Add Text button pulls up the Switch’s virtual keyboard to let you type text onto the image, which works both with the controller buttons or the Switch’s touchscreen. Type out your message, hit OK > Accept (both at the bottom right, accessed with the Plus button) to get your text on the image.
From here, you can change the size, color, position, and angle of your text. The menu on the right side of the screen contains all the options — at the top, a slider adjusts the overall size of text, going from smaller on the left to larger on the right, which you can adjust with either the directional pad, the left analog stick, or the Switch’s touchscreen.
Click one of the color squares to select the text’s color, which will include a border of a different preset color to make sure it stands out from the background image. Clicking the third option lets you use the analog stick or directional pad to move the text around on the image to change its position. You can also use the stick here to adjust its angle, rotating the text as you see fit.
When you have your text looking the way you want it, you can finalize the process by hitting Finished. The new, edited image will appear in your Album.
Step 5: Sharing on Facebook and Twitter

If you’re happy with what you made and want the world to see it, it’s time to hit the Post button. You’ll be prompted to pick your Switch user account, which will then pull up your linked social media accounts. If you haven’t linked your accounts, you will be prompted to do so before sharing, but you can switch to your other social media account by hitting the Change Posting Location button at the top of the screen.
From here, just compose a message to accompany your image. The Switch automatically adds the #NintendoSwitch hashtag and a hashtag related to the game you used to make your image, but you can delete them if you want. Once you type your update, hit the Post button at the bottom of the screen.
As the Switch advises, you can pull up your social media account on another device, such as a
Step 6: Downloading your screenshots to a computer
When you open a picture in the album, you’ll see the third choice on the menu listed as Copy. This option lets you copy the image and then save the file to your microSD memory card. By doing this, you can remove it off your Switch without putting it on the Internet. This option is always available even after you’ve edited a picture. You can access it by navigating back to the album, opening the screenshot you want to save, and then selecting Copy.
If the system you’re using asked you to create a copy when you were in the process of editing your initial screenshot, you would finish up with two versions. Version one would show the image you captured from the game, and the other would include the screenshot with the added text. If you click the Copy button, a menu will pop up, allowing you to select where you want to save your copied screenshot. To keep your screenshots, you’ll have to install a microSD card. If you have System Settings already saving your images to a microSD card, then you can easily use the Copy button to save it to your Switch’s internal memory storage. Once you’ve indicated where you’d like the image to go, hit Copy.

Once you’re done saving all your photos, press down and hold the Power button and choose Power Off from the menu that pops up. This will turn off your Switch. Remove the microSD card from your Switch and put it into your device’s SD card reader. Make sure you buy an adapter before trying this step, as many computers lack a built-in microSD card reader.

After this, you’ll see a corresponding file named Nintendo. Click on it and select Album. Then, you’re free to pick the photos you’d like to move from the album and download them to your device as needed.
Editors' Recommendations
- Best video game deals: PlayStation 5, Xbox S and X, Nintendo Switch
- Nintendo Indie World 2024: How to watch and what to expect
- Best gaming console deals: cheapest prices on PS5, Xbox S and X and Switch
- All upcoming Switch games: 2024, and beyond
- How long is Dragon’s Dogma 2?