
Monster Hunter has always been armor and gear focused. The main reason to hunt a monster multiple times is to carve parts to put toward new armor and weapons. Quality gear is what keeps you alive when squaring off against powerful monsters. In Monster Hunter World: Iceborne, all the monsters are quite powerful due to Master Rank difficulty. Don’t worry. That means the gear you can forge is also more formidable.
Our Monster Hunter World: Iceborne weapons and armors guide offers tips and tricks to get the most out of your gear to really thrive on the hunt.
Recommended reading:
- Tips and tricks to mastering the hunt in Monster Hunter World: Iceborne
- A guide to taking down every monster in Monster Hunter World: Iceborne
- How to pick the right weapon in Monster Hunter World
Armor
Best armor sets
You know the drill. As you play through quests and slay monsters, more set options will open up at the Smithy. During our copious amount of time spent with Iceborne, we unlocked more than 100 armor sets. That number is daunting to say the least. You’d probably have to play Iceborne for 1,000 hours to have enough monster parts to craft every piece of armor. Luckily, the objective isn’t to craft every piece of armor — just the ones you need.
Here are the four best armor sets in Iceborne.
Viper Kadachi +

- Total Defense: 660
- Total Fire Defense: 5
- Total Water Defense: 15
- Total Thunder Defense: -15
- Total Ice Defense: -10
- Total Dragon Defense: 5
Each piece of Viper Tobi-Kadachi armor has 132 defense, along with decent Water resistance and mild Dragon and Fire resistance. The big draw of the Viper Kadachi + armor is that it offers the Evade Extender skill, which significantly increases your roll distance. Adding to that, you’ll also get the Evade Window skill, which increases invulnerability when dodging. Constitution reduces stamina depletion and Quick Sheath lets you remove and stow weapons slightly faster. It also increases the proficiency of paralysis and poison attacks.
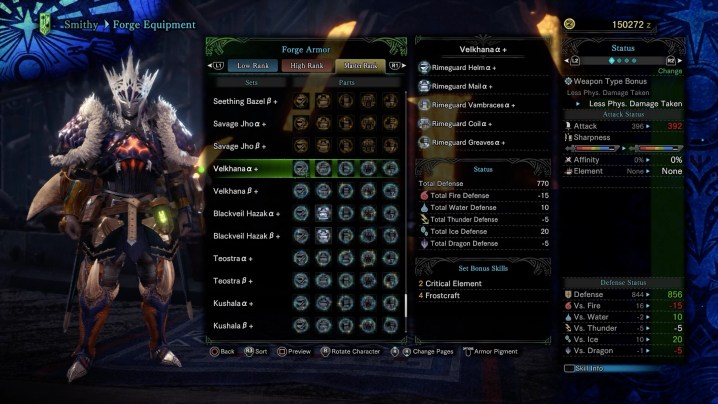
Velkhana +

- Total Defense: 770
- Total Fire Defense: -15
- Total Water Defense: 10
- Total Thunder Defense: -5
- Total Ice Defense: 20
- Total Dragon Defense: -5
The Velkhana set is, unsurprisingly, one of the best armor sets in Iceborne. It also happens to look the coolest. Velkhana armor pieces have 154 defense and offer great resistance to Ice and Water attacks. The skills provided by Velkhana armor, especially the set bonuses, make it an unbelievably great option. Admittedly, you have to wait quite a while to unlock it, but it’s well worth the wait.
With a full set, you’ll deal more elemental damage — regardless of element — when landing critical hits. Attack power rises when your weapon is sheathed, then depletes as you use it. On top of the set bonuses, you’ll get Divine Blessing (has the chance to reduce damage), Defense Boost, Flinch Free (nullifies knockbacks and tripping), Critical Draw (100 percent critical hit chance when drawing weapon), Quick Sheath, and Coalescence (enhances attacks after removing status effects).
Fulgur Anjanath +
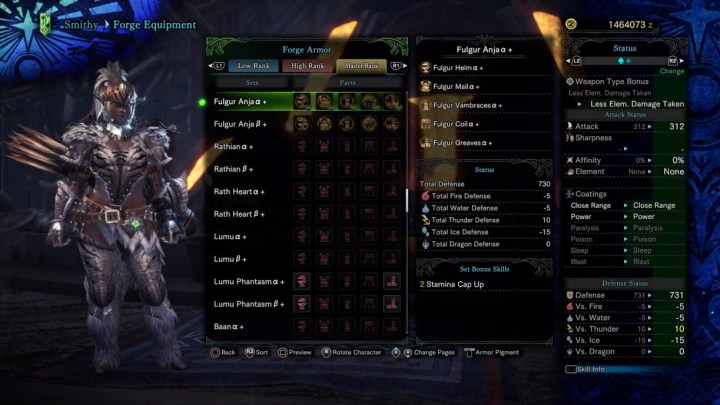
- Total Defense: 730
- Total Fire Defense: -5
- Total Water Defense: -5
- Total Thunder Defense: 10
- Total Ice Defense: -15
- Total Dragon Defense: 0
Fulgur Anjanath is one strong T. Rex, so it’s no surprise his armor set happens to be one of the sturdiest in Iceborne. A full set will increase your stamina cap, which is particularly helpful in the frigid Hoarfrost Reach. Elemental thunder damage is increased. If you use thunder-based weapons, this set will help you against Nargacuga, Tigrex, Viper Tobi-Kadachi, and other monsters who are weak to thunder. The best skill it offers is Weakness Exploit. When striking weak points, you’ll have a 30 percent affinity boost that turns to 50 percent when striking wounded areas. This armor also has the benefit of increasing item duration by 50 percent — an extremely helpful skill when using consumables such as Armor Skins, Adamant Seeds, and Might Seeds.
As a bonus, you’ll get a Defense Boost, Stun Resistance, resistance to knockbacks, and improved evasion when afflicted with status effects.
Nargacuga +

- Total Defense: 700
- Total Fire Defense: -10
- Total Water Defense: 10
- Total Thunder Defense: -15
- Total Ice Defense: 0
- Total Dragon Defense: 0
The Nargacuga set is great against water and has some really excellent skills. Will a full set, you’ll get Nargacuga Essence, a helpful skill that keeps your weapon sharp much longer. For light weapon users, the Stamina Surge skill is a huge plus, as it significantly increases stamina recovery. The Evade Window skill was mentioned earlier, but Nargacuga’s is unmatched at a level five. You don’t have to worry about taking damage when dodging.
Focus on resistances
While we heartily recommend the four sets listed above, when you’re having a rough time with a monster, you may want to focus on resistances. Is Glavenus rocking you with fire and blast damage? Craft the Uragaan set to increase your Fire resistance. Having trouble against Barioth? Go back and farm Banbaro materials to create a set that’s more resistant to Ice.
Look for bone piles and mine ore

Lots of non-monster-based armor sets and weapons require bones and ore to craft. See a bone pile, search it. Walk by some ore? Take your pickaxe out and get to work. While monster sets tend to offer more skills, you can still forge a great set with just ore and bones. The benefit here is that you don’t have to hunt monsters over and over again to complete an armor set.
Armor Spheres
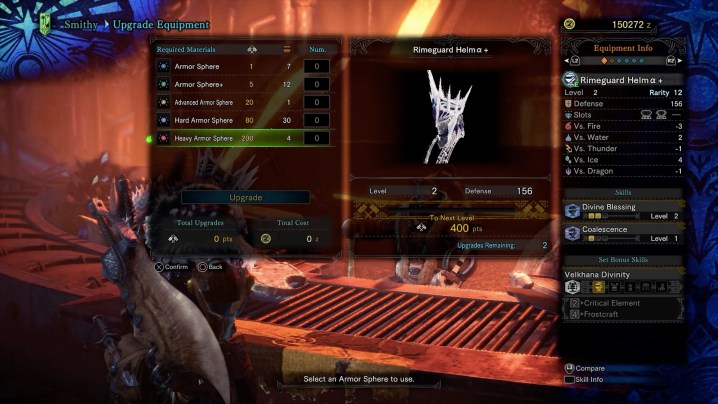
Armor Spheres let you upgrade each armor piece’s overall defense. Complete bounties and quests to earn Armor Spheres. Master Rank brings Heavy Armor Spheres into the fold. Keep in mind that you won’t have a surplus of these unless you complete bounties all the time. With that in mind, we don’t recommend upgrading pieces of armor that you don’t envision wearing for more than a few quests. You want to save them up to fully upgrade the sets that you use most frequently
Decorations

Armor pieces come with innate skills, but don’t forget to fit slots with jewels. Each piece of armor and weapon can hold up to three jewels of three various sizes. The bigger the jewel, the more powerful the skill. Decorations are a great way to balance weaknesses. If you choose armor that’s particularly weak against one element, you can even the scales by adding a Jewel.
You’ll earn jewels with each quest you complete in Iceborne, but you can also meld new ones at the Elder Melder. Certain “+” Mantles like the Ghillie Mantle+ can also be fitted with jewels, so don’t forget to access those from the Specialized Tools menu.
While we don’t recommend choosing gear based on the number of slots (or slot size), it’s foolish to venture out into Hoarfrost Reach without adding skills to your gear with Decorations.
Weapons

When it comes to Master Rank weapons, it’s harder to give a definitive list of what’s best. Each of the 14 weapons in World return in Iceborne with Master Rank versions. While their upgrade paths are connected with low/high rank, you don’t have to fully upgrade a weapon to unlock Master Rank versions. Instead, you can forge the starting Master Rank version of a weapon on its respective tree if you have enough zenni and the right parts.
Since Iceborne is an expansion, you probably already have a favorite weapon or two from World. Use what you’re most comfortable with in Iceborne.
From there, you have to decide which weapon tree to follow. Your primary concern should be overall attack damage. Keep in mind these vary largely between weapons. 400 attack with Dual Blades is excellent, but very meager with the Great Sword (good is over 1,000).
But after attack damage, you want to look at the three other core attributes: Sharpness, Affinity, and Element.
Sharpness
The Sharpness meter is confusing, as it has six different colors, starting with white (sharpest) and ending in red (dull). After sharpening a weapon, you’ll have it at its sharpest, but as you use it, well, it naturally becomes less effective. When deciding between two weapons in the same class that have similar values, take a look at sharpness. If you see lots of white, blue, and green, your weapon will be effective longer between whetstone uses. If a sizable chunk of the meter is taken up by red, orange, and yellow (especially red), the blade will lose its effective sharpness at a faster rate.
Affinity
Don’t be too concerned with this stat. A ton of weapons have zero percent affinity, even Master Rank weapons. But if you are comparing similar weapons and one has a 20 percent affinity while the other has zilch, just remember that affinity relates to critical hits. An affinity of 20 percent is significant. That means one out of every five swings, on average, will result in more damage. Critical hits are also more likely to stagger monsters. If you don’t have any affinity, you can increase this through armor skills and Decorations.
Element
This one is important. Elemental damage can drastically change the course of a fight. Every monster is critically weak to at least one element, and somewhat weak to multiple. Almost every weapon has elemental damage: Fire, Water, Ice, Thunder, Dragon, Paralysis, Poison, Blast, Sleep, and so on.
As you progress through Iceborne, you will want to start forging weapons that capitalize on weaknesses. You can check the Hunter’s Notes to view weaknesses for monsters you’ve researched.
Bowguns are the exception, as they have a deviation stat rather than an element, which rates how much bullets move away from the crosshairs when in flight.
Editors' Recommendations
- Where to find the Unmaking Arrow in Dragon’s Dogma 2
- The best armor in Helldivers 2
- Monster Hunter Wilds: release date speculation, trailers, gameplay, and more
- Monster Hunter Wilds is coming in 2025
- The best skills in Avatar: Frontiers of Pandora


