Red Dead Redemption 2 is an often brutally violent game, but that doesn’t mean you can’t get away for a relaxing break every now and then. What better way to kick back than by going on a little fishing trip? It just so happens that RDR2 has a pretty robust fishing system, which is mighty impressive since it’s almost completely optional.
Fishing has tangible benefits, too. Its a good and simple way to keep your food stocked, and you can sell your haul for a decent profit as well. To help you become an expert fisherman, we’ve put together a guide packed with everything you need to know about the art of fishing in RDR2. Here’s our Red Dead Redemption 2 fishing guide.
Recommended reading:
- Red Dead Redemption 2: How to hunt like a pro
- Red Dead Redemption 2 beginner’s guide
- Red Dead Redemption 2 cheat code list and how to activate them
How to unlock fishing in Red Dead Redemption 2

Like many other things in RDR2, fishing isn’t available from the start. You’ll have to wait until the chapter two mission, “A Fisher of Men.” During this mission, you take John Marston’s young son Jack fishing down at a river near camp. This mission serves as the basic tutorial for fishing, and from then on, your fishing rod will always be available in your satchel.
You can then visit any body of water and cast your reel to see if you can get a bite.
The basics of fishing
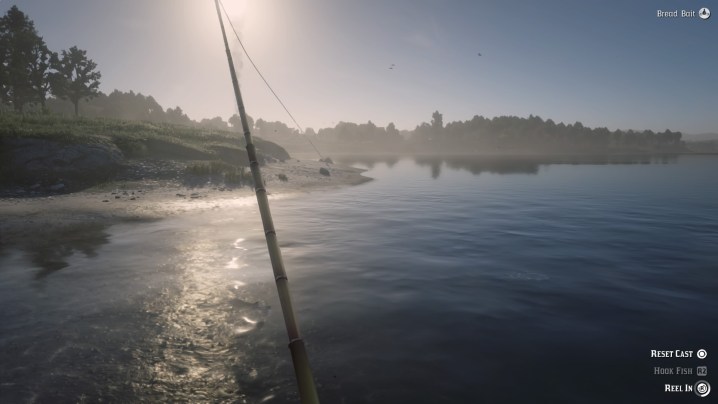
The actual act of fishing is fairly simple. You simply press and hold L2/LT to hold out the rod, then press and hold R2/RT to cast. How far the line goes is determined by how long you hold R2/RT. The left stick moves the rod and the right stick, when moved in a clockwise direction, reels the line back in. If at any time you’re unsatisfied with your current attempt, you can simply press Circle/B to cut the line and start over again.
The nuance of this activity comes with the type of fishing you’re doing. In RDR2, you can either fish with a bait or a lure.
Bait fishing

Bait fishing, the type that is taught to you in the chapter two mission, is the straightforward, leisurely sort. You’re most likely to catch small/medium size fish with standard bait. All you need to do is cast your line and wait for a fish to come to it. You can speed up this process by pressing R2/RT to swivel the bait. This action attracts fish to latch onto the hook.
Since a lot of bait is perishable, you don’t want to just cast your line anywhere. The longer it sits in the water, the less chance you have of snagging a fish. Instead, you can often see visible ripples in the water. The ripples indicate fish are near, beneath the surface. Try and cast your line close to the ripples for the best chance at success.
Once a fish bites, you need to press R2/RT to hook it and then tire it out. Flick the left stick in the opposite direction of the tug until you stop feeling resistance on the pole. If you try and reel while the fish is fighting, there’s a good chance your line will break and you’ll have to restart the process. Typically you have to switch between reeling and tiring the fish out at least a few times (unless your line is right at the water’s edge).
Lure fishing

Lure fishing is a bit harder to perfect but nets you some bigger scores. Instead of just casting towards the ripples, you want to cast beyond them. In order to lure fish properly, you have to reel the line in slowly until the fish bites. As you’re reeling, flicking your lure can help, but sometimes you will have to recast multiple times in order to get the right angle.
Because lure fishing attracts larger fish, you’re more likely to lose a fish once it’s on the line. That means you have to be careful when reeling/tiring it out. We found that during the tiring process, especially with large fish, you can’t just move the line in the opposite direction. It helps to move it in every direction except the direction the fish is fleeing. This is because if you put too much pressure on the line in one direction, it’s likely to snap. Also, be mindful of when to reel and don’t get greedy. If a large fish wants to get away and you’re still reeling, it will get away. Lure fishing takes more effort and patience.
Once you catch a fish you can either use it to make a meal or sell it to the butcher for cash.
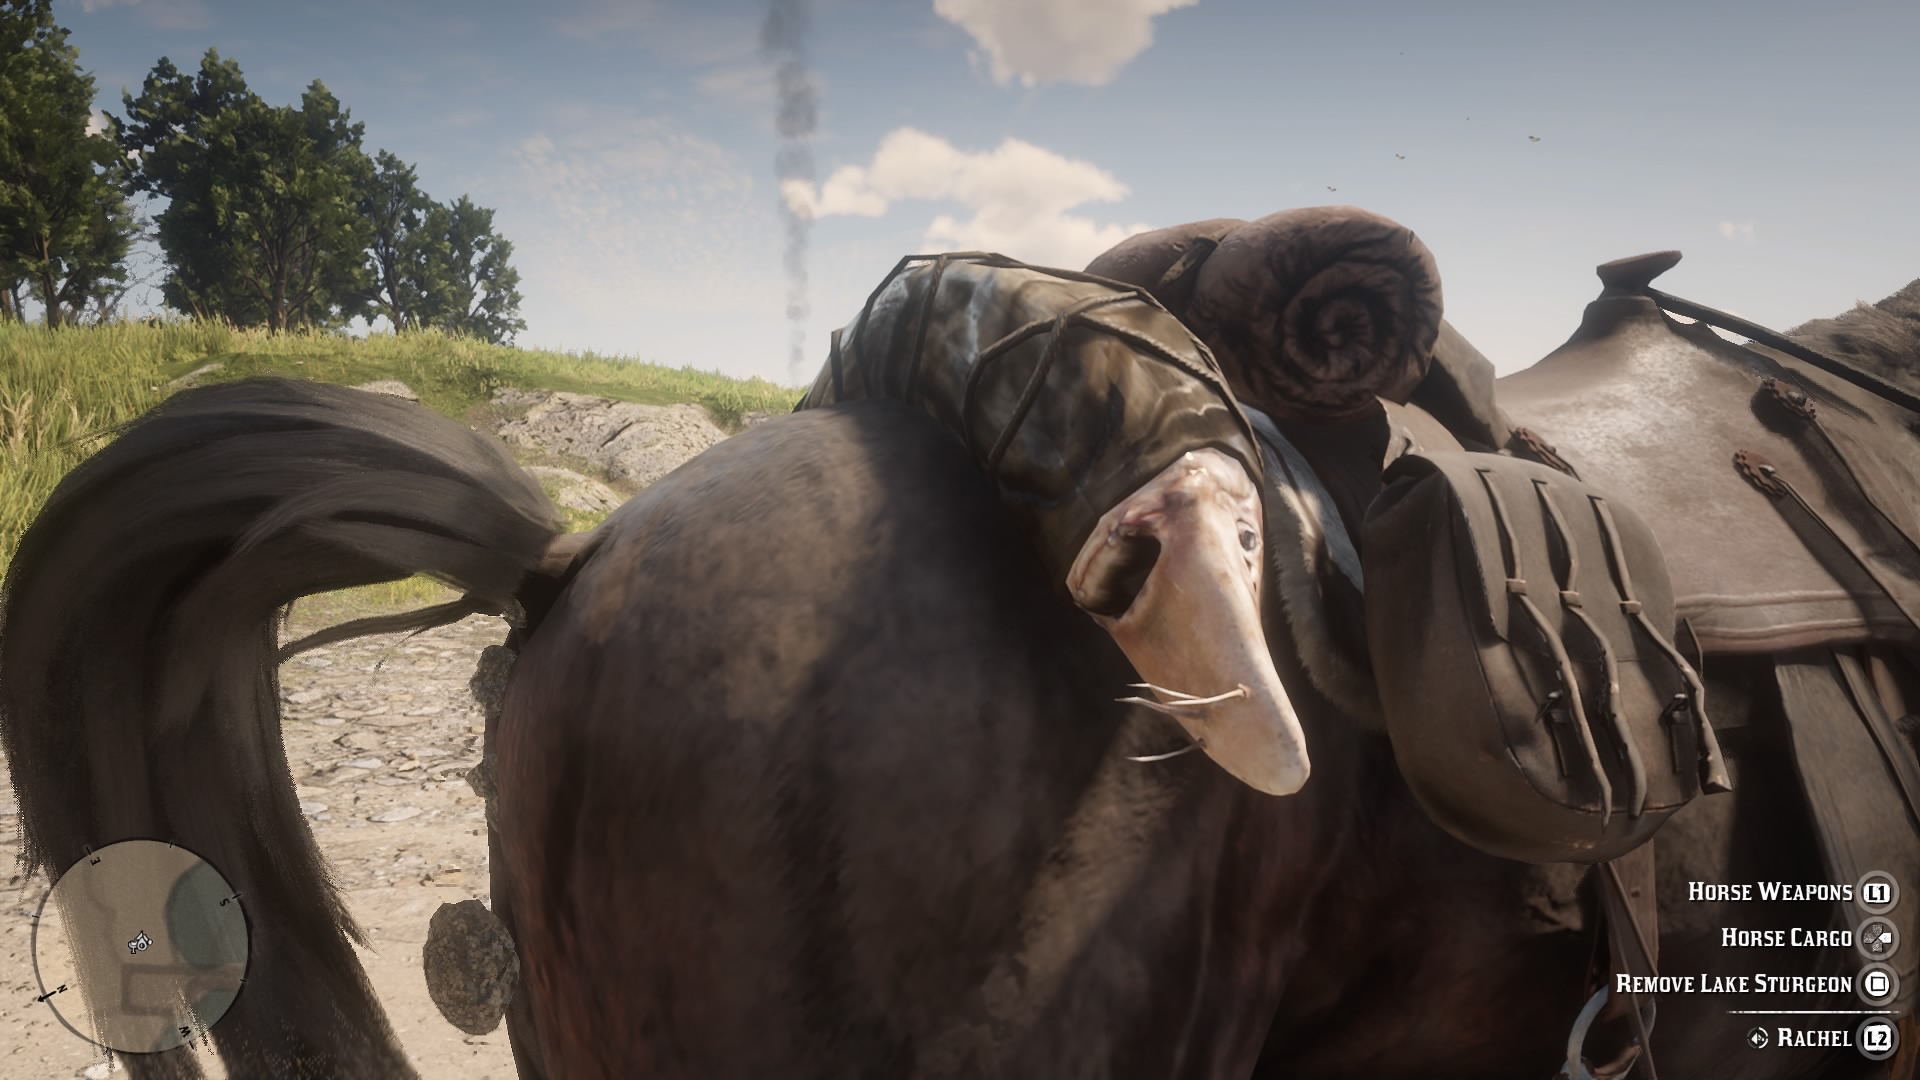
Bear in mind that big fish caught with lures must be stowed on the back of your horse.
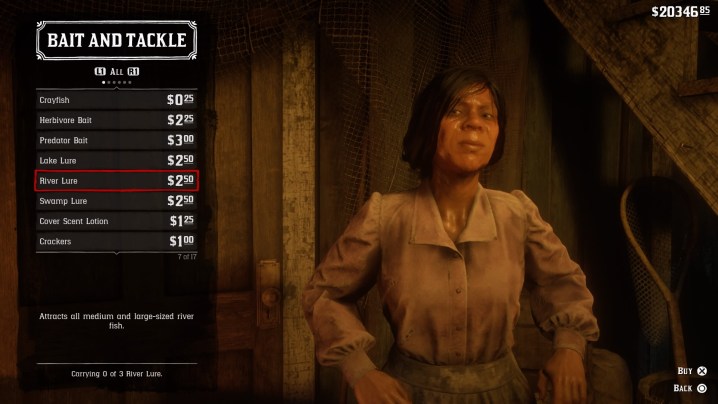
Where to buy bait and lures

The only shop that sells items specific to fishing needs is the Bait and Tackle store in Lagras. There, you can buy lures and baits such as live worms. Of course, you can fish with regular food such as cheese, bread, and corn, but lure fishing requires you to head over to Lagras. We’ve marked the location of the shop on the map above.
Types of bait/lures and fish they attract
Here’s a list of the baits and lure you’ll come across and which fish they attract:
- Crayfish: For catching big fish (Largemouth Bass)
- Live crickets: For catching medium fish (Rock Bass, Smallmouth Bass)
- Live worms: For catching medium fish (Steelhead Trout, Smallmouth Bass, Rock Bass)
- Cheese: For catching small fish (Bluegill, Rock Bass)
- Corn: For catching small fish (Chain Pickerel, Bullhead Catfish)
- Bread: For catching small fish (Perch, Redfin Pickerel, Bullhead Catfish)
- Special Lake Lure: For catching Legendary Fish (Legendary Bluegill, Legendary Largemouth Bass, Legendary Perch, Legendary Redfin Pickerel, Legendary Rock Bass, Legendary Smallmouth Bass, Legendary Sockeye Salmon)
- Special River Lure: For catching Legendary fish (Legendary Bullhead Catfish, Legendary Chain Pickerel, Legendary Large Sturgeon, Legendary Muskie, Legendary Steelhead Trout)
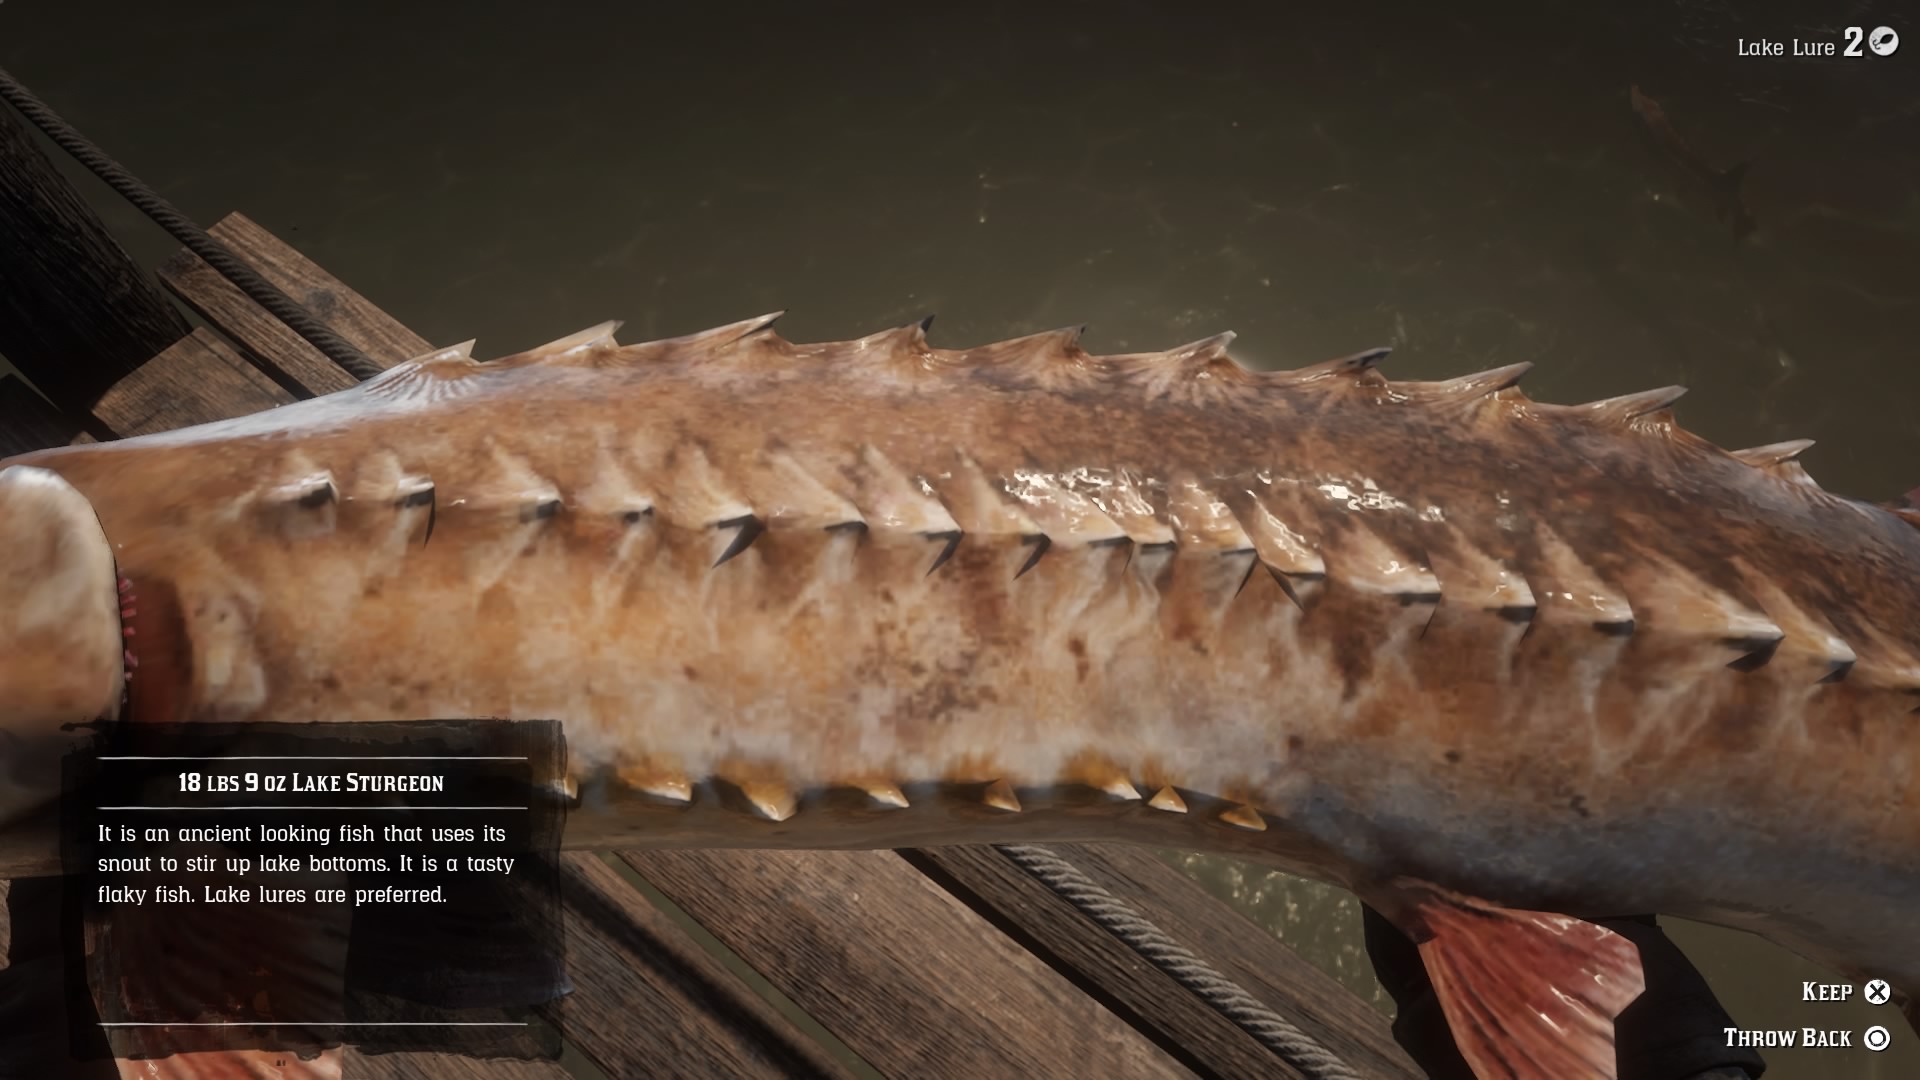
- Lake lure: For catching medium and large fish in lakes (Lake Sturgeon, Muskie)
- River lure: For catching medium and large river fish (Sockeye Salmon, Northern Pike)
- Swamp lure: For catching medium and large fish in the swamp (Longnose Gar, Channel Catfish)
Each of the three lures have “special” versions that increase the likelihood of catching big fish in their respective bodies of water. More on this later, but special lures only become available at the shop after getting the legendary fishing map.
Without visiting the shop, you can still fish for small fish with bread, cheese, and corn. We’ve found these three basic baits in many of the general stores.
Where to find each type of fish
You can’t find all the fish in one area. Certain types of fish prefer lakes over rivers, the north over the south, etc. Here’s where you’re likely to encounter each type of fish:
- Bluegill: Lakes and rivers
- Bullhead Catfish: Swamps
- Chain Pickerel: All bodies of water
- Channel Catfish: Swamps, especially when rainy
- Lake Sturgeon: Southern lakes and swamps
- Largemouth Bass: Southern bodies of water
- Longnose Gar: Swamps, especially when rainy
- Muskie: Northern lakes
- Northern Pike: Northern rivers
- Perch: Lakes and rivers
- Redfin Pickerel: Southern rivers
- Rock Bass: Lakes
- Smallmouth Bass: Northern rivers
- Sockeye Salmon: Northern rivers
- Steelhead Trout: Southern lakes
Fish right when the sun comes up and when it’s raining

Fishing in real life is often done in the early morning hours because that’s when the fish bite. It works similarly in RDR2. You’ll find more fish swimming around in the morning than you will at any other time of day. Fishing around noon is your second best option. Also, though you can’t control it, when rain starts falling, you can catch some real big fish, especially in the swamps. None of this means you can’t catch fish whenever you’d like, but RDR2 cares about realism.
What about legendary fish?
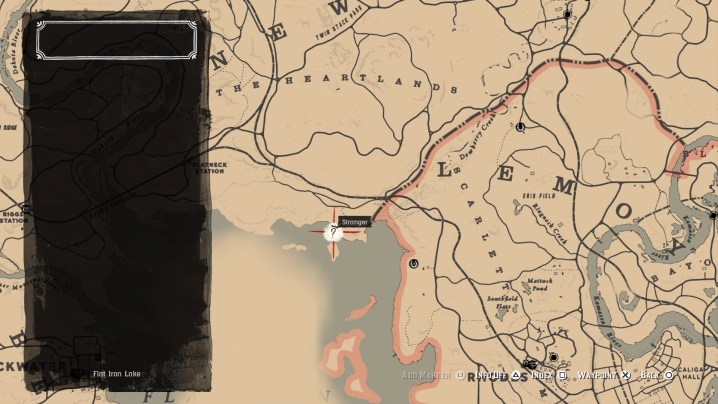
Early on, a story mission reveals that there are legendary hunts. Well, there’s also legendary fishing opportunities. There are 13 of them. In order to learn their locations, you have to acquire a map in The Heartlands. Open your map and look directly south of “The Heartlands” down to the water’s edge. There you will find Gill’s Landing and one of the “stranger’ events (shown as a white circle). Speak to Jeremy Gill on the dock and he will offer you the “A Fisher of Fish” side quest. The quest is to catch all 13 legendary fish. Mr. Gill thankfully gives you a map with the fish locations on it.

Before you attempt to catch any of the legendary fish, make sure you have the special lures (Special River, Special Lake, Special Swamp). You need those to catch legendary fish.
Editors' Recommendations
- What is dragonsplague in Dragon’s Dogma 2 and how is it cured?
- Nintendo Switch Game Vouchers: how they work and eligible games
- Red Dead Redemption on Switch is already discounted in holiday sale
- How to change suits in Spider-Man 2
- All suits in Spider-Man 2 and how to get them