If you’ve played other survival games in the past, you might think you will have an easy enough time transitioning over into Rust. The truth is, Rust may share many mechanics with other survival games like Ark: Survival Evolved and 7 Days to Die, but the brutal difficulty of this game can turn off even the biggest survival-game fans. Not only do you have to worry about the world, animals, zombies, and environment killing you off, but the other players in the game might be the biggest threat of all.
Death will be a part of the experience. There’s no getting around it, but you can at least minimize the frustration of learning the game by avoiding some unnecessary mistakes. If you follow this beginner’s guide, you will be able to survive long enough to become a predator instead of easy prey in Rust.
Further reading
Picking your server
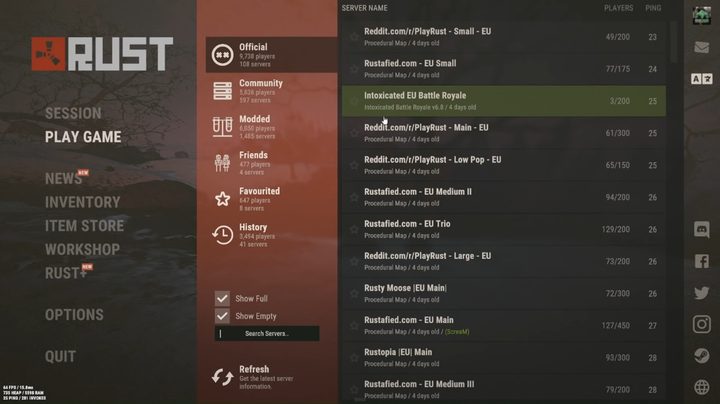
Before you even take your first step in Rust, you will have a very important decision to make — the server you choose to play on can make your first experiences with the game pleasant or downright miserable. The last thing you want to do is pick one at random just to get playing as fast as possible. As new meat in the world, your best chances of having a smooth experience will be to go to the Community tab of servers and use the search function for terms like “friendly” or “beginner” to at least start off with others around your skill level. From that list, aim for one with as few people as possible. That might sound boring, but you will have enough to worry about early on without having to deal with griefers constantly setting back your progress.
Normal servers, especially ones with tons of players in them, are often packed with veterans who would love nothing more than to ruin your first time with the game. Bear in mind that even if a server is titled something like “friendly,” players can absolutely still attack and kill you. These are just the servers where you have the best chance of other players not hunting you down for sport. Smaller community servers also have a reputation for being relatively hacker-free, or at least have admins who will actively ban cheaters, which is just another thing you don’t want to deal with early on.
Understand your stats and statuses
The key word in a survival game is, well, survival. To do that, you need to understand how to stay alive. Thankfully, most of the stats you need to worry about are staples of the genre and analogs you can easily equate to real life. The three bars you see on the bottom right of your screen at all times are health, calories, and rads.
Health, just like in every game with a health meter, is how close you are to death. If you get hit, shot, bit, fall too far, or anything else that hurts, your health goes down. You can reduce health damage with armor and replenish your health by eating food.
Eating food is also important for keeping your hunger meter up. This meter goes down over time naturally, forcing you to keep participating in the game instead of just bunkering down for days, but also drains as you perform actions. Running, chopping trees, gathering resources — these all cost some valuable calories. You gain more calories, again just like in real life, by eating and drinking. If your calories hit zero, your health meter will start to drop until you either find something to eat or die.
Your last meter is rads, and this one isn’t as obvious as health or calories. Rads refers to radiation, more specifically how much radiation your character has been exposed to. You’ll know you’re in a radioactive area by the clicking of a Geiger counter you may have heard in TV shows and films. Being in a radioactive area will increase the rate you burn through your calorie meter, but if it gets over 500 you will get radiation poisoning. Once this effect occurs, your health meter will start to drain all the way down to one HP, but won’t completely kill you. Thankfully, you can drop your radiation levels by staying out of radioactive areas (duh), taking anti-radiation pills if you are lucky enough to have some, or eating specific foods that reduce radiation.
Nighttime not only brings a lack of visibility but also the threat of freezing. You start out with no clothing in Rust, at least anything that will keep you warm, and if you don’t make any, or have shelter, you will become cold once the sun goes down. Being cold, like being in a radioactive zone, will cause you to burn through your calories quicker. To stave off being cold, you can obviously craft or loot clothing, or stay near a campfire. While near a campfire, you can gain the comfort buff, which actually slows your calorie drain.
Sometimes when you take damage, your character will start to bleed. Bleeding is a constant health drain that you will need to use either a bandage or medkit to stop the effect. Your health drains fast, and we mean fast, when you’re bleeding, so you should always have one of these items ready.
Essential materials and craftables
When you first wake up in Rust, you’re given a measly rock, torch, and two bandages. That’s not a lot to work with, so you’ll need to start building up your supplies. That rock is going to be your best friend early on since you’ll be using it to collect all the basics you’ll need to start crafting the good stuff.
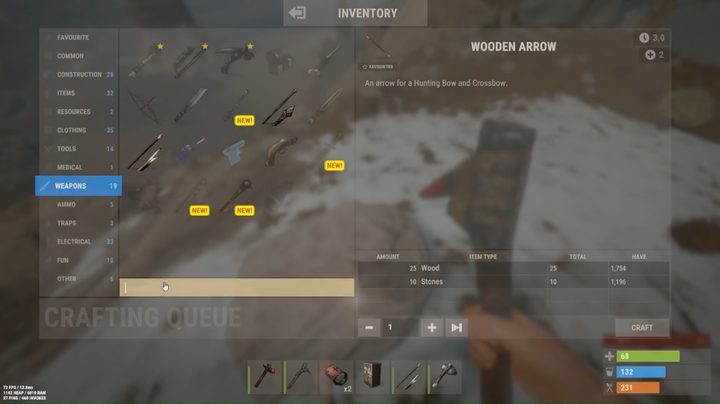
Right away, find a tree or search the ground for piles of logs, and get yourself plenty of wood. Wood is used for so many things in Rust that you can never really have too much. You’ll want it for campfires, shelter, storage boxes, and a hatchet. Be on the lookout for stones, too. You want to get 10 wood and five stone as fast as you can to make yourself a basic stone hatchet. Craft it by hitting Tab to open up your crafting menu. The hatchet will allow you to get way more resources out of trees and rocks that slamming on them with your starting rock.
Once you’ve got a hatchet, your next focus becomes stocking up on food and cloth. The importance of food should be obvious and will be a constant requirement no matter how long you play. Your main sources of food will be killing animals, finding cans around the world, or eventually killing players and taking it off their bodies. Leaving that last method out, hunting is going to be best since you can collect meat, animal fat, and cloth from a successful kill. Early on, with only a hatchet to your name, don’t take on anything more dangerous than a boar. Chickens and rabbits are nice and vulnerable targets if you spot them. Just like a tree or rock, make sure to fully whack away at their corpse to fully drain them of materials.
Cloth alone can also be picked up from hemp plants growing around the world if you stumble across them. Each plant gives 10 cloth, which is very handy early on.
As soon as you get 30 cloth, you will want to immediately craft a sleeping bag, or even a few. Just like a bedroll in 7 Days to Die, or a bed in Minecraft, setting down a sleeping bag and using it will make that your new spawn location rather than the beach you begin the game at. The only difference is you can only spawn on a sleeping bag every five minutes, so having two or three set will keep you from having to go all the way back to the beach if you end up dying too quickly. Just make sure you pick the right spot to place them. You want to set up camp somewhere hidden so other players don’t attack or loot you, but also near resources like wood and stone and not too far from towns to go loot supplies from.
Building and maintaining a base

All right, you’ve got the basic materials down and found a place to call home. Next up you need to build yourself a base to protect yourself and work out of. Your basic base is going to be a wood shelter. This isn’t much more than a basic box made of wood, but it’s better than nothing. It only costs 50 wood to make, but you will want at least 30 more because this shelter doesn’t come with a door, and the door is the most important part. Not only does it keep animals out, but other players too since you’re the only one who can operate your door. Anyone else who wants to get in will have to spend the time bashing away at it until it breaks.
However, it isn’t just other players you have to worry about breaking down your shelter. Rust keeps the pressure on by making all structures you build deteriorate over time through decay. A wood shelter, like the one you just built, will last for 12 hours, a wooden building will hold up for a full day, and metal buildings can last four full days. You’ll need to perform upkeep on your base if you want it to last. To do this, you need to collect 1,000 wood in order to craft a tool cupboard and place it inside your base. Think of this as your base’s stomach. As long as you keep it stocked with the same materials it is built from, it will use them to prevent decay. Sticking with the stomach analogy, also know that the bigger your base is, the more resources it will suck up, so don’t build anything too big to feed.
Gather resources (but not too much)

This sounds a little backward, but trust us. In the early days of Rust, you will probably be tempted to pick up and harvest everything you come across, but there’s really no need to overstock yourself like this. If you spend too much time gathering up stuff, you’re just inviting danger onto yourself by not prioritizing building a basic shelter set up somewhere safe. Until you have a place to actually store any extra stock of materials, they’re useless if, or rather when, you die. Focus on just getting what you need to make a base, find a safe spot to build it, and get your essentials sorted before worrying about stocking up on tons of wood and stone.
Work toward a furnace
After the early hours of the game, the basic tools and weapons you’ve been working with will start to feel terribly inefficient. And that’s true. The next tier of craftable items are made of metal, but you can’t just slap two pieces of scrap together and expect a gun to pop out. What you need to invest in is a furnace to melt down the metal and sulfur ore you pick up. So, how do you make one? You need 100 wood, 200 stone, and 50 low-grade fuel. Low-grade fuel is the only tricky component here, and is crafted by combining three animal fat and one cloth. By the time you should be worrying about making a furnace, you should have plenty of cloth and animal fat left over from hunting for food. You also need a supply of wood to actually run the furnace, just like campfires.
Smelting takes a long time, so always have something cooking while you go out and do other things to be more efficient. In addition to the metal and sulfur you get out of it, charcoal is also produced as a byproduct, but don’t toss this away. Later on, you will need that as an ingredient for gunpowder. Once you have metal, an entire world of opportunities opens up.
Avoid other players
The last tip is to become a hermit and stay that way as long as possible. Unless you’re playing the game with someone you know and trust personally, it is not a very good idea to interact with anyone else while you’re figuring things out. There is built-in voice and text chat, so you may read or hear people that sound like they just want to help, but that’s a major gamble in Rust. Players love to trick others into exposing themselves just to get an easy kill and loot whatever you might have. Until you feel very confidant in your ability to either defend yourself or escape an ambush, it is best to stay undetected.
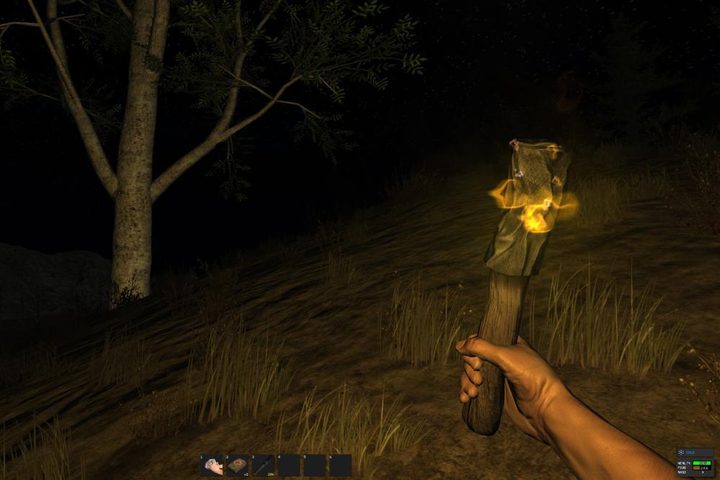
Aside from building your base in a hidden location, that also means you need to not draw attention to yourself. Running around with a torch at night, for example, is like holding a spotlight on yourself for anyone to see. If you are going out at night, tough it out in the dark for safety. That also applies to campfires. Either only burn them inside your base once you’ve built one, or do all your cooking during the day. On the flip side, if you see any light — or worse, multiple lights — roaming around, run and hide. A single person has a slight chance of being genuinely friendly, but packs are almost always out looking for blood.