
At first, you might be disappointed to see that Link has lost all his core abilities from Breath of the Wild when you first begin The Legend of Zelda: Tears of the Kingdom. While those moves were great, what replaces them is even better, and you will likely forget all about those old ones in a matter of hours. Ultrahand in particular is essentially limitless in what you can do with it. Building contraptions, most often vehicles, is easy and intuitive. Still, sometimes you know what you want to build and would rather skip the process of, you know, building it. For that, the game offers you Autobuild.
However, like so many things in Tears of the Kingdom, you have to seek it out in order to utilize it, and the game is perfectly fine with you never stumbling upon it. To save you time building those common contraptions, here’s everything you need to know about Autobuild, plus where to find all the Schema Stones in Tears of the Kingdom.
What is Autobuild?
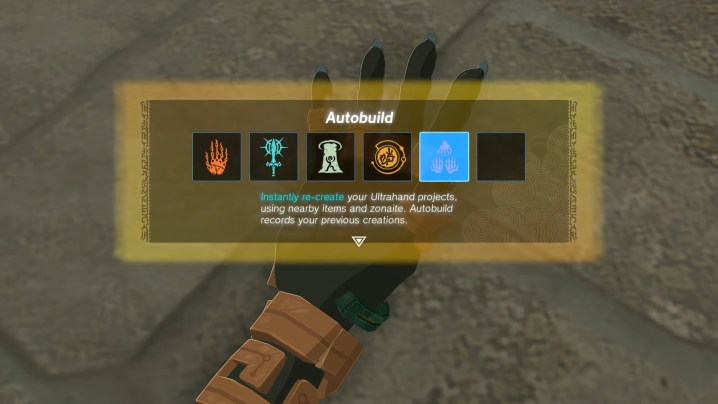
Autobuild is a new ability Link can get access to alongside his others such as Fuse, Ascend, and Ultrahand. What this does is allow you to instantly recreate the most recent constructions you’ve made using Ultrahand, or choose from blueprints you collect via Schema Stones. After selecting it, you will see a large purple area on the ground and a transparent image of whatever object you have chosen to be built so you can place it as you see fit. You can’t simply make these constructions for free, though, and can only use this ability as long as the materials you would otherwise use to make it using Ultrahand are nearby.
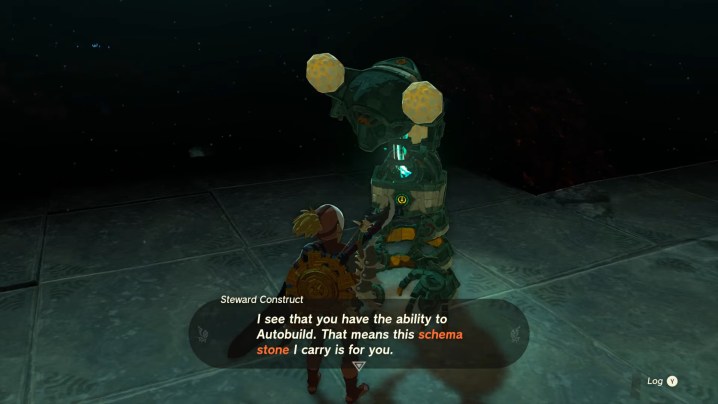
Unlocking Autobuild is a bit of a task. To begin, you need to find Josha and get the “A Mystery in the Depths” quest, which unlocks after you do his “Camera Work in the Depths” quest. This is one of the earliest quests you can find that sends you down into the Depths. This will lead you down to the Iayusus Lightroot in the Depths. From this location, begin moving south toward the Nihcayam Lightroot at coordinates -0705, -0867, 0481.
Continue from this new waypoint to the Abandoned Central Mine. You will find a friendly Construct here you can speak to and learn the Autobuild ability. Be warned that as soon as you acquire the ability and get a quick introduction to it, you will be faced with a boss fight against Master Kohga.
All Schema Stone locations
There are 11 different Schema Stones, but really you will only be looking for seven since the first one you get teaches you the Autobuild ability in the first place. The remaining 10 each act as blueprints for different vehicles and objects you can cycle through and build using Autobuild. You won’t find these laying around like other materials and instead need to earn them from Constructs (and one from Josha) in various spots in the Depths and Surface. Here’s where you can find them all:

Fanplane
The Fanplane is essentially unmissable. Once you’ve gotten Autobuild and beaten Master Kohga for the first time, simply speak to the Construct again to get your first Schema Stone.
Hot-Air Balloon
Once you’ve fully completed the “Mystery in the Depths” quest, head back up to the surface to find Josha and report in. As a reward, you will get a free Schema Stone that lets you make a Hot-Air Balloon.
Beam Cycle
The second Surface level Schema Stone is in the Shrine of Resurrection, due west of the Temple of Time Ruins next to the River of the Dead. Inside you will find a Yiga Clan member you need to defeat before speaking to the Construct inside to get this new blueprint.
Dirigible
Back underground at the Abandoned Lanayru Mine, you will find three researchers who are actually more Yiga Footsoldiers in disguise. Take them out and speak to the nearby Construct to get this nifty blueprint.
Bridge
The only non-vehicle Schema Stone on the list, the Bridge Schema Stone is in the Abandoned Hateno Mine. Once again, you will need to dispatch some disguised Yiga soldiers before talking to the Construct and claiming your prize.
Hovercraft
The Hovercraft blueprint can only be picked up after you work your way through the second part of the “Master Kohga of the Yiga Clan side quest. You will be taken to the Abandoned Gerudo Mine, and have to defeat Master Kohga for the second time to get the Schema Stone.
Bolt Boat
While you’re in the zone of fighting Master Kohga, round three takes place in the Abandoned Lanaryu Mine. Come out on top to unlock this new water vehicle.
Lightning Boat
Before you leave after getting the Bolt Boat, talk to the Construct here to grab an easy Schema Stone.
Automated Ally
Another unique blueprint, the Automated Ally is found in the Abandoned Eldin Canyon Mine. As usual, just speak to the Construct to claim your new stone.
Rocket Platform
Another quick one to pick up, the Rocket Platform is waiting for you at the Abandoned Herba Mine in the hands of another friendly Construct.
Editors' Recommendations
- All Teddy Bear locations in Fallout 76
- Where to find the Unmaking Arrow in Dragon’s Dogma 2
- All companions in Baldur’s Gate 3 and how to get them
- All Demiguise Statue locations in Hogwarts Legacy
- How to get the Finishing Touches achievement in Hogwarts Legacy


