
How to dye clothes and gliders in Zelda: Tears of the Kingdom

We all love to customize the way our characters look in games, and while The Legend of Zelda: Tears of the Kingdom doesn’t possess a fully customizable Link, it does provide you with an opportunity to change the color of some of his armor. You can also dye your paraglider, giving you a sleek new look as you glide around Hyrule’s skies. If you want to change up Link’s style, make sure to read on for where you need to go to dye your armor and paraglider.

How to dye your armor

Hateno Village location on the map.

The first step to dying your armor is heading over to Hateno Village, which you may remember was an important spot in Breath of the Wild too. When you arrive in Hateno Village, seek out the Kochi Dye Shop. Inside, you can speak to an NPC known as Sayge – you can’t miss him, as he’s an interesting-looking fellow in a strange hat with bottles of dye on his belt.

Choosing dye colors menu in Tears of the Kingdom.

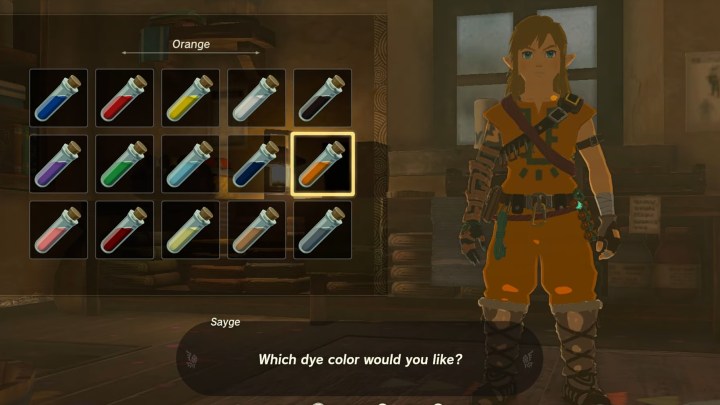
Sayge will allow you to dye your armor or paraglider, though it’s worth noting that there are a few unique pieces of gear that can’t be dyed. Each dye job requires 20 rupees and a selection of materials that you’ll have found (or will need to find) across Hyrule. You can see a preview of what you’ll look like with the new dye, so you can decide if it’s really the vibe you’re going for. And if you decide to change up your paraglider, Sayge will even shoot you out of a cannon so you can glide around a bit and see how you like it. What a nice guy!

Editors' Recommendations

Billy Givens
Billy Givens is a freelance writer with over a decade of experience writing gaming, film, and tech content. His work can be…
Where to find diamonds in Zelda: Tears of the Kingdom
Zelda holds a tear-shaped object in her hand in The Legend of Zelda: Tears of the Kingdom's final trailer.

Diamonds are one of the best resources in The Legend of Zelda: Tears of the Kingdom, as they sell for 500 Rupees and offer 25 attack power when fused to weapons. Since they're so valuable, they're tricky to find, with only a handful of ways to get your hands on them.

In this guide, we'll show you how to find diamonds in Tears of the Kingdom.
Where to find diamonds

Read more
How to complete the A New Signature Food quest in Zelda: Tears of the Kingdom
Reede explaining his plan to find a new taste.

Side adventures in The Legend of Zelda: Tears of the Kingdom come in all shapes and sizes. Some can feel as important as your main quest, while others ... not so much. The "A New Signature Food" quest will likely fall into the latter category in terms of your overall objective of saving Hyrule, and yet is deadly serious for the residents of Hateno Village. We'll help you make this quest a piece of cake – or rather cheese – with this guide for Tears of the Kingdom.

Read more
How to complete The Beast and the Princess quest in Zelda: Tears of the Kingdom
Link speaks to Cima and Penn

The Legend of Zelda: Tears of the Kingdom is absolutely bursting at the seams with side content to uncover and complete, but activating some quests requires you to have another quest started first. This is the case with "The Beast and the Princess," which requires you to have already started the "Potential Princess Sightings" quest at Lucky Clover Gazette before visiting Penn at the New Serenne Stable in North Hyrule Plain. If you've already started this quest, though, we'll tell you how to complete it below.
How to complete The Beast and the Princess quest in Zelda: Tears of the Kingdom
If you speak to Penn at New Serenne Stable, he'll tell you about a potential Princess Zelda sighting to the south, claiming she was seen riding on some type of beast. It sounds like we're headed down to the coast, so make your way far south to the Bronas Forest either on foot or by making use of nearby Skyview Towers or shrines. For reference, the closest shrine to this area is Jojo-u-u Shrine, so fast traveling there can get you a massive head start on wrapping up the quest. Regardless of how you get down here, though, our next stop is Lakeside Stable.

When you reach Lakeside Stable, look across the ravine and glide over to an NPC named Cima who is relaxing by a nearby bonfire. Engage in some dialogue to learn the truth about Princess Zelda and the beasts in the area, and then wrap up your conversation. About this time, Penn will show up and speak to you, too, ultimately bringing a close to the quest and giving you some rupees as thanks for investigating the mystery.

Read more