If you’re just getting into woodworking, this pallet wood beer carrier is a fantastic project to cut your teeth on. In addition to having a rugged look, it’s sized to accept all sizes of bottles and cans, from old-school shorties up to 22-ouncers, and even wine bottles. It’s also dead simple to put together, and can easily be completed in a few hours.
You’ll only need the most basic tools for this project, though there’s just one specialized piece of gear we recommend: a Forstner drill bit or a hole saw. These will help you make the holes for the dowel, though you can use almost any kind of saw to cut out the pieces (we recommend a jigsaw). In the end, it all goes together with a hammer and nails. Despite the simple tools, materials, and techniques (or maybe because of them), the end result looks awesome.
Below, you’ll find a step-by-step breakdown of how to build one yourself. Along the way, you’ll learn some cool techniques, like using one part to trace another, and making bridle joints: the simple interlocking notches that connect the parts of the interior grid. Your jigsaw is the big star here, as it can cut make every cut needed in this entire project — even the tight notches in the grid. Here’s everything you’ll need:
Tools and Materials

- Wood pallet (1x)
- Oak slat, 1/4 in. thick by 3-1/2 in. wide
- Jigsaw
- Drill/driver
- 1-1/8 in. Forstner bit
- Hammer
- Compass
- Small box of 16-gauge panel nails
- Bottle opener
Pro tip: Replace your all-purpose jigsaw blades with blades designed for smooth cuts in wood, and you’ll be amazed at the results.
Step-by-step instructions
Cut out one end and use it to trace the other

- Square up the board for the ends of the caddy. We used a miter saw to get a square cut on both ends of this 3/4-in.-thick board, so we could get both ends of the tote from this one board. A jigsaw or handsaw would also work well here.
- Lay out one of the ends. Mark the width (6-3/8 in.) all the way down the board, measuring over from its straightest edge. Then mark where the top ends, 13 inches from the end of the board. Now measure down 1-1/4 inches from the top and place your compass point there, centered on the width of the workpiece. Set the compass to mark the dowel hole, then set it to 1-1/4 inches to mark the parallel arc at the top. To finish the layout, draw in the angled edges of the ends. The angles start 7-1/2 inches from the bottom, and connect to the arc at the top.
- Drill the hole for the handle. Clamp the board onto a piece of waste wood, which will prevent splintering on the back side of the hole while you drill through. Then use a big bit to make a hole that matches your dowel diameter. A cheap spade bit will work here, but we went with a more specialized Forstner bit because it makes a smoother cut.
- Cut out this end piece. With the hole drilled, cut out the entire end piece. You are cutting the extra width off the board here, as well as the angles and the curve near the top. Two handsaws (backsaw and coping saw) will do the job, as will a bandsaw — but a jigsaw is arguably the cheapest, most effective option.
- Sand it smooth. Use 80-grit paper, backed with a wood or rubber block, and smooth the curves and angles for a clean, finished look.
- Trace one end onto the other. To lay out the second end of the caddy, just trace the first one onto the other end of your board. Be sure to trace the hole too. Then just drill, saw, and sand this end like the first.
Cut the side slats and handle, then assemble the caddy

- Cut the other parts to length. The side slats, bottom slats, and dowel are all 11-3/8 in. long, which makes things easy. A jigsaw or handsaw will make all of these cuts, but feel free to use bigger power tools if you have them. For each of these parts, cut one end square before measuring and cutting the other end to length. Be aware that the side slats need to be trimmed down to 2 in. wide, and at least one of the bottom slats needs to be cut narrower as well. This is another instance where a jigsaw or handsaw would work just fine.
- Start the assembly process with the round handle. Put the dowel in place in the holes you drilled into the end panels of the caddy, and drive the 16-gauge panel nails into it to hold the dowel in place. Be sure to drill 1/16 in. pilot holes first, so the wood doesn’t split (pallet wood is notoriously prone to cracking).
- Nail on the side panel boards next. Once again, drill 1/16-in. pilot holes first, which will help keep the nails on track and keep the wood from splitting.
- Now attach the bottom slats. The bottom slats are nailed on the same way.
Build the divider grid and drop it in

Note: You can simplify this project by leaving out the divider grid, but we don’t recommend it. The snazzy gridwork serves an important function: it keeps bottles and cans from banging around, especially when the caddy isn’t full, and it adds an overall feeling of quality.
- Cut the parts to size and knock off the corners. The thin slats are already cut to the right width, so cut them all to length now and make a 45-degree cut on the upper corners. These little chamfers look nice along the sides of the caddy where the dividers show. Again, almost any saw will do here.
- Lay out the joints. Start by laying out one side of each notch. Then use another slat to lay out the other side of each notch, lining it up with the first layout line and tracing the second along the other side with a sharp pencil. That way, you can be sure the slots will be the right size.
- Cut the notches. The jigsaw (or a bandsaw) works great here. Saw along each side of the notch — using a jigsaw blade designed for wood — and then nibble away the waste and square off the end of the notch. Lastly, try to fit the mating piece into the notch you just cut. If it’s too tight, take tiny slices off the sides of the notch.
- Assembly is simple. Try the assembly first without glue to be sure it comes together properly and will drop into the caddy afterward (If it won’t, you might need to cut some of the slats just a hair shorter). It’s all right to tap on the parts with a hammer and a protective piece of wood to get them to slide home, but if you need to bang on them, you have more work to do with the jigsaw. To finish, add some yellow glue to the little mating surfaces before sliding the pieces together for the last time.
- Drop in the grid and admire your handiwork. The grid just drops into the bottom of the box, where it will happily sit and do its job. Now drop in some cold bottles and cans and grab that Instagram pic.
Important measurements (for reference)
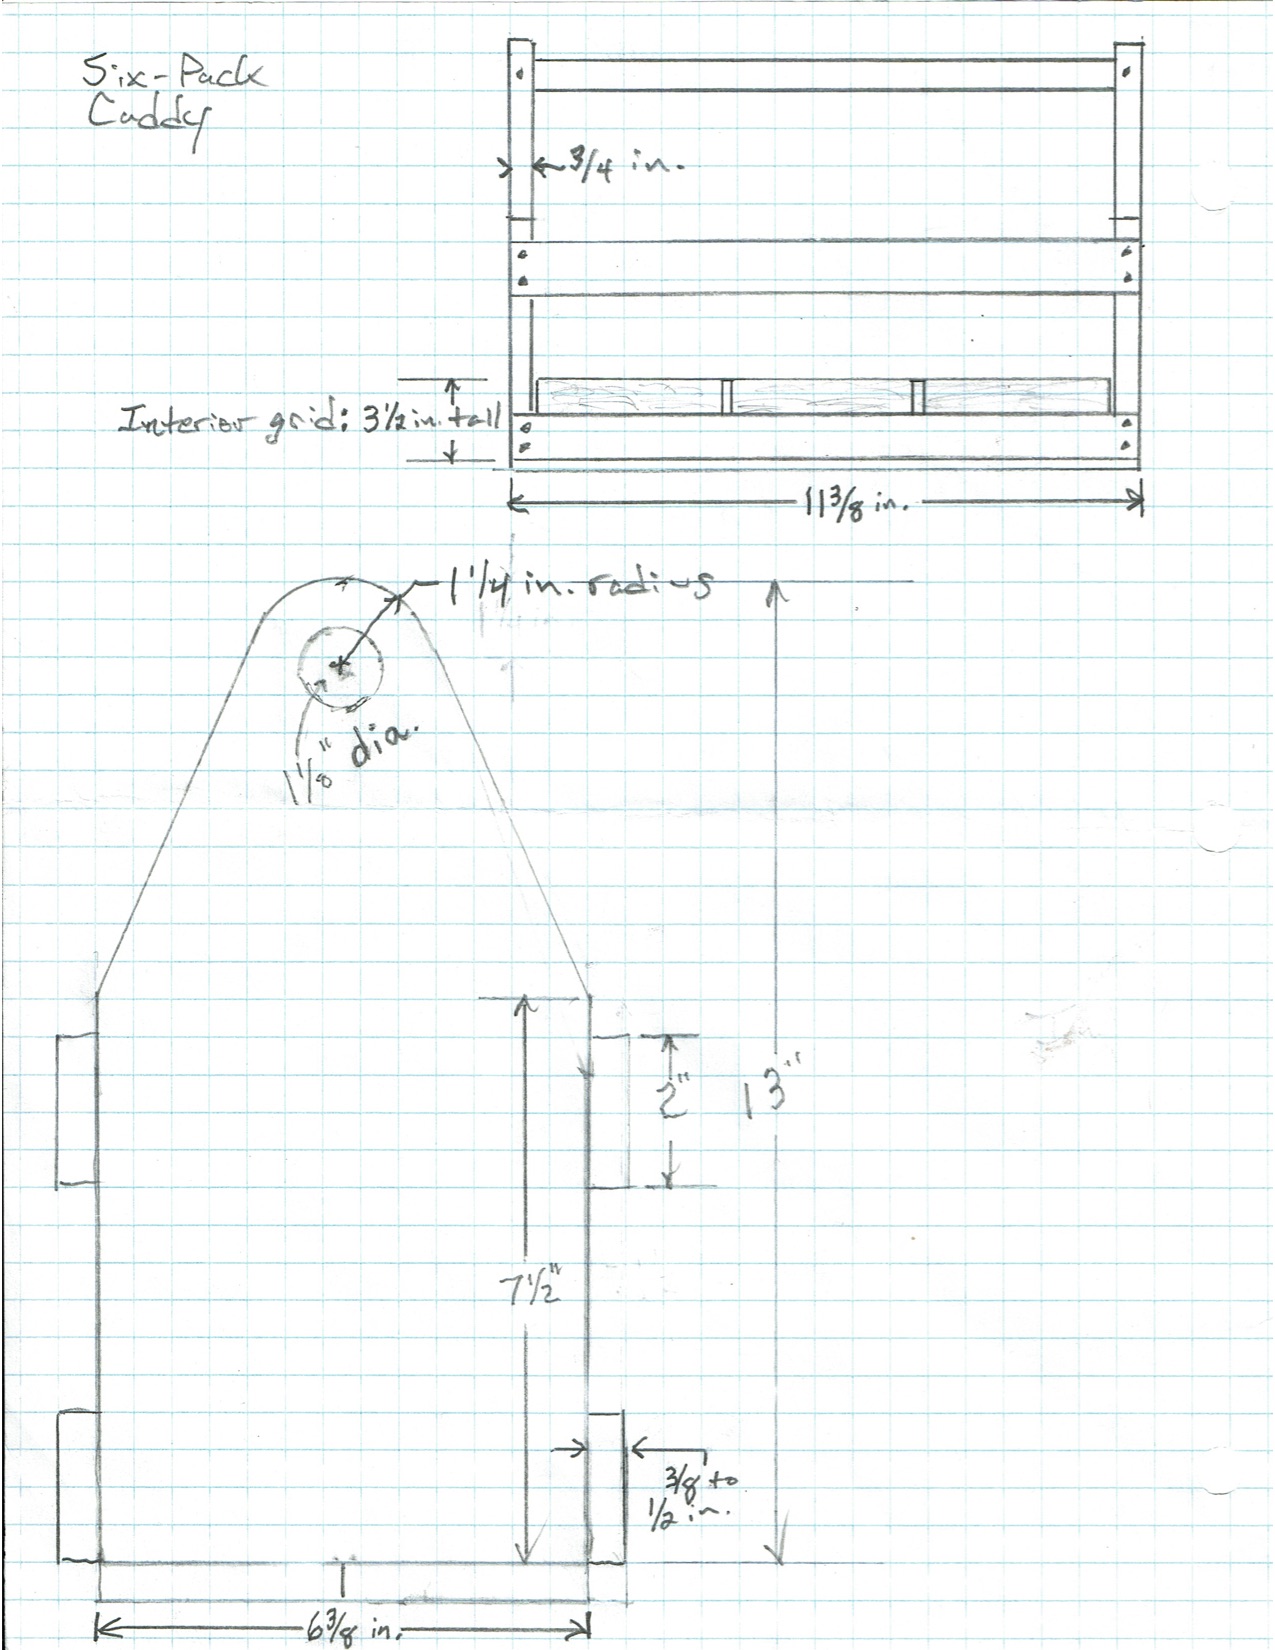
- Ends of caddy: pallet wood, 3/4 in. thick by 6-3/8 in. wide by 13 in. high.
- Side slats: pallet wood, 3/8 to 1/2 in. thick by 2 in. wide by 11-3/8 in. long
- Bottom slats: pallet wood, 3/8 to 1/2 in. thick by 6-3/8 in. wide total by 11-3/8 in. long
- Dowel hole: 1-1/8 in. dia., centered 1-1/4 in. from the top. Feel free to use a 1-in.-dia. dowel if a 1-in. drill bit is easier to find.
- Radius of top curve is 1-1/4 in.
- Angles start at 7-1/2 in. mark and connect to arc at the top.
- Interior divider grid: oak slats from home center, 1/4 in. thick by 3-1/2 in. wide
- Center slat is 9-3/4 in. long
- Cross slats are 6-1/4 in. long
- End spacing, 3-1/6 in.
- Middle spacing, 3-1/8 in.
- Joinery notches are 1/4 in. wide by 1-7/8 in. tall.
Bonus tip: The easy way to harvest pallet boards

When you lock horns with your first wood pallet, your inclination will likely be to start pulling nails and harvesting whole boards. Good luck with that. Aiming for strength at all costs, pallet-makers often use ring-shank nails that are very tough to pull out. We’ve heard tell of pallets joined with staples, making the boards a cinch to remove, but we haven’t found one of those unicorns yet.
There are a few ways to defeat the nails (just ask Google), but none are fun, and you’re likely to split or damage as many boards as you save. If you can avoid pulling nails or pounding boards loose from the back side, we say do it.
Our favorite way to harvest pallet wood is the simplest: Just run a circular saw along the top of the slats, as close as possible to the frame pieces below, and the slats will drop free. You end up with pretty short pieces, but for projects like this one, those are fine.
The Weekend Workshop is our weekly column where we showcase a badass DIY project that you can complete with minimal skills and expertise.