
Getting a new smart thermostat? We understand if you don’t want to pay extra to have it professionally installed when you can do it yourself. Installing a smart thermostat requires some basic work with electrical wiring, but the average homeowner can usually tackle the task with the right guide. Here’s how to get your smart thermostat installed and working, with helpful tips and tricks you should know.
- Step 1: Check HVAC compatibility
- Step 2: Turn off power to your thermostat and access thermostat wiring
- Step 3: Fully disconnect the old thermostat
- Step 4: Install the smart thermostat mount
- Step 5: Attach the wiring to the smart thermostat
- Step 6: Attach the smart thermostat faceplate
- Step 7: Turn on your smart thermostat and connect it to Wi-Fi
Note: A screwdriver, drill, and needle-nose pliers are important tools you may need.
Step 1: Check HVAC compatibility

Ideally, everyone should check their HVAC system compatibility before they even purchase a smart thermostat. Not all smart thermostats are compatible with existing wiring, depending on what type of system you have (heat pump, furnace, etc.) and how the previous thermostat was wired.
Fortunately, Google offers an excellent compatibility checker for its Nest Thermostat, and we suggest you visit it and walk through the steps to check on your wiring. This compatibility test should also work for most other smart thermostats on the market.

Pay particularly close attention to wire quality and voltage, which can be deal-breakers for smart thermostats. Smart thermostats usually need a C-Wire for continuous power, which is common in modern homes but not guaranteed. C-Wire adapters are also available, but if you don’t have a C-Wire, we suggest contacting an electrician to install one. Google’s walk-through of wire labels will come in very handy later on when you are installing a new thermostat, so this is a great exercise even if you are pretty sure your smart thermostat will be compatible.
Step 2: Turn off power to your thermostat and access thermostat wiring

Find your circuit breaker panel and look for breakers that are labeled “HVAC,” or sometimes “heating and cooling” (there might be more than one breaker). Flip them off to turn off power to your thermostat and shut the system down while you work.
If you go back to your thermostat and it’s still on, it may have a battery backup. As a test, try to significantly change the temperature and see if your HVAC system turns on.
Once your electricity is definitely off, remove the faceplate on your old thermostat if you have not already done so in the steps above. The faceplate usually disconnects when you pull on it, although sometimes a small screw or fastener holds it on, so inspect the design carefully. If you can’t figure out how to take off the faceplate, look for your thermostat model online, and see if there are any specific instructions.
Once the faceplate is removed, you should see a series of wires connected to various terminals on the thermostat.
Step 3: Fully disconnect the old thermostat

Pause, and take a smartphone pic of the wire positions and any labels for your old thermostat. This isn’t always necessary, but it can be a very useful reference later. Notice the small letter labels on each connection? That’s what you want to take note of, along with each wire’s color. Take multiple photos if necessary, and if wires don’t have clear separate colors, you will need to label them with little tags before you move on. Fortunately, not all thermostat wiring is as confusing as the one shown above. Many have simpler configurations, like this:
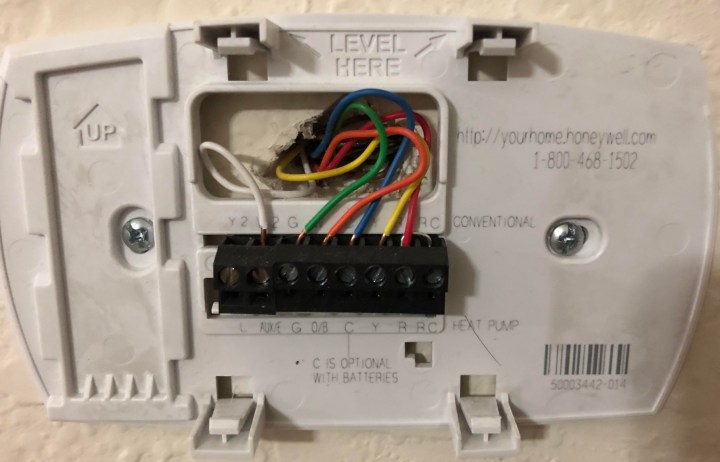
These wires are typically held in place by tabs or screws. Gently un-attach these and remove the wires. If the wiring looks a little disheveled, you can twist the wires back together again in preparation for the new thermostat. If the wiring looks seriously damaged or badly frayed, it’s better to bring in an electrician if you don’t have experience repairing wires.
With the wiring undone, you can now remove the old thermostat entirely from the wall. The mount is typically screwed on and can be unscrewed with a screwdriver if necessary. What’s left should be a small hole with a number of wires coming, and a blank patch on the wall. Clean the wall if it’s dirty underneath the thermostat.
If your smart thermostat is smaller than the old model, this is also a good time to paint the wall underneath if the wall colors don’t match (this is why it’s handy to keep a can of interior house paint around in storage).
Step 4: Install the smart thermostat mount
If you haven’t already, unbox your smart thermostat, remove the pieces, and find the mount — sometimes called the trim plate, or just the back (the trim plate may be a separate piece, but it’s a good idea to install it as well). Again, these are designed to screw into the wall, so route the wires through the mount and attach it. You may be able to use the old screw holes if they line up correctly; otherwise, mark and drill a new hole for this process. If old holes are still visible, you can always patch them later.
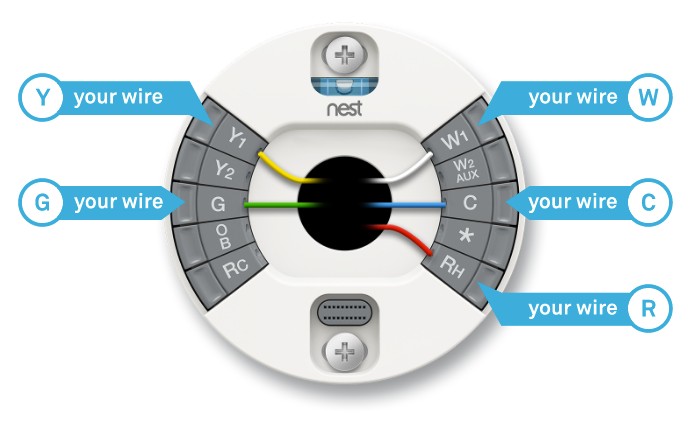
An advantage of smart thermostats is that their mounts tend to be very clearly labeled for wiring and well designed. Above you can see an example of the Nest Thermostat mount. Below is an Ecobee 4 Thermostat mount.

You can see the slots and tabs for attaching individual wires in the right arrangement. Now it’s time to focus on the details.
Step 5: Attach the wiring to the smart thermostat

This step will vary depending on the wiring of your old thermostat. If the wires are in good condition and labeled on the wiring itself, you can attach wires to the corresponding tabs on the mount without much trouble. Make sure each wire is fully inserted and secure before moving on. As you can see, needle-nose pliers can help direct and tamp wires as you work.
If your wires don’t have labels, now is when you should bring up your smartphone and look at the photos you took of the old wiring, so you can match the color of each wire to the correct tab.
Step 6: Attach the smart thermostat faceplate

When all of the wires have been attached, carefully tuck them into the mount. Now attach the “faceplate” of the smart thermostat, which is usually more of a computer with a screen attached. The faceplate should naturally snap onto the mount as long as there are no wires in the way. Make sure it’s level and not upside down — even round thermostats like Nest should be installed the right way.
Step 7: Turn on your smart thermostat and connect it to Wi-Fi
 Now, you are ready to start on the software side of the installation. Head back to your breaker panel and switch on the power for the HVAC system again. Check your smart thermostat: It should be turning on and booting up now. When finished, the thermostat should walk you through some basic steps for connecting it to your home Wi-Fi network, so have your Wi-Fi name and password handy. You should also be able to do this right from the thermostat app, which you should download now if you haven’t already done so.
After it’s connected, the thermostat will have you choose a number of settings for heating and cooling your home. Follow the instructions on the app/thermostat to customize your temperatures, how the thermostat behaves, and what information it shows. Now you’re set. It’s a good idea to explore unfamiliar smart features in the coming days so you know how they work, and how to take advantage of them.
Editors' Recommendations
- How to convert your window blinds into smart blinds
- How to prevent your Ring smart camera from being hacked
- The 4 best smart thermostats in 2024
- The best smart blinds for Google Home, Alexa, and HomeKit
- How to save money with your smart home this winter


