Got a Facebook Portal, but worried you won’t be able to use it because you’re not as tech-savvy as you’d like to be? Don’t worry. Setting up your Facebook Portal is a super-easy process that will take you just a few minutes. Here’s how to get started using your Portal, step by step, no matter if you have a Portal, Portal+, or Portal Mini.
Starting up your Portal

Step 1: First, you need to power up your Portal. Plug the power cord that came with it into the back of the screen, then plug the cord into the wall.
Step 2: You’ll see the screen power on, and then it will ask you your language of choice — tap the screen to make your selection.
Step 3: Next, it’s time to connect the device to your Wi-Fi. Select your Wi-Fi network from the options on the screen, type in your password, and tap Join > Next > Continue. If your Portal needs to download a software update, it will notify you on the screen. When it’s done, it may ask you to restart the Portal.
Step 4: Restart your Portal as requested. Now, you can follow the on-screen instructions to give your Portal a name. You can choose a pre-made option from the menu, or you can tap the Custom Name option to give your Portal a name that’s more unique. When you’re done, tap Next.
Step 5: Next, you need to log in to your Facebook and/or WhatsApp account, then tap Next and follow the instructions that pop up on the screen. If you don’t have one of these types of accounts, we have a guide to get you started with a new Facebook account and a guide to getting started with WhatsApp. The Portal will work as a photo frame if you link your Facebook or Instagram accounts, though the calling feature will still work if you only log into WhatsApp.
Step 6: Portal will now encourage you to manage your contacts. This takes a little longer, but it’s well worth it. You can view all of your Messenger or WhatsApp contacts and select some to set as favorites. Choose the contacts with whom you would like to have video calls. You can then select some contacts to hide, which can be a nice feature if there are certain contacts you don’t want to call, even if by accident.
Step 7: Portal will try to walk you through a guide on how the moving camera works at this point. It’s not necessary, but if you’ve never used a smart display before, it can be handy to see how it works.
Step 8: Connect music accounts from platforms like Spotify and Pandora if you want. Again, this is entirely optional, but it’s nice to get this all done at once if you plan on listening to music.
Step 9: Now, you can manage your photos to help Portal act as a slideshow picture frame (a bit more on this below). Portal will walk you through how to display Facebook photos, how to add photos from your phone, and other basic steps.
Step 10: Finally, Portal will ask if you want to link an Alexa account. Alexa is, in general, a much better voice assistant than Portal’s own assistant, so we recommend doing this. Portal will then follow this up with some privacy options about whether or not you want to store Portal voice recordings (this does not affect
Customizing the Portal home screen
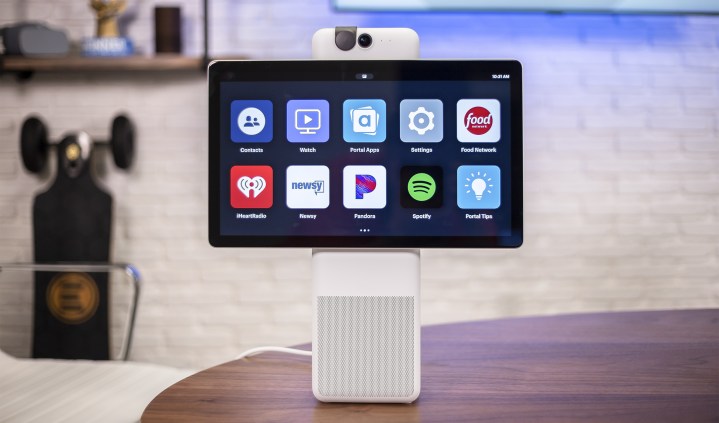
The home screen on the Facebook Portal displays a number of apps you can use to access your features. You can add new apps at any time by simply selecting Portal Apps and viewing the list of available app options. This is useful for adding more music services, setting up your Portal for Zoom meetings (the two are compatible), and more.
If you ever want to get rid of an app, give a long-press on any app and hold down until the X symbol appears in the corner of the app. Select the X to remove the app, and select Done when you are finished.
Using your Portal as a picture frame

Now, you’re ready to use your Portal. One of the biggest uses for the Portal is as a photo frame. To set this feature up, go to the home screen and tap Settings, then tap Superframe and Photos. Next, your Facebook photo albums will appear on the screen. Tap the toggle switch beside the albums you would like to see on your Portal when it’s used as a picture frame.
You can also upload photos to your Portal using the Portal app. Just tap your Portal on the home screen and tap Create Album > Add Photos > Add. Choose the photos you want to upload (you can add 20 at a time) and toggle on the slider beside the option Display in Superframe.
There’s also the option of having your Instagram photos pop up by adding your account. You can do this by tapping on Settings, then tap Superframe and Instagram. From here, all you need to do is type in your Instagram account and password.
How to make calls on a Portal

You can make calls to your contacts on Facebook Messenger and WhatsApp. To make a call on Portal, say, “Hey Portal, call [contact name].” To answer a call, say, “Hey Portal, answer,” and to hang up, say, “Hey Portal, hang up.” You can also use the screen to start up a call. Go to the home screen and tap the Contacts app. Tap on the person you would like to call, and then tap Video. To end the call, tap the screen, then tap the red X icon that pops up.
By tapping the screen during a call, you will see other options pop up. One option will let you add more members to the call. You can add up to seven Messenger contacts or up to three WhatsApp contacts to a call. The add option looks like a blue circle with a person icon in it. Just tap it, then tap the contacts you want to add to the call.
Augmented reality and Story Time
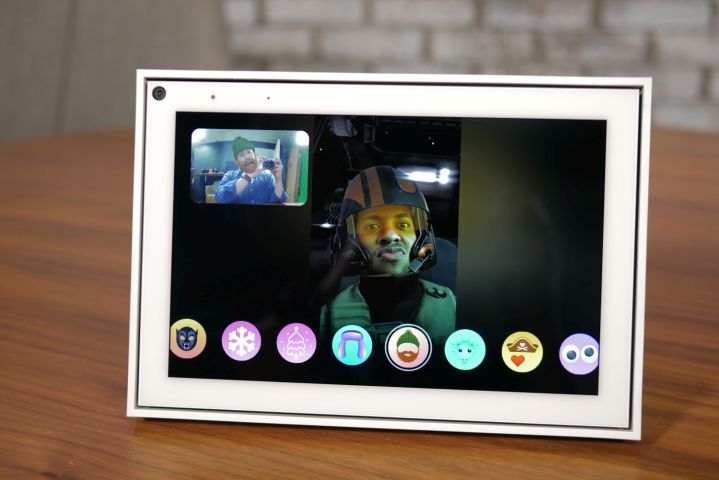
Once you touch the screen, the augmented reality (AR) and Story Time selections will appear as well. The AR effects put masks and different filters when you’re talking to someone on a call. The Story Time option allows you to use cool effects and graphics to tell a story on the screen. All you need to do to open the AR and Story Time settings is touch the Gray icon with a mask and music notes. From here, you’ll need to select AR or Story Time from the list.
How to play music on a Portal

The Portal gives you access to pre-installed Spotify, Pandora, and iHeartRadio apps. To access one, just swipe to the left on the home screen, select the app you want, and log into your account using the app’s directions.
If your friends also have a Portal, you can share songs with them during calls. To do so, just go to your home screen and tap the gray symbol with a mask and music notes on it. Then select which app you want to use and find the song or station you want to share. Your friend will receive a notification. All they need to do is tap Accept to start listening to the song or station you shared with them.
How to download more apps
The Portal only allows a set number of apps, but it offers a variety to choose from – tap Apps to browse through them. All you have to do is tap on an app to download it.
Editors' Recommendations
- Can Alexa call 911? How to set up Alexa for emergencies
- How to set up Roomba to map different floors
- How to set up and install the Google Nest Doorbell (battery)
- How to set up a HomePod for stereo audio
- How to set up boundaries and virtual barriers for robot vacuums and mops