Having an iPad doesn’t mean you’re forced to use it as a tablet. After all, you can connect a keyboard cover and type away like any other 2-in-1. Even the Apple Pencil makes it feel less like a tablet and more like a computing device that’s thinner than Apple’s MacBook Air. Connect a Bluetooth mouse, and you’ll never need a silly clamshell laptop again.
Apple added mouse and trackpad support in March 2020 with the release of iPadOS 13.4. We show you how to connect a Bluetooth mouse to your iPad, how to change the pointer, and list the most commonly used gestures. We even cover Bluetooth trackpads if you’d rather navigate iOS with a finger. However, be sure your iPad is on 13.4 or newer before pressing on!
Pairing a mouse or trackpad
To pair a Bluetooth mouse or trackpad, use the same steps as pairing any other Bluetooth device. Remember that your device’s Bluetooth component must be turned on to function. In this example, we used an old Microsoft Sculpt Touch Mouse. Here’s how to pair your device:
Step 1: Open the Settings app.
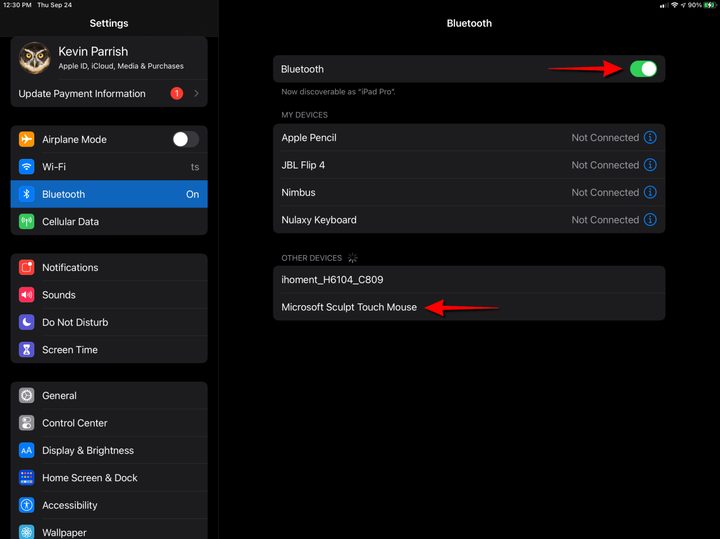
Step 2: Tap Bluetooth listed on the left.
Step 3: Tap the toggle to turn Bluetooth on (green) if it’s off.
Step 4: Place your mouse or trackpad into pairing mode. This is typically done by holding down a dedicated button underneath until an LED flashes. However, check the peripheral’s manual for exact instructions.
Step 5: The device should appear under Other Devices. Tap the mouse to begin pairing.
Step 6: Tap Pair on the pop-up prompt.
The peripheral is ready to use once it moves up to My Devices and says Connected. It will automatically pair in the future when both devices are on and nearby. Be sure to leave Bluetooth on, however, or you will need to switch it on manually every time you wish to connect.
Later on, if you find using a mouse is just too annoying, follow these steps to forget the device:
Step 1: Open the Settings app.
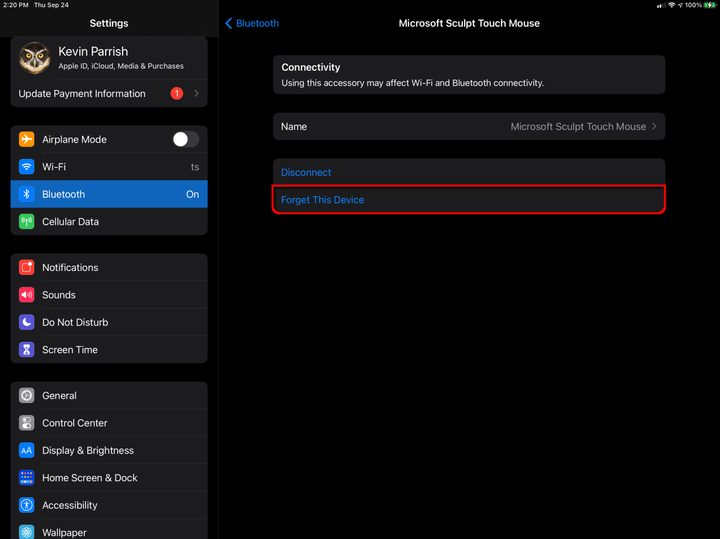
Step 2: Tap Bluetooth listed on the left.
Step 3: Tap the blue “i-circle” icon next to the listed mouse.
Step 4: Tap Forget This Device.
Using a mouse with iPad
Before using a mouse for the first time, you may wish to adjust the settings. Here’s how:
Step 1: Open the Settings app.
Step 2: Tap General listed on the left.
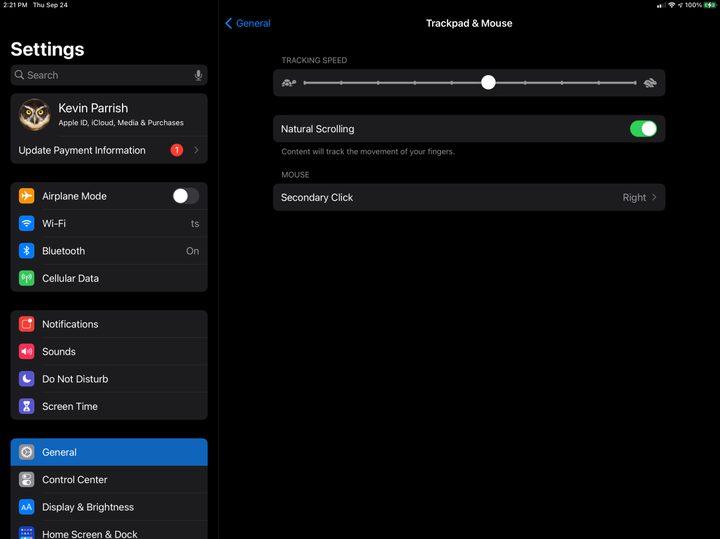
Step 3: Tap Trackpad & Mouse listed on the right.
Step 4: Adjust the mouse speed, assign the Secondary Click, and toggle on/off Natural Scrolling.
Similar to using a mouse on any other device, you can use the onscreen circular cursor to move around the display and use a standard left-click to make selections. You will notice that the cursor automatically snaps to individual buttons to make them easier to click, or that the cursor will change when hovering over text.
Customize the pointer

You can’t change the shape, but there are options for changing the color and size. Here’s how:
Step 1: Open the Settings app.
Step 2: Tap Accessibility listed on the left.
Step 3: Tap Pointer Control listed on the right.
Step 4: Change the color, size, and scrolling speed as needed. Other options include automatically hiding the pointer and toggling off animations.
Basic mouse gestures
Below is a list of mouse movements and tricks for navigating an iPad using any third-party mouse, or Apple’s Magic Mouse.
- Wake your iPad: Click the left mouse button.
- Open the Dock: Move the cursor to the bottom of the screen until the Dock appears.
- View the Home screen: Continue to move the cursor to the bottom of the screen after the Dock appears.
- Switch apps: On the Home screen, move the cursor to the bottom of the screen until multiple apps appear.
- View slide over: Move the cursor past the right edge of the screen.
- Open Control Center: Push the cursor over the status icons in the top right corner and left-click.
- Open Notifications Center: Move the cursor over the time and date in the top left corner and left-click.
- Open contextual menus: Click the right mouse button.
Using a trackpad with iPad

Before using a trackpad, you may wish to adjust the settings. Here’s how:
Step 1: Open the Settings app.
Step 2: Tap General listed on the left.
Step 3: Tap Trackpad & Mouse listed on the right.
Step 4: Adjust the tracking speed, the scrolling direction, and set the secondary click. With some models, you will also see toggles for Tap to Click and Two Finger Secondary Click (for context menus).
Think of the trackpad just like an external mouse: With a click on the left side, you can control the on-screen cursor to adjust the display or select various features. The cursor makes it easier to click individual buttons by automatically snapping to them, and the cursor changes itself when hovering over text content.
Basic trackpad gestures
As far as cursor support goes, iPadOS has a ton of wonderful trackpad gestures. We highly recommend linking the gestures with Magic Trackpad or Magic Trackpad 2, which will help you maintain better control.
- Wake your iPad: Click the trackpad.
- Open the Dock: Swipe a finger past the bottom of the screen until the Dock appears.
- View the Home screen: Keep swiping a finger past the bottom of the screen once the Dock appears.
- Switch apps: Swipe a finger past the bottom of the Home screen until multiple apps appear.
- View slide over: Swipe a finger past the right edge of the screen.
- Open Control Center: Move the cursor over the status icons in the top right corner and click.
- Open Notifications Center: Move the cursor over the time and date in the top left corner and click.
Advanced trackpad gestures
Apple Magic Trackpad 2 will allow you to employ more control and better features of movement. You’ll be able to scroll, zoom, and toggle through windows more efficiently. However, you have to make sure you have the latest version of the Apple Trackpad for each of these gestures to work seamlessly on your iPad.
- Scroll: Drag two fingers up, down, left, or right.
- Zoom: Pinch two fingers open or close to zoom in or out, respectively.
- Go Home: Swipe up with three fingers.
- Open App Switcher: Swipe up with three fingers, then pause before lifting your fingers. Alternatively, pinch four fingers together and pause.
- Switch between open apps: Swipe left or right with three fingers.
- Open Today View: On the Home or Lock Screen, swipe two fingers right.
- Open Spotlight: From the home screen, swipe two fingers down.
- Secondary click: Click with two fingers at once.