
At first glance, these two programs might appear redundant, as they’re both made with the goal of editing photographs of all kinds. But the truth is, each program is designed with a different purpose in mind, and each offers a distinct post-production photography workflow.
In the most simple terms, Adobe Photoshop is effectively a digital darkroom, where you can make detailed adjustments and alterations to any kind of image. Adobe Lightroom, on the other hand, is closer to an entire photography studio, as it imports, organizes, edits, and exports photographs.
The difference between the two programs is further blurred thanks to Adobe Camera Raw and Adobe Bridge, two integrated programs of Adobe Photoshop that, when combined with Adobe Photoshop, create a workflow similar to that of Adobe Lightroom. But the underlying differences remain the same.
Below, we’ll break down the characteristics of each program to better help you decide which solution is best for you.
Adobe Photoshop

Adobe Photoshop is the gold standard in the world of photo editing, used by amateurs and pros alike around the globe. It has come a long way since its inception in the early ’90s, and recently it has become more useful than ever for photographers, thanks to the addition of Adobe Bridge and Adobe Camera Raw.
Together, these three programs work hand-in-hand to provide a similar experience to Adobe Lightroom, albeit more compartmentalized.
Adobe Bridge is where your photography workflow would begin. After importing the photos from your memory card, Adobe Bridge is where you can browse the images in the folders you’ve organized them in. In addition to organizing the files, Adobe Bridge displays detailed metadata information captured with the photographs and even creates thumbnails for each image. By doing so, Bridge speeds up the process of browsing through your folders, especially if you shoot photographs in the RAW format.

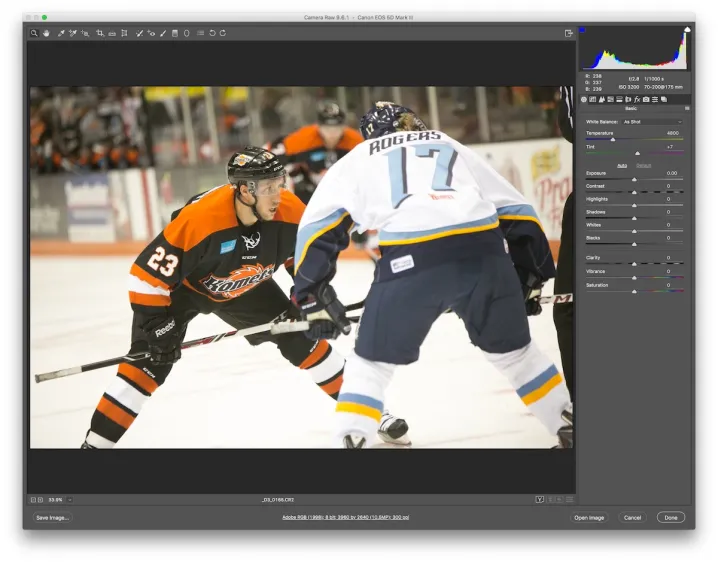
Speaking of RAW photographs, Adobe Camera Raw is another vital component to the Photoshop workflow. Unlike JPEGS, which you can open directly in Photoshop, RAW photos will first be opened up in Adobe Camera Raw, before they’re opened in Photoshop.
In Adobe Camera Raw, you can tweak almost every aspect of a photograph, from the white balance and exposure to lens correction and curves. Over the years, Adobe Camera Raw has become more capable than ever. Nowadays, it includes features once reserved for Photoshop, such as adjustment layers and Adobe’s Magic Healing Brush tool.
Realistically, if you shoot RAW photographs, you can very easily perform 90 percent or more of your work using only Adobe Bridge and Adobe Camera Raw, reserving Photoshop for only the most intense edits.
After you’ve made adjustments to your RAW photos in Adobe Camera Raw, you can open them up in Photoshop, where they will be imported in their respective RAW format. From there, you can do all the heavy editing that isn’t capable of being done in Adobe Camera Raw, from rich compositions to applying precise filters.

The advantages of using Adobe Photoshop, Adobe Bridge, and Adobe Camera Raw together as a post-production workflow lies in the ability to make the process as simple as desired. If you don’t do a lot of heavy edits, Adobe Bridge and Adobe Camera Raw might be all you need for most images, and such a solution is far less resource intensive on your computer than Lightroom, which is known to be a memory hog.
The disadvantage of such a workflow is the inability to do everything you need within a single program. In the event you use Photoshop often, there are times where you could have three different programs open at once to edit a single photo — far from intuitive!
Adobe Lightroom

Lightroom offers similar results in a different form factor. Unlike the Photoshop workflow, Lightroom offers an all-in-one solution to organizing, editing, and publishing your photographs.
The core of Lightroom is a catalog. In essence, a catalog is the brain behind the operation. It’s where all of your images and their respective information are stored. Within each catalog, you can create folders, collections, and other file directories to organize your work exactly how you see fit.
The user interface of Lightroom consists of various “modules.” Each module serves as a distinct process in the post-production process, and together they work to create a seamless workflow from import to export.

For example, the Library module within Lightroom is where you organize and sort through your photos and videos. Here, you can see the metadata, add new metadata, rate the images, and get an overall glimpse of the images you have in your Lightroom catalog.
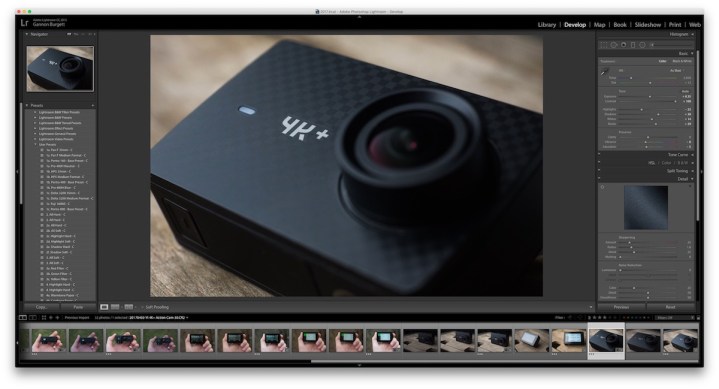
The Develop module within Lightroom is where you’ll probably spend most of your time. This module is effectively a more robust version of Adobe Camera Raw. You can adjust exposure, white balance, sharpening, lens distortion, and pretty much anything imaginable, with both JPEG and RAW photos.
Other modules include Book, Slideshow, Print, and Web, all of which are dedicated solutions to publishing your images in various formats.
The great thing about Lightroom is you can customize the entire experience to fit your needs, and it’s all within a single app. You export your final, edited photograph from the same window you imported it in.
That said, if you need to create more substantial edits — such as those needed in a multiple-image composition — you can easily open photos directly into Photoshop and edit them there. The resulting images will then be saved in your Lightroom catalog.
Depending on your machine, and the size of your catalog, Lightroom can be a little resource-intensive on your computer. But so long as your device can handle it, it’s an incredible post-production program that’s getting better with each update.
Conclusion
The Lightroom solution has a slightly steeper learning curve. But once its initial quirks are overcome, it offers a more seamless experience, albeit at the cost of more computer power. The Photoshop workflow is less organized, but can prove more lightweight and minimalist.
Ultimately, there’s no right or wrong solution; there is only the one that best works for you. Adobe’s Photography-specific Creative Cloud plan, which is the most affordable option for photographers, gives you access to all of these programs. So if you’re on the fence, we’d suggest trying out both solutions and seeing which one you prefer.
If you have any questions, don’t hesitate to leave feedback in the comments below. We’ll do our best to respond in a timely manner to address your inquiries.
Editors' Recommendations
- The best Adobe Lightroom alternatives
- How to delete and recover photos from your iPhone
- What is Photoshop Camera? How Adobe’s new A.I. app edits photos before you take them
- Lightroom CC and Lightroom Classic: What’s the difference?
- How to make and install Photoshop actions to speed up your editing workflow


