
Photoshop is as much a graphic design program as it is a photo editor, which includes working with text. Adding and editing text in Photoshop is simple, once you learn where all the controls are and a few extra tricks. Here’s how to add and edit text in Photoshop.
Photoshop’s text tools

A majority of working with text in Photoshop is simply finding and recognizing the icons. Here are the tools that you may use to add or edit text in Photoshop.
| The text tool (located in the toolbox on the left) | |
| The move tool (located in the toolbox on the left) | |
 |
Change the text orientation |
| Change the text size | |
| Create warped text | |
 |
Change the text color |
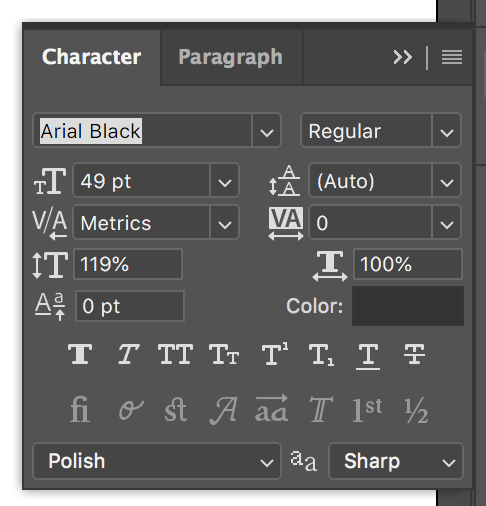
| Open the character and paragraph panels |
How to add text in Photoshop
1. Click on the T icon in the left-hand toolbar.
The default option is regular, horizontal text — this is the option that most will use frequently. If you click and hold on the Text Tool icon, however, you’ll open up a submenu that has a few different options, including vertical text. The Type Mask tool — which has a horizontal and vertical option — creates a text-shaped selection of your photo. Use this option if you want to create words that are filled with your photo instead of laying text on top of the photo.
2. Draw a box on the canvas roughly where you would like the text to be.
As you add in text and formatting, you can tweak where the text is by clicking and dragging out one of the small boxes on the corners or middle edges to resize the box.
3. Adjust font type and font size at the top.
 When a text box is active, you’ll see font options at the top of the screen. Adjusting the font and font size is similar to working in a word processing program — just choose from the drop-down menu or type in a size or font name. If you click and hold on the Text Size icon — the one with two different-sized Ts — and move the cursor left or right, you can quickly adjust the text size in small increments. The color of the text can be adjusted by highlighting the text and selecting a new color from the bottom of the toolbox on the left-hand side or from the colored box next to the paragraph alignment options at the top.
Adjusting text is about more than the font and size being easily accessible at the top of the screen, however. Click the File icon in that top toolbar to open the character and paragraph panels. From here, you can make more advanced adjustments, such as creating paragraphs with double line spacing or changing only the text’s width or height with the vertical and horizontal scale options.
4. Use the warp options to bend text (optional).

If you need the text to bend to fit with the photo, such as wrapping words around the edges of an object, you’ll want to use the warp tool. Access the warp options by clicking on the Warp icon — it looks like a crooked T over the top of a hill. In the pop-up window, choose the shape that you want under the style drop-down menu. Then, use the sliders to further refine the shape.
5. Make bad word art with the 3D button (optional).
Miss word art, or creating a 3D graphic? Use the 3D icon at the top to make your text 3D. Click Yes when the pop-up asks if you want to switch to a 3D workspace and experiment with the new 3D tools in the Properties panel on the right.
How to edit text in Photoshop
After creating text, you can use a handful of different tools to adjust the text. Text in documents with multiple layers may be difficult to select without a few tricks.
1. Make sure that you can actually edit your text.
A typical text box can easily be adjusted. But, if you are working with a text mask, rasterized type, or type that has already been turned into an object or layer, you can’t edit what the text says. That’s because these processes turn the text into pixels, and Photoshop no longer recognizes them as type. You also can’t edit a text mask after you’ve clicked out of it. If you opened an existing document, you may not be able to edit the text, either — PSD files are required to preserve the ability to edit text. You can’t open a PDF — unless it is a Photoshop PDF with the editing capabilities preserved — and just click to edit the text in Photoshop. In this case, you would need to remove the text and add a new text box.
2. Click on the text.
For text that can still be edited, simply click on the Text Tool and then click on the text to access all the different options. You may need to select the text layer first and hide others if you have a lot of layers in the file. Click on the Layers panel on the right. Text layers have the T icon and are usually named after the text inside that text layer. (Can’t find the layers panel? Hit the F7 key.)
3. To move the text around, select the arrow tool at the top of the toolbox on the right.
Make sure the text layer is selected, then click on the text and move it around.
What about using the paint or clone tools?
If you want to use the paintbrush, clone, erase, or paint bucket tools, you’ll first need to render the text. Once you render text, however, you can’t click on it to simply edit what it says or change up the font. To render the text, with the text layer selected, go to Type > Rasterize Type Layer.
Files with text should be saved as a PSD to edit later
Whenever working with text in Photoshop, save two versions — one as PSD in case you need to go back and adjust the text later, and the other whatever file type you need to share, like JPEG, PDF, or TIFF.
Editors' Recommendations
- The best Photoshop alternatives
- Photoshop will soon allow you to swap out boring skies automatically using A.I.
- Photoshop for iPad finally has Edge Detection — here’s how to use it
- You can now Photoshop someone out of an image with one click
- Photoshop for iPad gets better touchscreen control and Curves


