
Photoshop actions are an easy way to turn complex, multi-step edits into a one-click process. Actions record your exact steps and allow you to replay them to repeat the same edit across other photos. Photoshop pros often make their actions available to download, but you can also easily create your own.
Actions work best for edits that don’t vary between images. For example, a Photoshop action to correct white balance will only work on images that start with the same exact white balance settings, while wreaking havoc on others. The same idea applies to local edits — local adjustments don’t work for actions unless you want the same effect in the same exact location on subsequent photos.
Despite the limitations, Photoshop actions still have a number of different uses, from easily resizing images to creating a cartoon effect quickly. Here’s how to speed up your tedious Photoshop work by installing Photoshop actions or creating your own.
How to install Photoshop actions

1. Access the actions panel menu.
Inside Photoshop, find the actions panel. If it’s not already open, go to Window > Actions from the menu bar. Then, click on the actions panel menu in the upper right corner (the icon looks like four horizontal lines). In this menu, click on “load actions.”
2. Find and upload the .atn file.
In the pop-up window, locate the Photoshop action file with a .atn suffix and select it. Click okay.
3. Use your actions.
The new actions will be added to a folder in the actions panel, which usually has the same name as the .atn file. Select the action and click the play icon to run it.
If you want to run only part of the action, click the drop-down arrow next its name to see all the steps included in the action. Click the step from which you want to start, then click the play button.
How to create your own Photoshop actions
While downloading Photoshop actions offers access to some fun effects easily, creating your own Photoshop actions isn’t hard to do. Photoshop actions work great for building in effects, as well as speeding up frequently used editing processes.
1. Get your image to the starting point.
Once you create an action, Photoshop will record your every move. If there are any steps that you don’t want included in the action and applied to every image, get those out of the way first, or save them for after you stop recording the action. For example, you may not want to crop every photo, or you may want to fix flaws like underexposure before getting started.
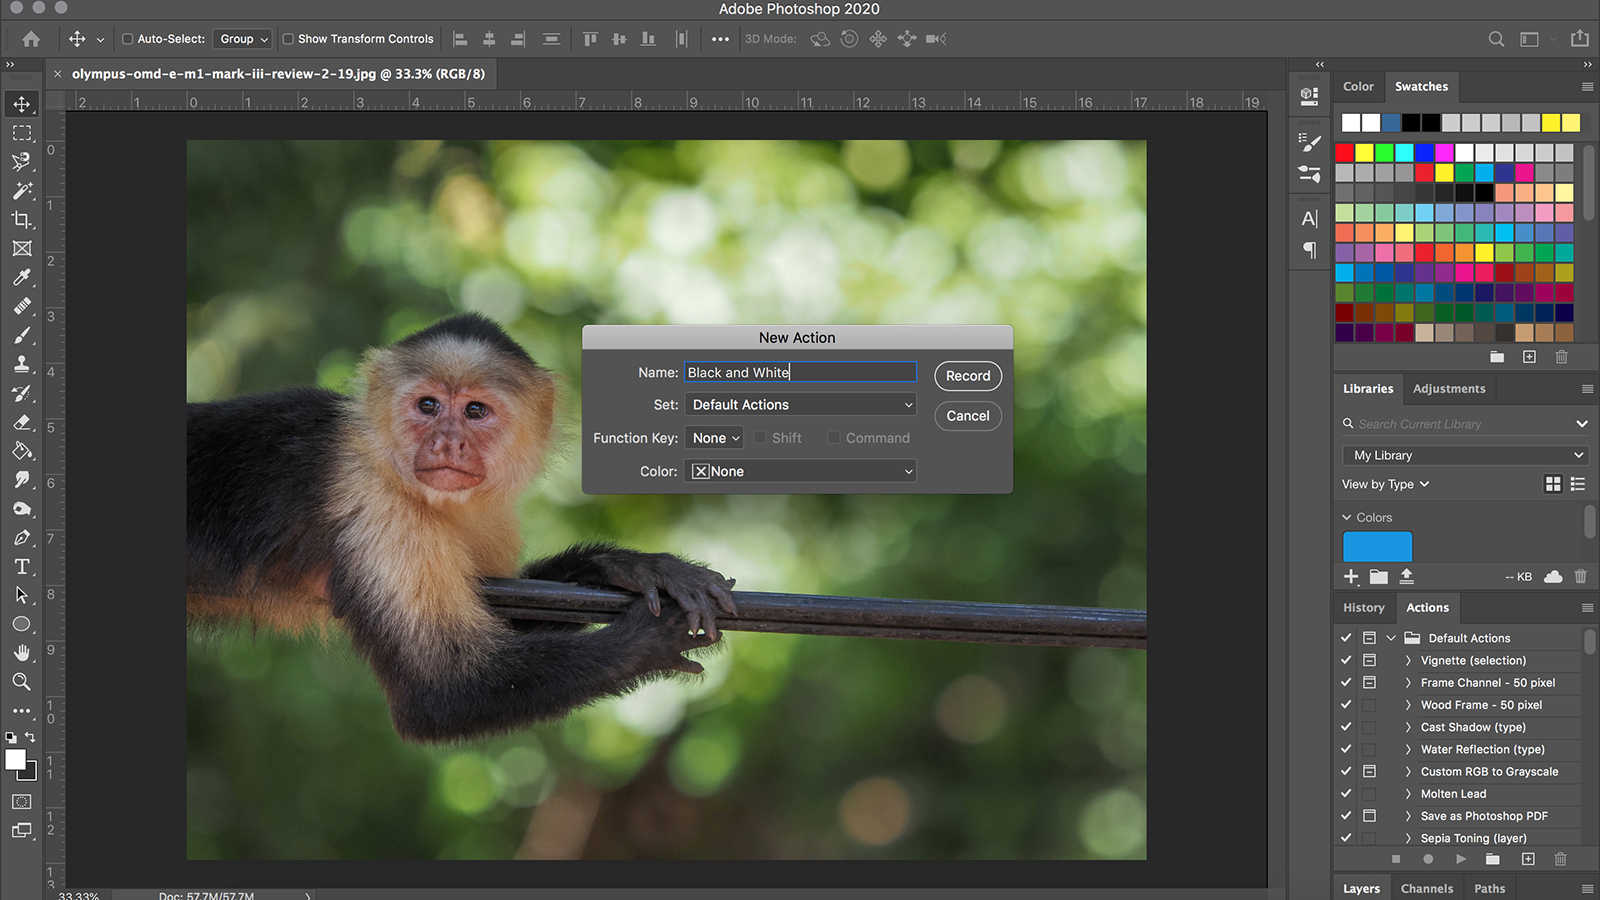
2. Create a Photoshop action in the actions panel.
In the actions panel (Windows > Actions, if it’s not already open), click the plus icon at the bottom. In the pop-up window, name your action. You can also use the set option to choose a folder for the action, the function key drop-down menu to create a keyboard shortcut, and the color option to make the action easy to find in the actions panel. Once finished, hit record.

3. Edit the image.
Photoshop is now recording your every move inside that action. Go through the steps that you want to record on the image. Remember, everything — from creating new layers to using the paintbrush to even save and export commands — is recorded.
4. Hit the stop button to finish (or pause).
Once you’ve finished with all the steps that you want to record, hit the stop button. If you want to add more steps after you’ve stopped recording the action, select the action again in the panel, and click the record button at the bottom of the panel.
You can delete an unwanted step in the action by dragging it to the trash can at the bottom of the action panel. Entire actions can be deleted the same way.
To use your action, select it in the actions panel and click the play button.
When and why to use Photoshop actions
The obvious use of Photoshop actions is for editing a batch of photos you’d like to have a similar look. Maybe you’ve put a lot of effort into creating your own personal style that you want to easily apply to future photos, or maybe you’re working on a project where every image needs to fit a specific mood.
But actions can also be used in a decidedly less creative, but still important, manner. For example, after editing a photo, maybe you generally export it multiple times for different platforms: a full-size version for Flickr, a 1080-pixel-wide version for Instagram, and maybe a specific size for your website. You might also need different crops for each one, such as 4×5 for Instagram. Without using actions, you would have to crop and export the image three different times.
Instead, you could record an action that will do all of this work for you and give you your three finished exported images in just a single click.
Photoshop actions sound complex if you haven’t used them before, but they can actually simplify the editing process greatly. So don’t be afraid to experiment with them to discover how they can best work for you.
Editors' Recommendations
- How to make a background transparent in Photoshop
- Photoshop for iPad finally has Edge Detection — here’s how to use it
- You can now Photoshop someone out of an image with one click
- Lightroom running slow? Here’s how to speed it up without buying a new computer
- How to change the color of an object in Photoshop in three simple steps


