Confused by Chrome? This is how to uninstall unused Chrome extensions

How to uninstall Chrome extensions
SergeyVolkoff/123RF
Extensions can add a lot to the Chrome browser’s capabilities, letting you do everything from saving passwords to blocking ads. But if you grow out of needing them, or feel like there are a few too many, you need to know how to uninstall Chrome extensions. Fortunately, the process is as simple as installing them, and we’ll walk you through it, step by step.

There are a couple of different methods you can use when it comes to uninstalling extensions. Although the second one is more comprehensive, the first should work in the majority of cases and since it’s easier, that’s where we’ll start.

If you want to learn how to change Chrome’s language, we have a guide for that, too.

Uninstalling through Chrome

The quickest and easiest method to uninstall an extension is to go through Chrome’s extension manager. There you’ll be able to disable or entirely delete each extension through a single click of the mouse.

Step 1: Open the Chrome browser and click the three-dot menu in the top right-hand corner.

Image used with permission by copyright holder

Step 2: Click “More tools,” and then “Extensions” in the resulting menu.

Image used with permission by copyright holder

Step 3: The Extensions page shows you all of the extensions you currently have installed. You can disable any you just want to turn off by unticking the relevant box. Alternatively, if you want to remove the extension entirely, click the small trash can symbol.

When asked if you want to remove the extensions, click the blue “Remove” button.
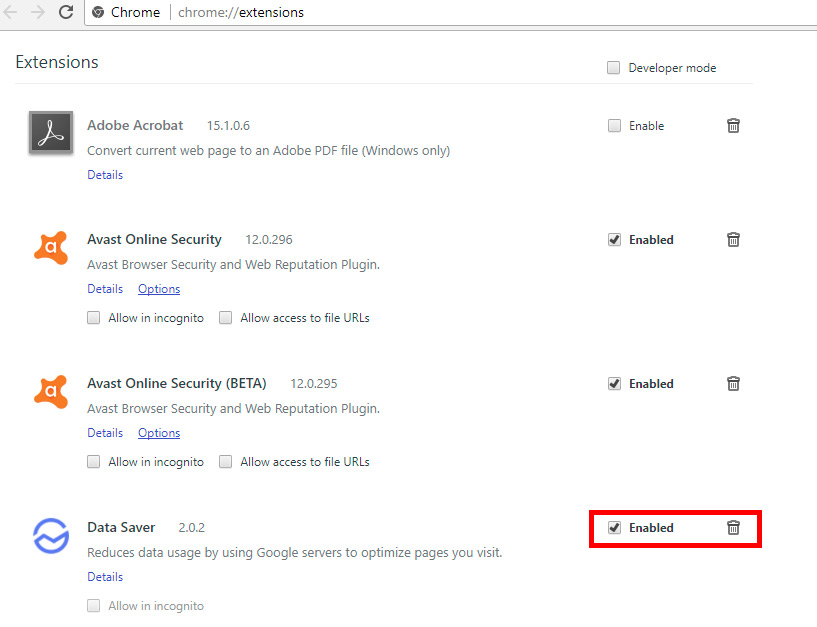
Image used with permission by copyright holder

Step 4: Restart Chrome and any extensions your disabled or removed will no longer be active.

Uninstalling through Windows folders

If for whatever reason the extension you want to uninstall isn’t found on the official list within Chrome, or you’d rather do things manually, you can also delete the extension yourself in its Windows folder. It’s a little more complicated and hands-on than the above method, but it’s still relatively quick.

Step 1: Close down all Chrome windows.

Step 2: Navigate to Chrome’s install location. For those running Windows 7 or later, that should be: “C:\Users\username\AppData\Local\Google\Chrome\User Data\Default.”

Note: “Username” in the above address is your specific Windows account name.

Step 3: Open the “Extensions” folder.

Image used with permission by copyright holder

Step 4: All of the folders within the “Extensions” folder represent individual extensions. Their names are hard to decipher, so to figure out which is which, you’ll need to open each folder up and then open the resulting version number folder. Images or file names within should give you an idea about which folder represents which extension.

Image used with permission by copyright holder

In this case, this folder is for the Videostream extension.

Step 5: Find the extension you want to uninstall and simply delete the folder. To do so, either left-click the folder to select it and press the “delete” key on your keyboard, or right-click it and select “delete” from the resulting menu.

Image used with permission by copyright holder

Step 6: Once finished deleting extensions, open Google Chrome and your extension list should be more to your liking.

Now that Chrome has all of the function you want, how about tweaking its style to fit your tastes, too?

Editors' Recommendations

Jon Martindale
Jon Martindale is the Evergreen Coordinator for Computing, overseeing a team of writers addressing all the latest how to…
I found a Chrome extension that makes web browsing bearable again
Google Drive in Chrome on a MacBook.

GDPR cookie consent notices were meant to hand privacy control back to ordinary internet denizens. Instead, they’ve unleashed a tidal wave of deception, with unscrupulous website owners using any means necessary to trick you into letting them harvest your private data for resale and profit.

It wasn’t meant to be like this. But while things might have not gone so well for GDPR, there’s still a way to protect your privacy and banish those annoying pop-ups in one fell swoop. Instead of rage-clicking Accept just to get the damned pop-ups to go away, I’ve found a much better way: the Consent-O-Matic browser extension.

Read more
Chrome is making a key change to protect you from phishing
Google Chrome with pinned tabs on a MacBook on a table.

Phishing campaigns -- where a fraudulent website or email is made to look like it comes from a legitimate source -- have caused a huge amount of destruction, leading to untold numbers of virus infections and money lost through scams. Google has just rolled out a powerful way to fight phishing in its Chrome browser, however, and it could help you avoid falling victim.

As part of Chrome’s 15th-anniversary update, Google will be pushing its Enhanced Safe Browsing feature to all users in the coming weeks. This checks website URLs against a list of malicious sites stored on Google’s cloud servers, all in real time. If a match is found, the website is blocked and a warning is displayed to users.

Read more
Google Chrome is getting a complete overhaul for its birthday
Screenshot of Google Chrome with updated Material You design language.

To mark the 15th anniversary of its popular web browser, Google is releasing a brand new update for Chrome. The biggest change will be a redesign for the browser that will now adhere to Google’s Material You design language. There is also an update for the Chrome Web Store, alongside enhanced search features and some tweaks to Safe Browsing.

Material You is Google's unified design language, which was first introduced with Android 12. According to a blog post shared by Chrome Vice President Parisa Tabriz, Chrome will be the latest product from the company that will be getting a design overhaul featuring new icons that place a strong emphasis on legibility. On top of that, there will be fresh color palettes that will expand to the tabs and toolbar.

Read more