Apple’s iPhoto is certainly not the most feature-filled photo management and editing software out there. However, it’s incredibly straightforward to export individual photos and albums from the program to whatever destination you’d like. By exporting your pics, you’re ensured that your files retain their original format without quality degradation. However, you can always opt to change the format, size and quality of your photos as well.
Here’s our quick-hit guide on how to export images from iPhoto, so you can save files elsewhere sans compression. Also, check out our guides on how to speed up your Mac, how to resize images, and our top picks for the best free image-editing tools if iPhoto just doesn’t cut it for you
Though it’s worth noting that the steps required to pull these tasks off may vary slightly depending on which version of iPhoto you’re running, most users should have little trouble deciphering the steps laid out below using our basic set of instructions.
Step 1: Select the photos
Browse your iPhoto library and select the photos or photo albums you wish to export. You can choose multiple photos or albums by holding down the Command key and clicking the photos you want, or by dragging the mouse over a range of photos. A yellow border will appear indicating what you’ve selected.

Step 2: Access the Export menu
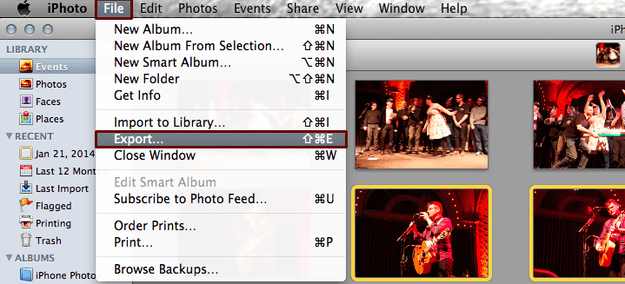
Once selected, click File located in the top-left corner of the screen, then click Export.
Step 3: Narrow the specifics
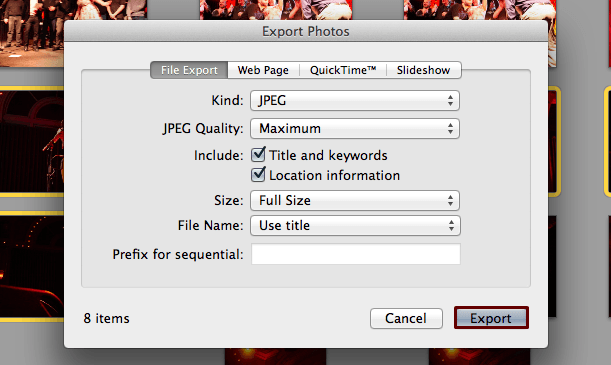
Choose the appropriate file format, quality, size, and other settings from the pop-up window. Below is brief rundown of the various options:
- Kind: Refers to the specific image format — whether it be JPEG, TIFF, or PNG.
- JPEG Quality: This option is only available if you previously chose to export your photos as JPEG files. Maximum quality remains the best option if you intend to print your images, but medium or high should suffice if you’re posting them to the Web.
- Size: Refers to the desired resolution of your photo(s). Any option other than Full Size will lower the number of pixels, in turn reducing both the physical size and overall quality of the image.
- File Name: You can choose from several options for the File Name. You can use the title you originally gave the image in iPhoto, the current filename, a sequentially numbered filename, or an album title. The sequential and album title options are your best bets if you are working with a large batch of photos since they accompany the File Name with a numbered sequence.
Click the Export button in the bottom-right hand corner of the window when you’re done tinkering with settings.
Step 4: Select a save location
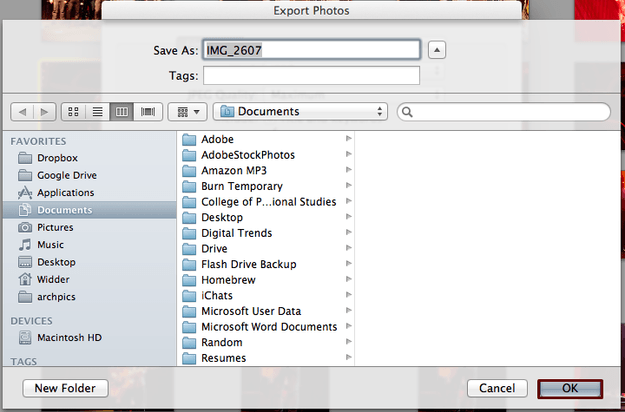
Choose a save location for your images. Then, click OK in the bottom right to begin exporting images.
Step 5: Access the new files
Your images should now be saved in the destination you chose in Step 5. Now do with them what you will!
What do you think of our basic guide for exporting images from iPhoto? Do you know of alternative method for doing so? Let us know in the comments below.